You are on the documentation page for the Toret iDoklad plugin for WooCommerce, which connects the e-shop and the iDoklad invoicing system.
To use the plugin, an account in the iDoklad system with a tariff that allows using the API connection is required.
You can purchase the iDoklad plugin here: Toret iDoklad for WooCommerce
- Plugin Installation
- Plugin Activation
- Video Tutorial
- Connecting with iDoklad
- Number Series
- VAT (DPH)
- Company ID (IČ) and VAT ID (DIČ)
- Assigning Tax Rates
- Assigning Payment Methods
- Setting Bank Accounts for Different Currencies
- Issuing Invoices
- Issuing Proforma Invoices (Zálohové faktury)
- Issuing Credit Notes (Dobropisy)
- Paying Proforma Invoices
- Automatic Payment Checking (Payment Pairing)
- Paying Invoices (Marking as Paid)
- Display in Order Overview
- Setting Content of Issued Documents
- Email and Thank You Page Settings
- Stock Synchronization Settings
- Filters
- How to Change Invoice Language
- Influencing Sending Invoice/Proforma to iDoklad
- Changing PDF Invoice and Proforma Language
- Setting Paid Invoice Status
- Changing Invoice and Proforma Description
- Changing Invoice Order Number
- Adding Currency Rate to Invoice
- Adding Receipt
- Postponing Invoice/Proforma Creation
- Changing Status at Which Document Is Marked as Paid
- Changing Status at Which Document Is Created
- Custom rules for stock synchronization of individual products
- FAQ
- Plugin testing
Plugin Installation
After purchasing the iDoklad plugin, you will receive a license key and a download link for the plugin zip file via email. You can find detailed instructions on how to install the plugin from your computer into WordPress here.
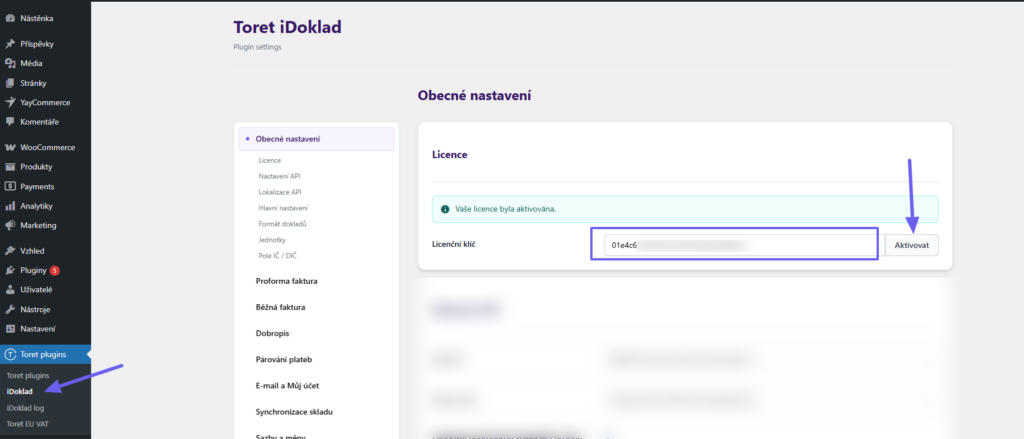
Plugin Activation
After installing the plugin, open the WooCommerce iDoklad plugin, insert the license key into the appropriate field, and verify the license.
Video Tutorial
Connecting with iDoklad
The first step required to connect the plugin with iDoklad is to register on the www.idoklad.cz website.
Attention! iDoklad is available in multiple tariffs. Verify that your chosen tariff allows API connection, which is essential for integration.
After creating your account and logging in, go to Nastavení (Settings) (gear icon in the left menu) > Aplikace (Applications). Here in the API tab, you generate access keys for connection.
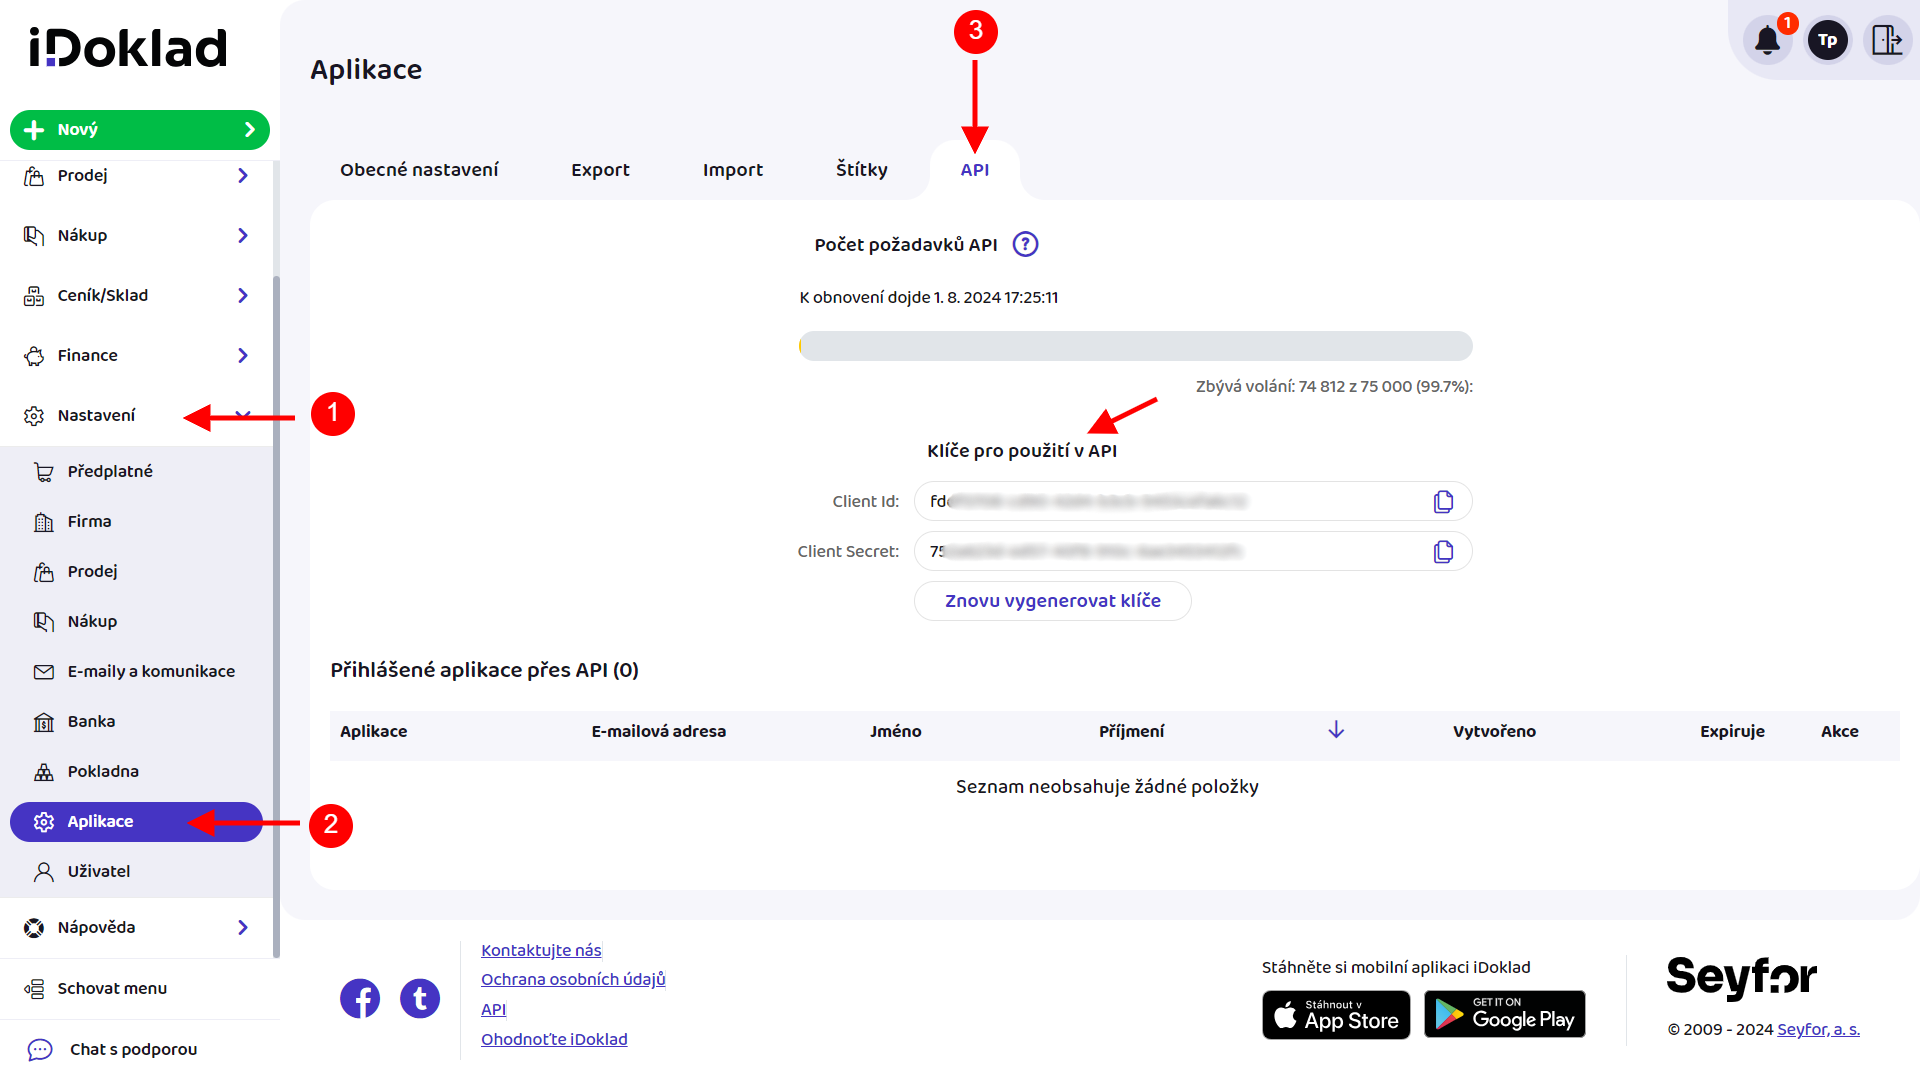
Here, click the Generate button to generate your Client ID and Client Secret and save them.
Then enter these two generated details into the iDoklad plugin (Toret plugins > iDoklad > Nastavení API). In the Lokalizace API (API Localization) section, select Czech or Slovak API, depending on which one you use. Do not forget to save everything.

Warning: If these details are entered incorrectly, it will not be possible to select a payment method and assign it to an order.
Number Series
For the correct registration, functioning, and pairing of proforma and regular invoices, it is necessary to set up number series. It is important to realize that number series are loaded automatically from the iDoklad system.
Therefore, it is first necessary to set up number series on the iDoklad portal and then synchronize them in the plugin.
Settings in the iDoklad System
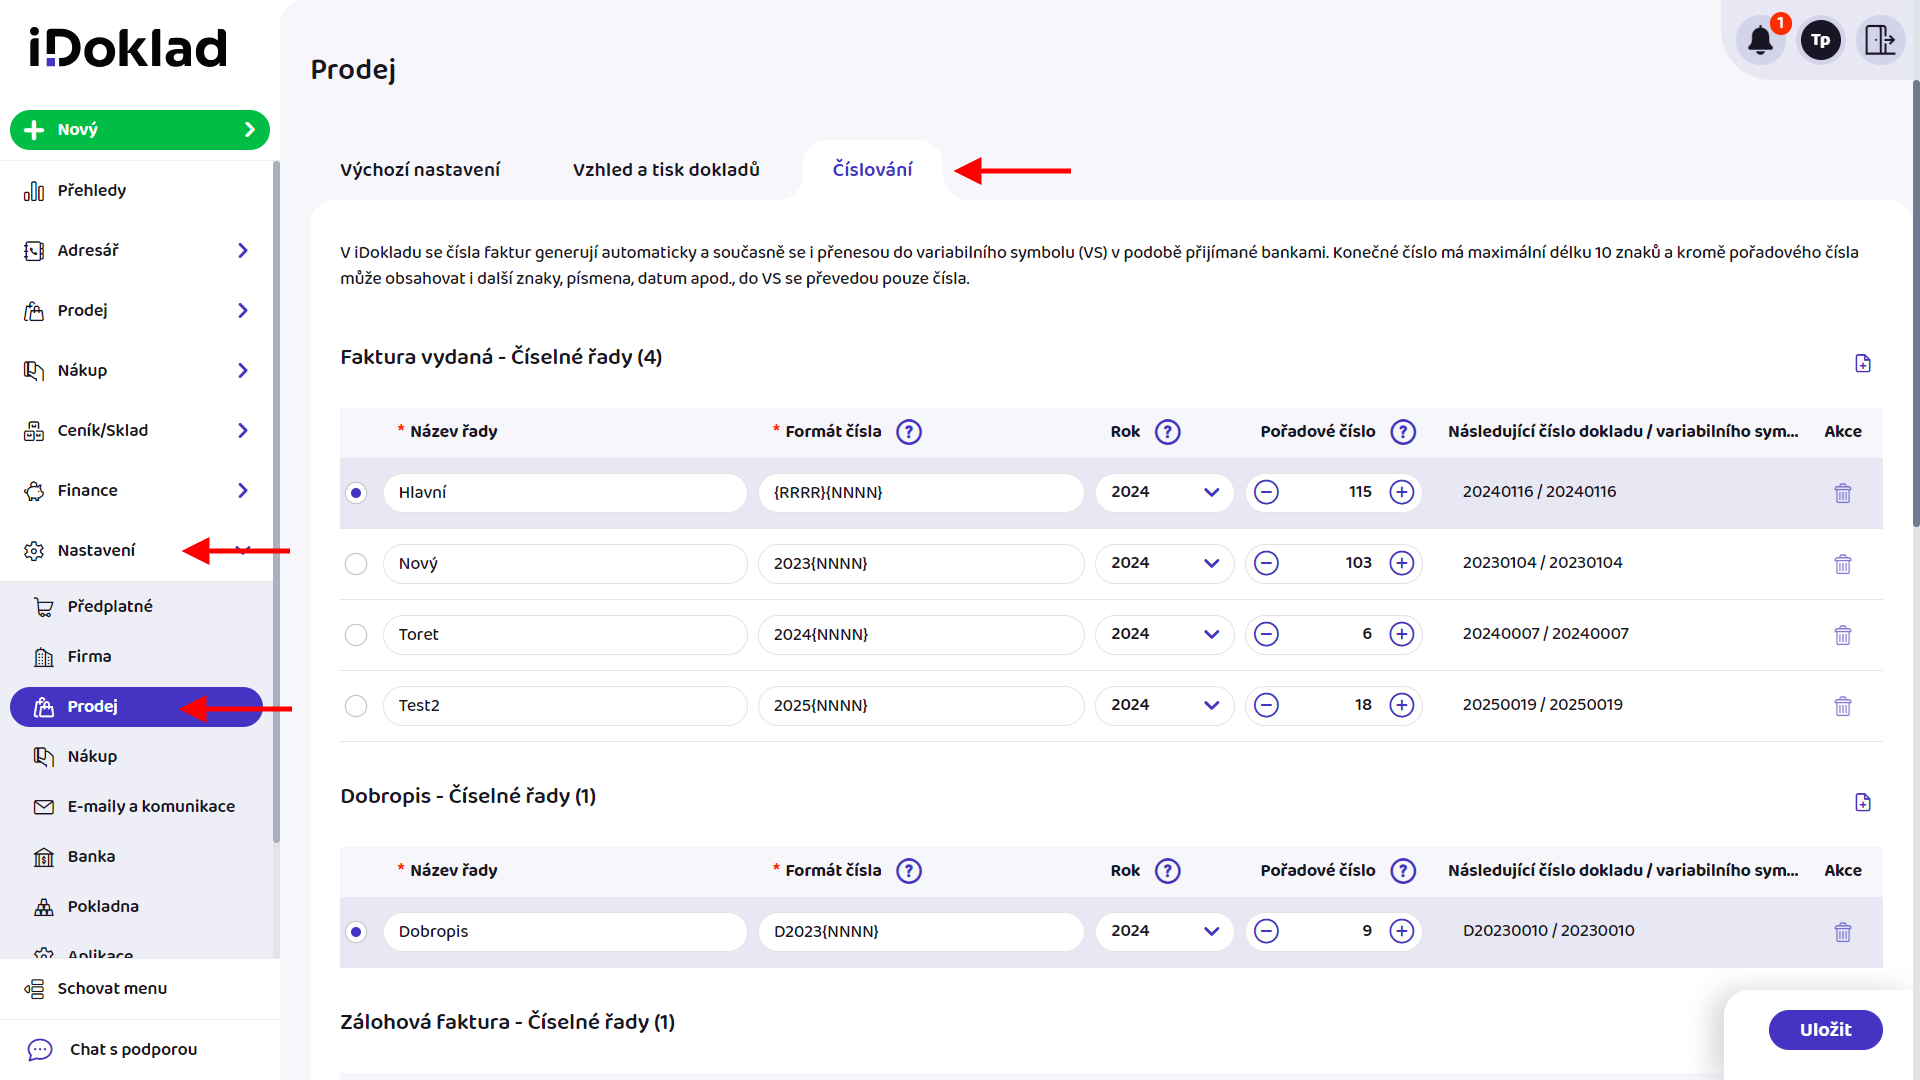
After logging in, go to Nastavení (Settings) > Prodej (Sales). Here select the Číslování (Numbering) tab.
We recommend carefully reading all comments and information on how number series are generated and set in iDoklad before doing so and starting to issue invoices.
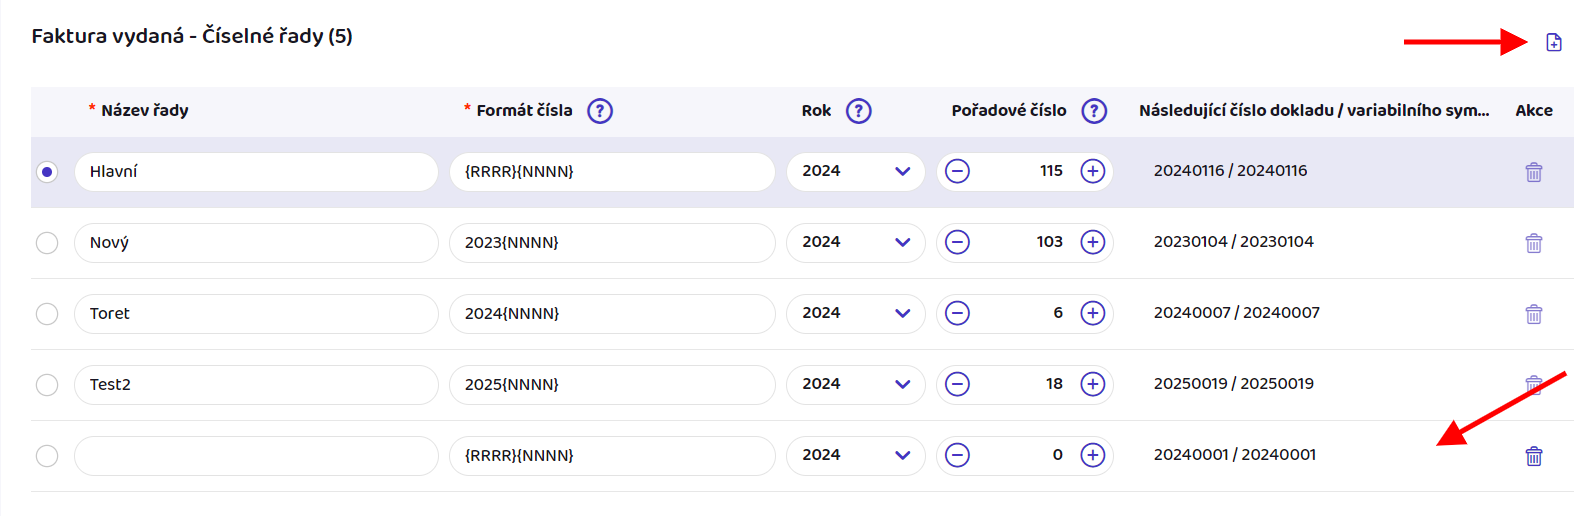
First, we will set up regular invoices. Clicking the Nová (New) button (document icon with a + sign) adds a new empty row for numbering to the overview. Here you need to fill in all fields. Explanations for individual fields will appear after clicking the question mark icon.
We will choose the same procedure for setting up number series for proforma invoices (zálohová faktura) and credit notes (dobropis), which you can find lower on the page.
You can insert multiple number series for regular invoices and credit notes. The one marked as selected will be applied. Finally, do not forget to save the changes made – the Uložit (Save) button is located at the bottom right.
After creating and saving number series in iDoklad, we will proceed to connect them in the plugin.
Settings in the Plugin
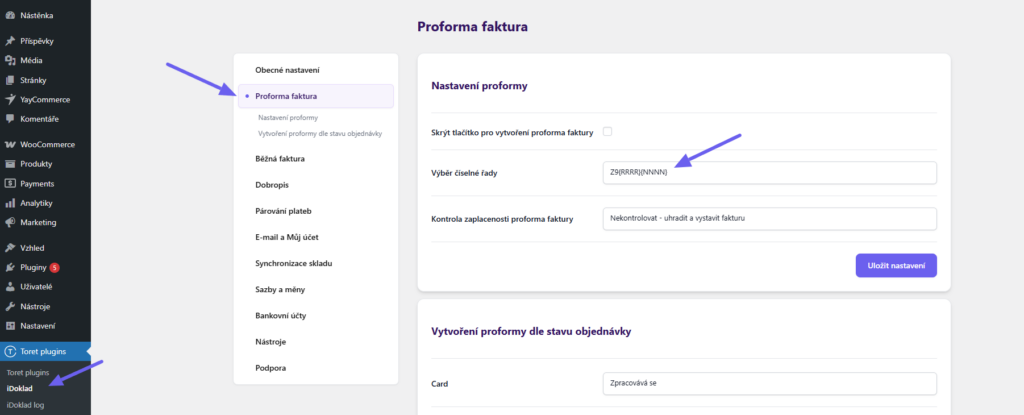
You assign number series to proformas, invoices, and credit notes in their settings sections. We will show this using the proforma invoice example.
Enter the plugin settings, the Proforma faktura section (Toret Plugins > iDoklad > Proforma faktura). In the Nastavení proformy (Proforma Settings) part, select the number series in the Výběr číselné řady (Select Number Series) dropdown. Save.
In the same way, set the number series in the Běžná faktura (Regular Invoice) and Dobropis (Credit Note) sections.
TIP: Didn’t number series load from iDoklad and you don’t see any in the dropdown? Try clicking Save first. After reloading, the series should be available.
VAT (DPH)
iDoklad calculates the VAT of items itself when generating an invoice, according to the assigned VAT rates in the plugin settings (see assigning VAT rates).
It is important that two decimal places are set in WooCommerce settings on the General tab. (WooCommerce > Settings > General > Number of decimals) If zero decimal places are set here, it is possible that iDoklad will calculate with a rounded amount and the total amount on the invoice will not match the amount in the order in WooCommerce.
If you do not want to display decimal places for prices on the website when two decimal places are set in WooCommerce, insert a script to hide zeros after the decimal point into the child theme.
add_filter( 'woocommerce_price_trim_zeros', '__return_true' );OSS Mode (One Stop Shop)
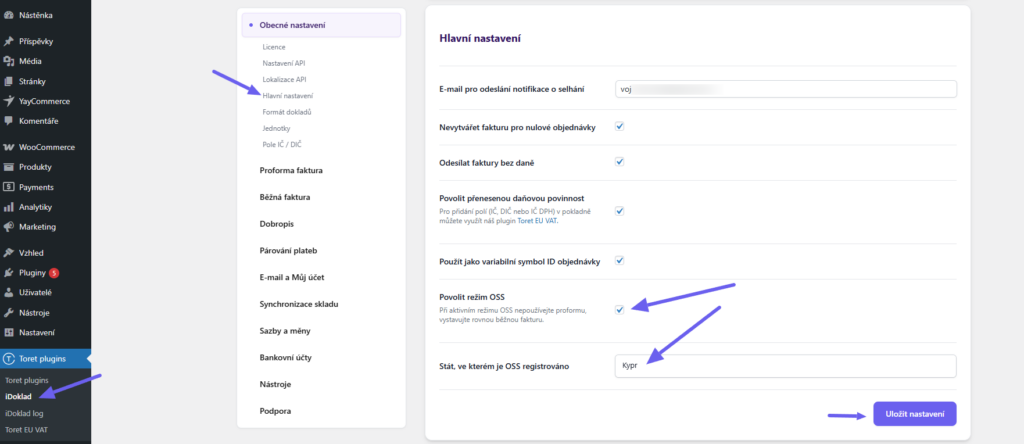
The plugin can work with the OSS mode. Enable it in the Obecné nastavení (General Settings) of the plugin (Toret Plugins > iDoklad > Obecné nastavení > Hlavní nastavení) and select the country where OSS is registered. Do not forget to save the changes made.
Company ID (IČ) and VAT ID (DIČ)
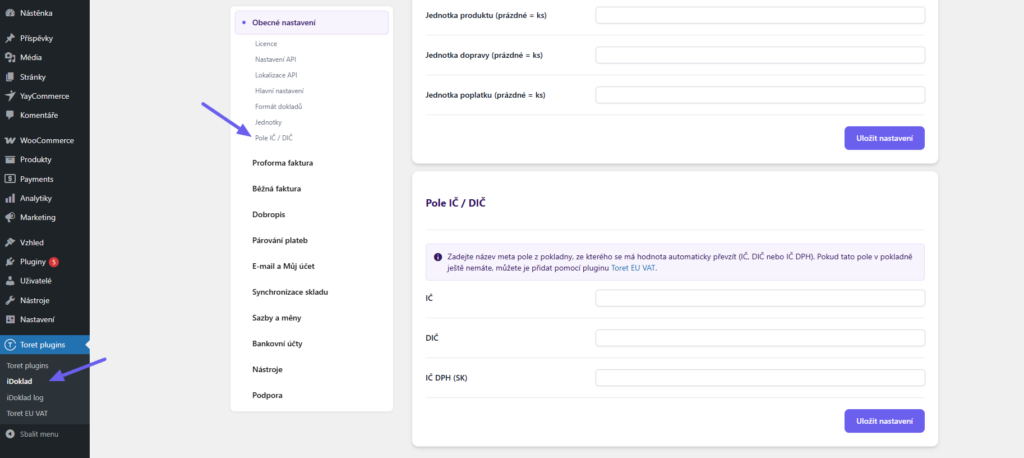
Since WooCommerce does not natively contain fields for Company ID and Tax ID, it is necessary to use a plugin to add them. If you use one, you must enter the meta field name from the checkout for IČ, DIČ, and SK DIČ (for Slovak clients) in the iDoklad plugin, which allows writing these data to the iDoklad system and invoices.
You can find the settings in the menu under the tab Toret plugins > iDoklad > Obecné nastavení > Pole IČ/DIČ (IČ/DIČ Fields)
TIP: You can easily add fields for Company ID, Tax ID, and VAT ID using the Toret EU VAT plugin, with which you can also set up reverse charge if necessary.
If you use a Toret plugin to add fields, it is not necessary to fill in field names. Thanks to mutual compatibility, automatic connection occurs.
Assigning Tax Rates
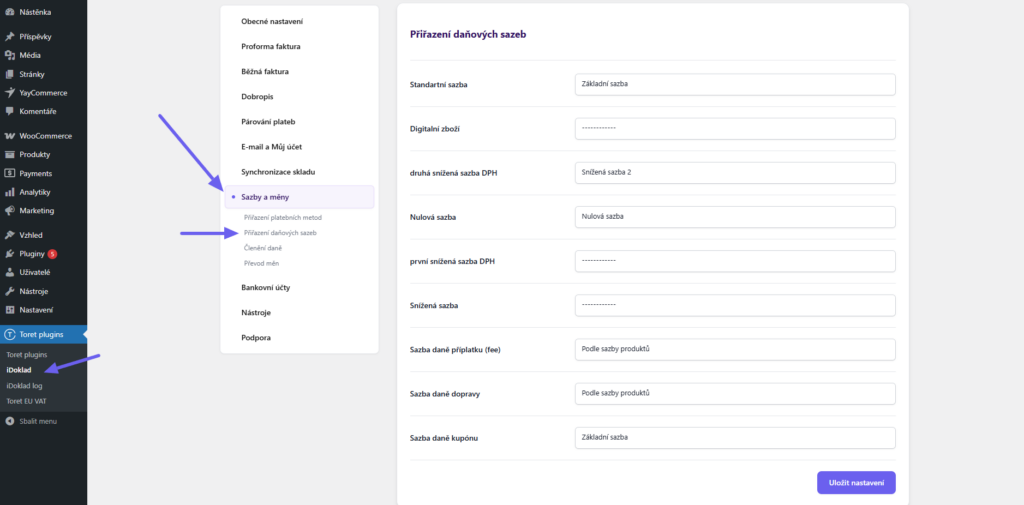
It is very important to pair tax rate settings in your e-shop according to the nomenclature/rates in iDoklad.
The standard rate, both reduced rates, and the zero rate need to be assigned only if you use these tax rates. The same applies to tax rates for shipping, coupons, and surcharges.
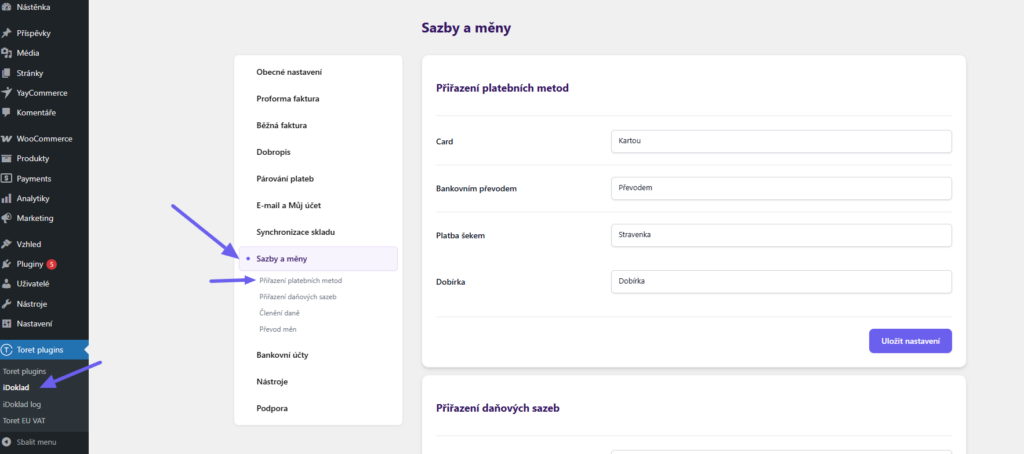
You can find the plugin settings in the administration menu under the tab Toret plugins > iDoklad > Sazby a měny (Rates and Currencies).
Assigning Payment Methods
For correct marking on invoices, it is necessary to pair e-shop payment methods with payment types available in the iDoklad system. You perform this assignment in the Sazby a měny (Rates and Currencies) section (Toret plugins > iDoklad > Sazby a měny > Přiřazení platebních metod)
Setting Bank Accounts for Different Currencies
(Toret plugins > iDoklad > Bankovní účty)
iDoklad supports using multiple bank accounts for different currencies. Invoices will always display the payment details corresponding to the relevant currency. Accounts can be loaded directly from the iDoklad service (recommended), or they can be entered manually in the plugin itself.

When using automatic loading, no additional information needs to be filled in.
When entering accounts manually, fill in the currency, account number, bank code, IBAN, and the corresponding SWIFT code. By clicking the “Add Row” button, you can add any number of additional rows for other accounts. After entering the data, don’t forget to save everything.

Issuing Invoices
In this chapter, we will explain issuing invoices.
Invoice Settings in the iDoklad System
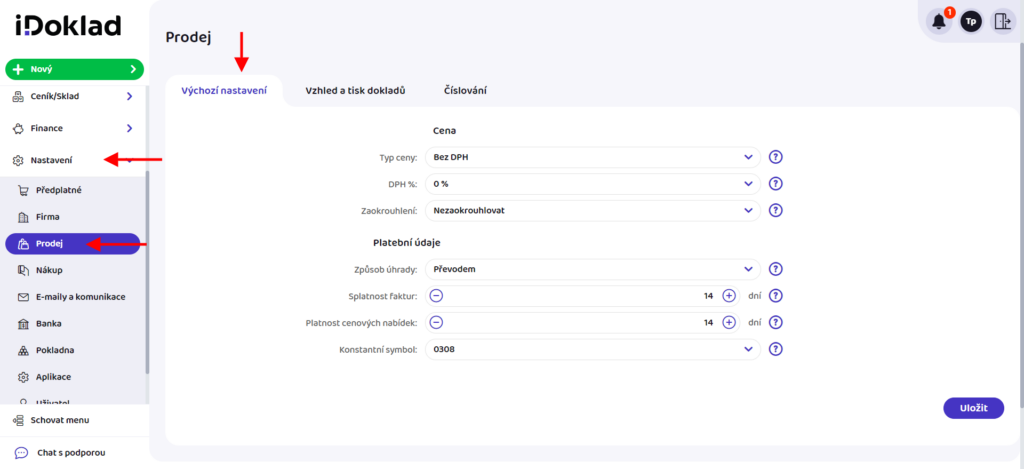
First, you need to set up invoices in iDoklad. After logging into iDoklad, go to Nastavení (Settings) > Prodej (Sales).
On the Výchozí nastavení (Default Settings) tab, fill in the data according to your needs. Help under the question mark icons will assist you with filling. Save the changes made.
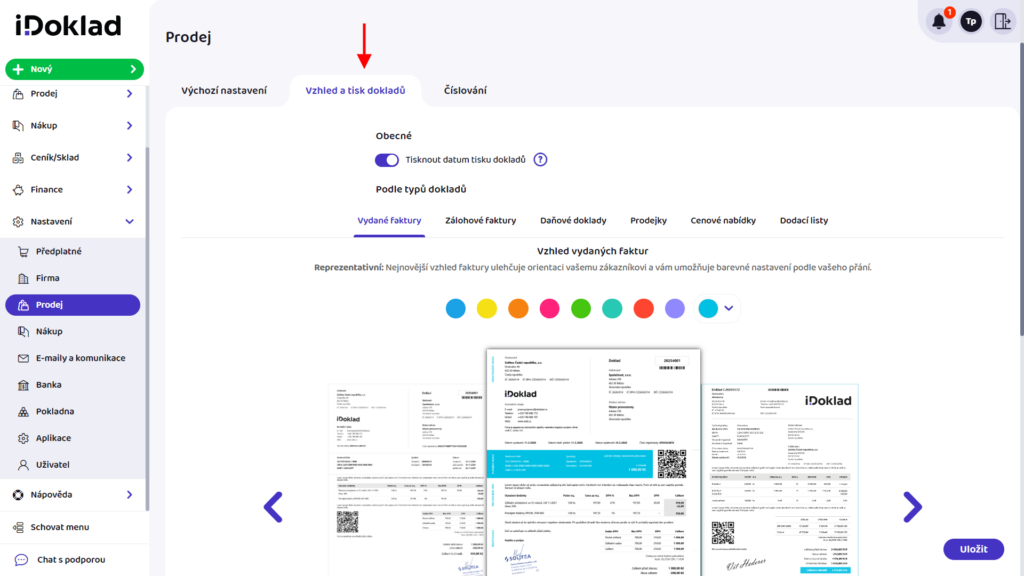
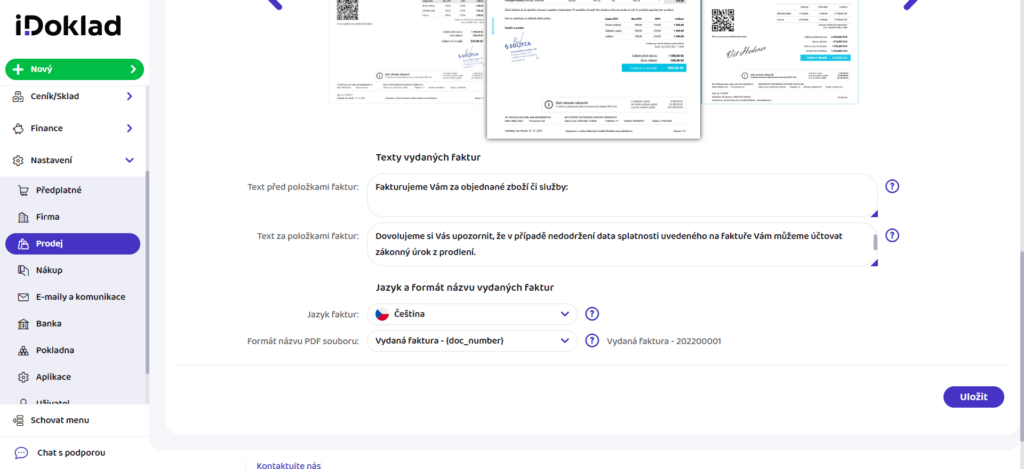
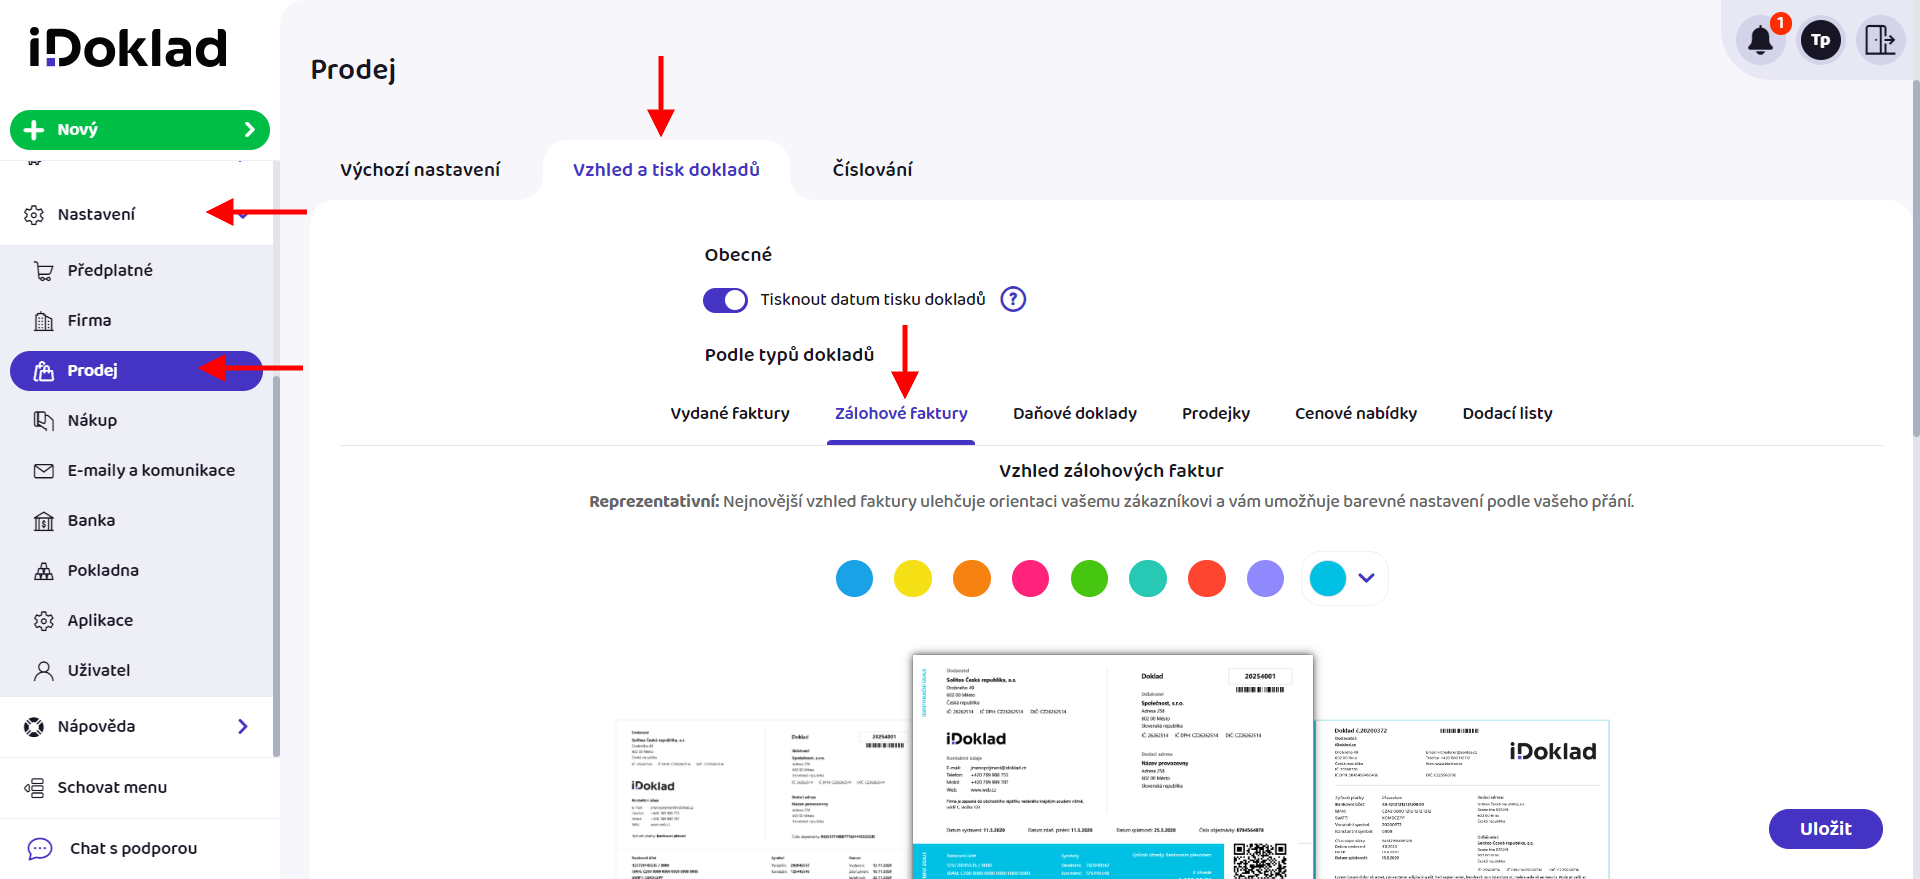
On the Vzhled a tisk dokladů (Appearance and Print of Documents) > Vydané faktury (Issued Invoices) tab, you then adjust the look, text, and language of invoices. Save the changes made.
We covered invoice numbering settings here.
After setting up invoices in iDoklad, we continue only in the e-shop administration.
Manual Invoicing
Invoices can be manually issued by clicking the Vytvořit fakturu (Create Invoice) button in the order overview or in the order detail.

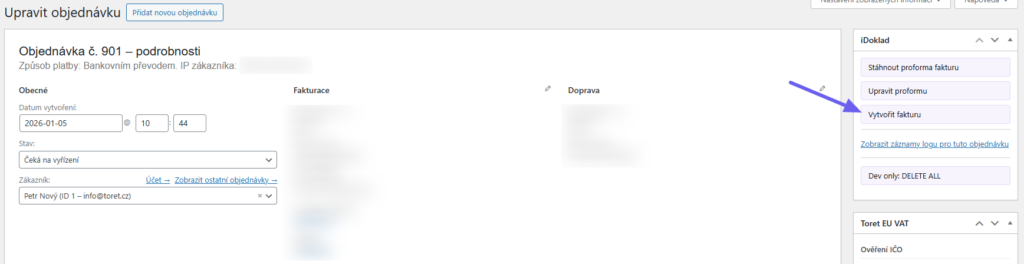
All issued documents can be viewed in the order overview by clicking on the link in the ID faktury (Invoice ID) column. The customer will have a link to download the invoice in the order email.
Automatic Invoicing
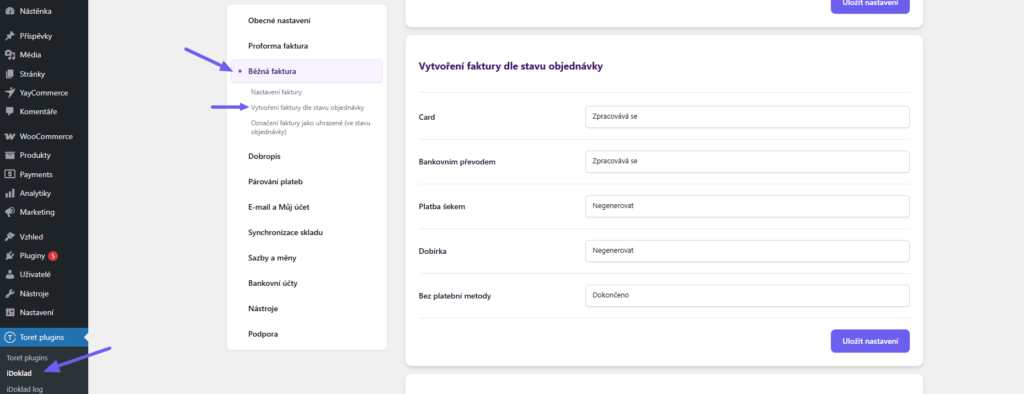
With automatic invoicing, the plugin automatically issues an invoice in the specified order status. You can set whether and in what order status to generate an invoice separately for each payment method.
You set automatic invoicing in the section Běžná faktura (Regular Invoice) > Vytvoření faktury dle stavu objednávky (Invoice creation according to order status)
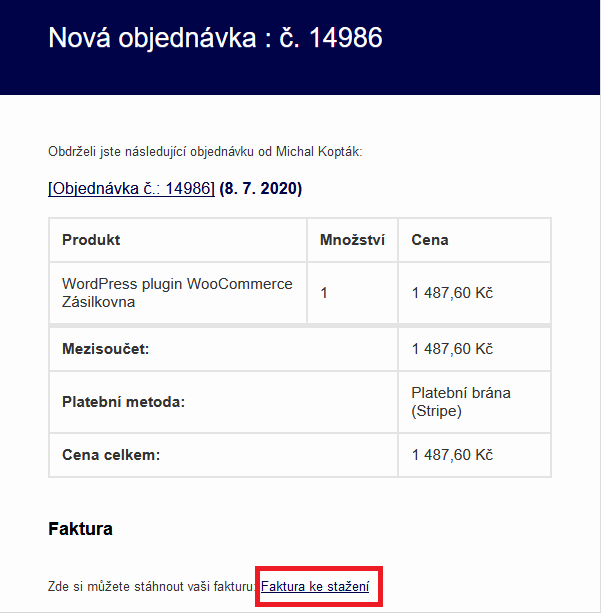
The customer will have the invoice for download in the order email.
You will have the invoice for the order in WooCommerce in the ID faktury (Invoice ID) column.
You will also find your invoices in the administration of your account at idoklad.cz.
Issuing Proforma Invoices (Zálohové faktury)
In this chapter, we will explain issuing proforma invoices.
Proforma Settings in the iDoklad System
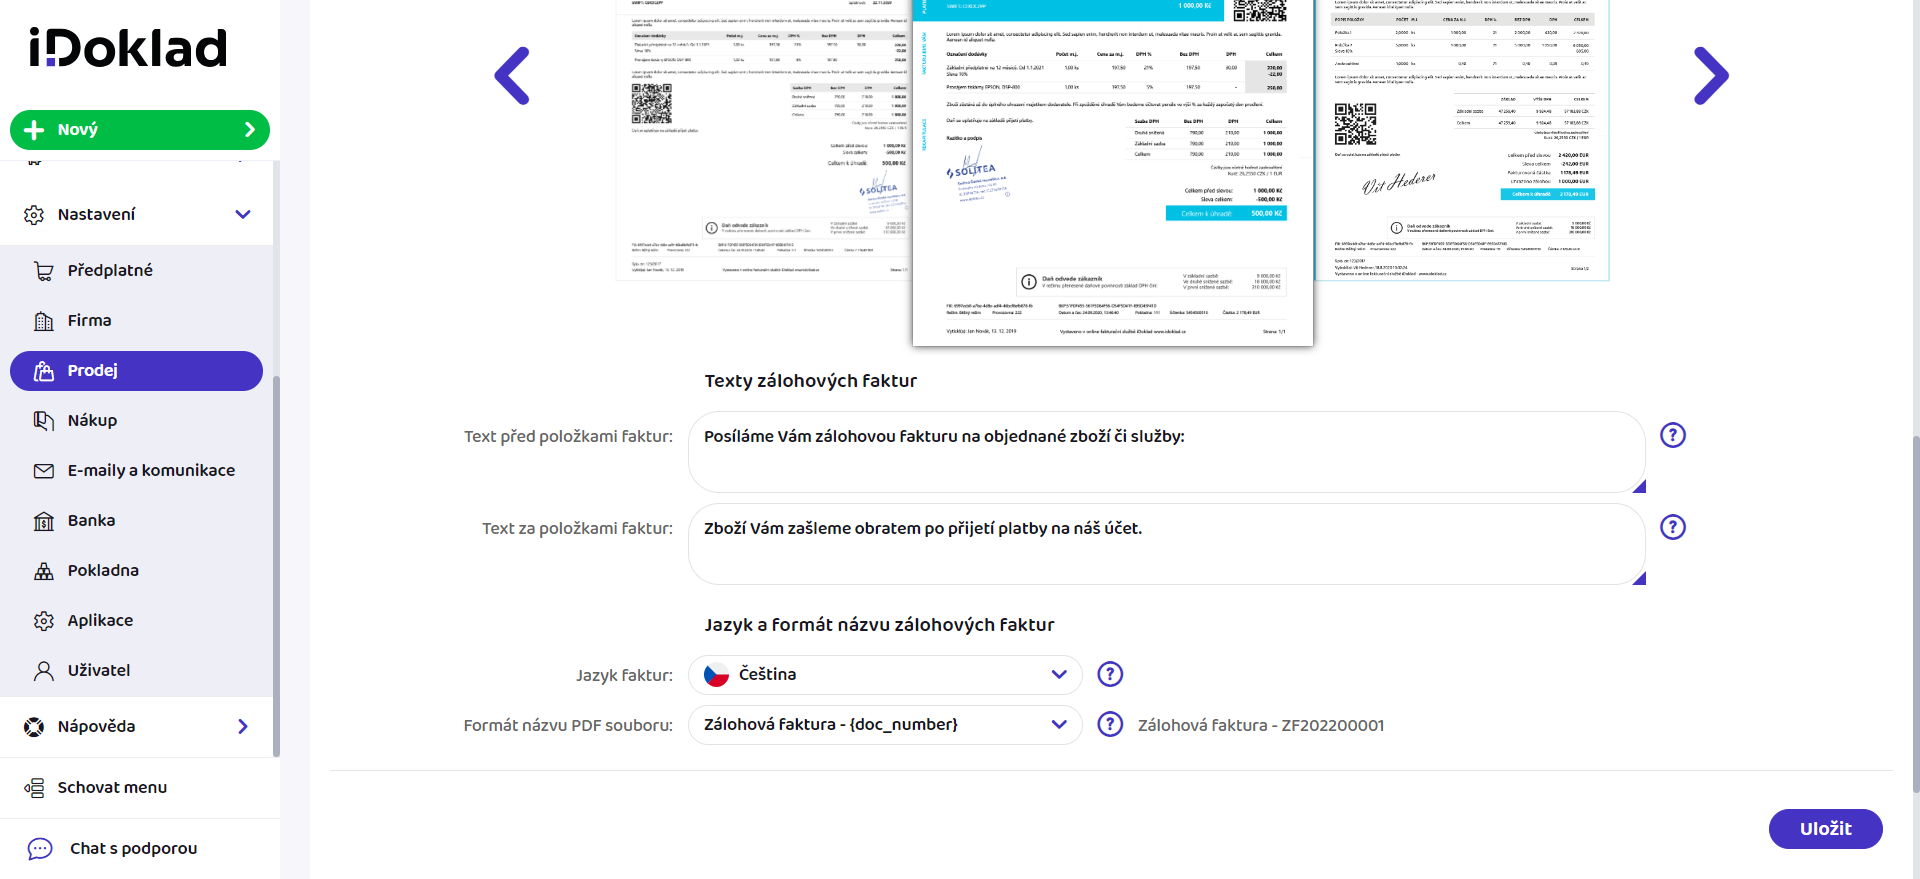
First, you need to set up proforma invoices in iDoklad. Here, after logging in, go to Nastavení (Settings) > Prodej (Sales) > Vzhled a tisk dokladů (Appearance and Print of Documents) > Zálohové faktury (Proforma Invoices).
Here you adjust the look, text, and language of invoices. Save the changes made.
After setting up proforma invoices in iDoklad, we continue only in the e-shop administration.
Manual Issuing of Proformas
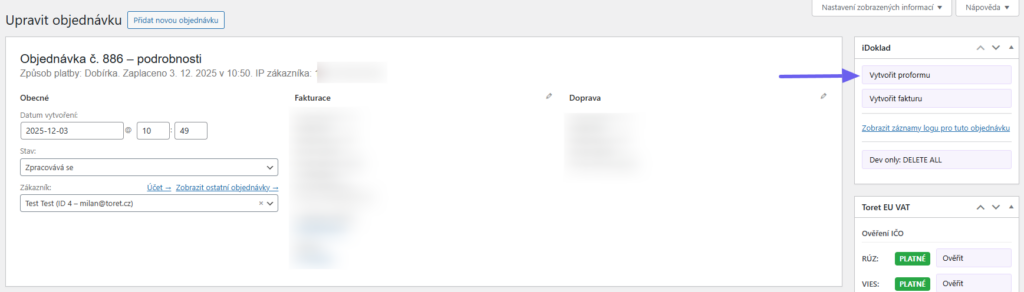
Invoices can be manually issued by clicking the Vytvořit proformu (Create Proforma) button in the order overview or in the order detail.

All issued documents can be viewed in the order overview by clicking on the link in the ID faktury (Invoice ID) column. The customer will have a link to download the invoice in the order email.
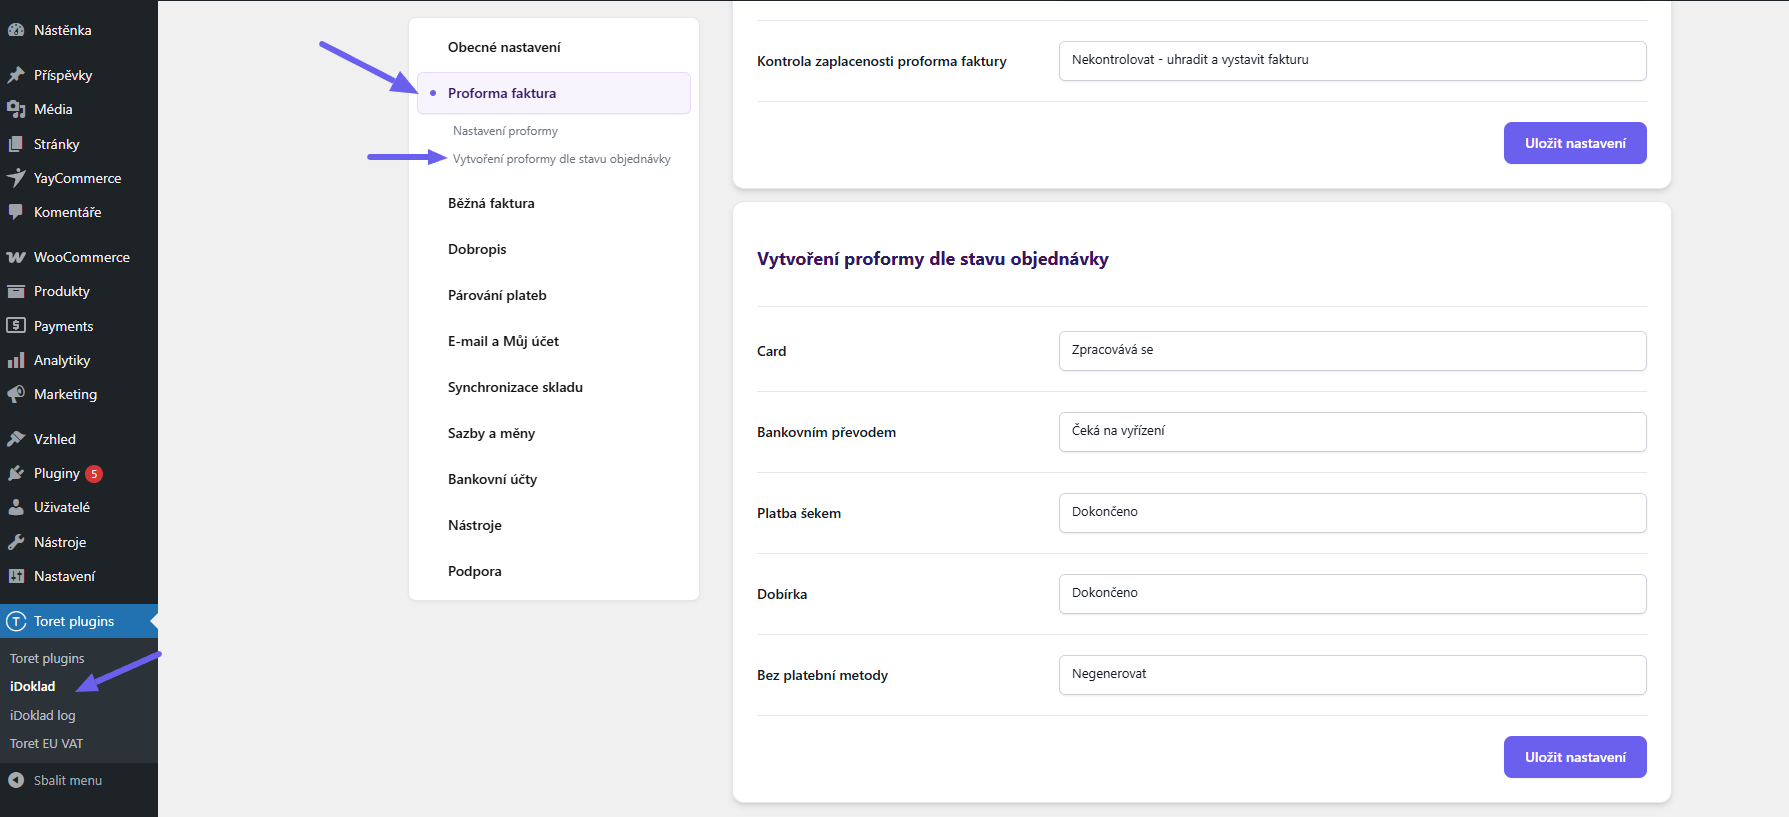
Automatic Issuing of Proformas
With automatic invoicing, the plugin automatically issues a proforma in the specified order status. You can set whether and in what order status to generate a proforma separately for each payment method.
You set automatic issuing in the section Proforma faktura (Proforma Invoice) > Vytvoření proformy dle stavu objednávky (Proforma creation according to order status)
TIP: A proforma should be generated for payment methods where funds are not credited to your account immediately or are deposited in cash, but some time is needed for their transfer to your account.
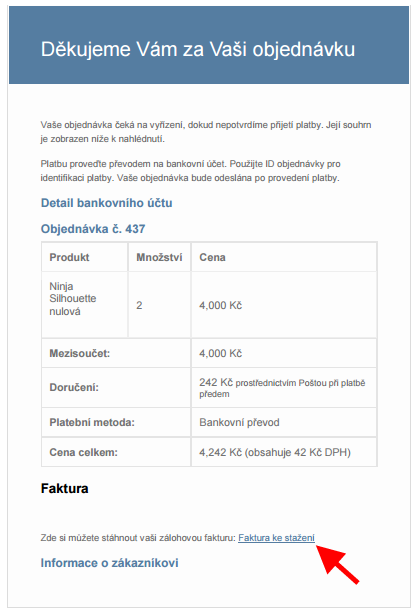
All issued documents can be viewed in the order overview by clicking on the link in the ID faktury (Invoice ID) column. The customer will have a link to download the invoice in the order email.
Link to proforma invoice in confirmation email.
Issuing Credit Notes (Dobropisy)
Just like issuing invoices and proformas, credit notes can be issued manually or automatically.
Manual Issuing of Credit Notes
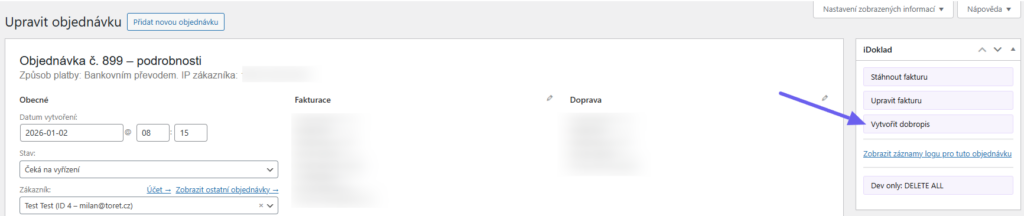
Credit notes can be manually issued by clicking the Vytvořit dobropis (Create Credit Note) button in the order overview or in the order detail.

All issued documents can be viewed in the order overview by clicking on the link in the ID faktury (Invoice ID) column.
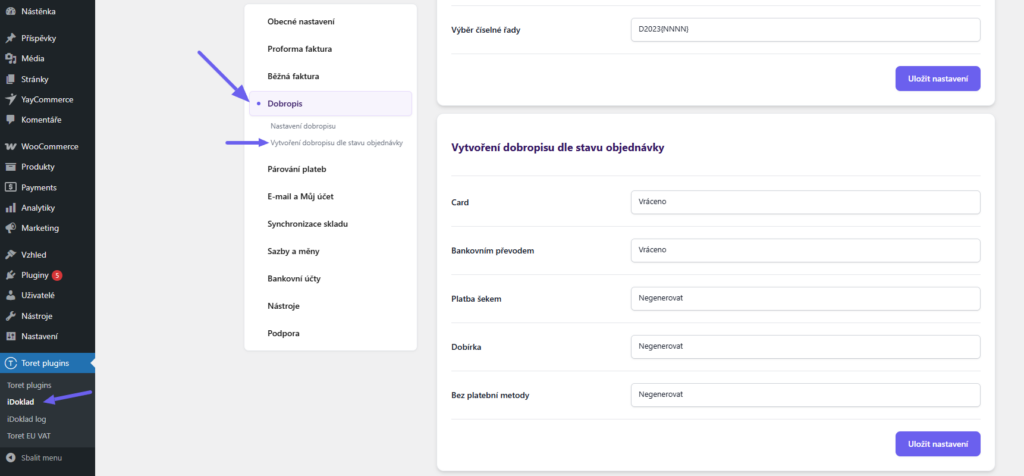
Automatic Issuing of Credit Notes
Automatic issuing of credit notes can be linked to specific order statuses for individual payment methods.
All issued documents can be viewed in the order overview by clicking on the link in the ID faktury (Invoice ID) column.
A link to the issued credit note is automatically added to the order email and also to the order details in the customer account.
Paying Proforma Invoices
In the plugin, you can set whether the payment status of the invoice will be checked (automatic payment pairing via cron) or not. You set this in the section Proforma faktura > Nastavení proformy > Kontrola zaplacenosti (Proforma Invoice > Proforma Settings > Payment Check).
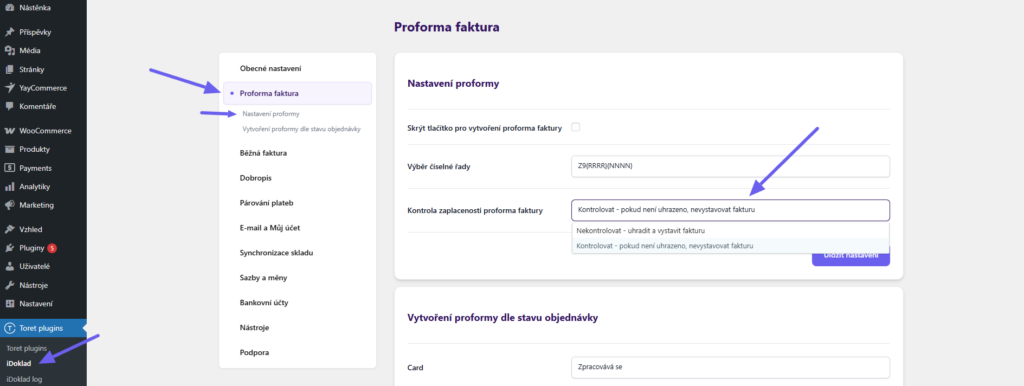
With option Nekontrolovat (Do not check): The payment status of the proforma will not be checked in any way. The subsequent issuance of the invoice occurs either manually or automatically if you change the order status yourself.
With option Kontrolovat (Check): The payment status will be checked using cron, and upon confirmation of payment, the order status will automatically change – see Automatic Payment Checking below. Invoice issuance can automatically follow the status change.
Automatic Payment Checking (Payment Pairing)
The iDoklad application contains a payment check function. If you set up bank account connection with iDoklad, the moment a payment with a certain variable symbol is credited to your account, this mechanism is able to pair this amount with the relevant invoice or proforma in iDoklad and confirm its payment.
To retrieve information about the invoice/proforma payment into WooCommerce, you can use cron, which will check the payment at regular intervals.
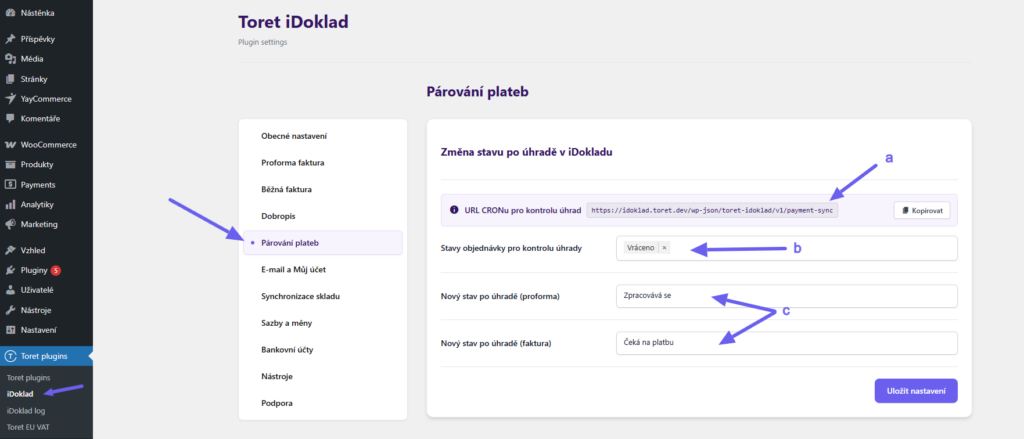
To set up automatic payment checking, enter the plugin settings Toret plugins > iDoklad > Párování plateb (Payment Pairing). Here you will find the URL address to enter into cron on your hosting (a) and select the execution interval. The recommended execution time is once per hour. This means that payment of invoices will be automatically checked once an hour.
Next, select which order statuses should be checked (b) and also set which status the order will switch to after detecting invoice/proforma payment (c). Save the changes made.
Paying Invoices (Marking as Paid)
Here we will explain how to set invoice payment in the plugin according to the order status (Toret plugins > iDoklad > Běžná faktura (Regular Invoice) > Označení faktury jako uhrazené (ve stavu objednávky) (Marking invoice as paid (in order status)))
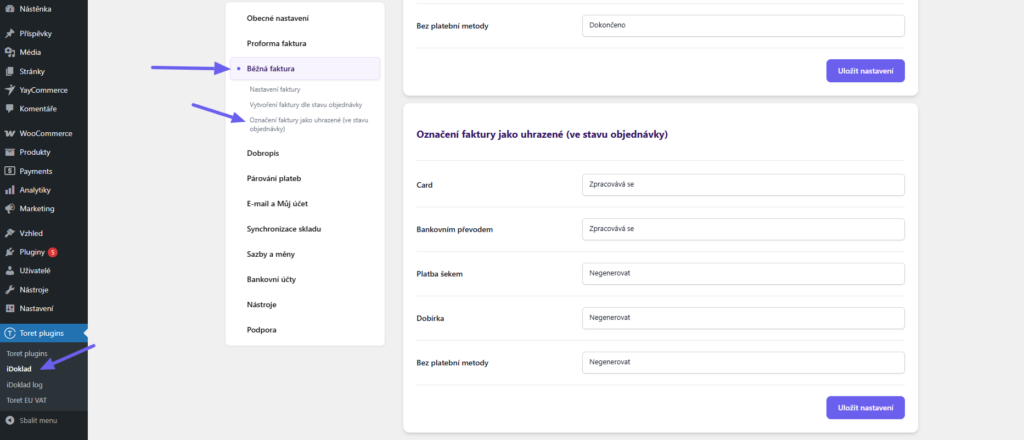
First, it must be realized that issuing an invoice does not automatically mean its payment. This is evident, for example, with the Cash on Delivery payment method, where the invoice is issued upon order confirmation and sent both in the confirmation email and then together with the product in the package. The invoice is paid only upon receipt of the shipment by the customer, and the order changes to the Completed status.
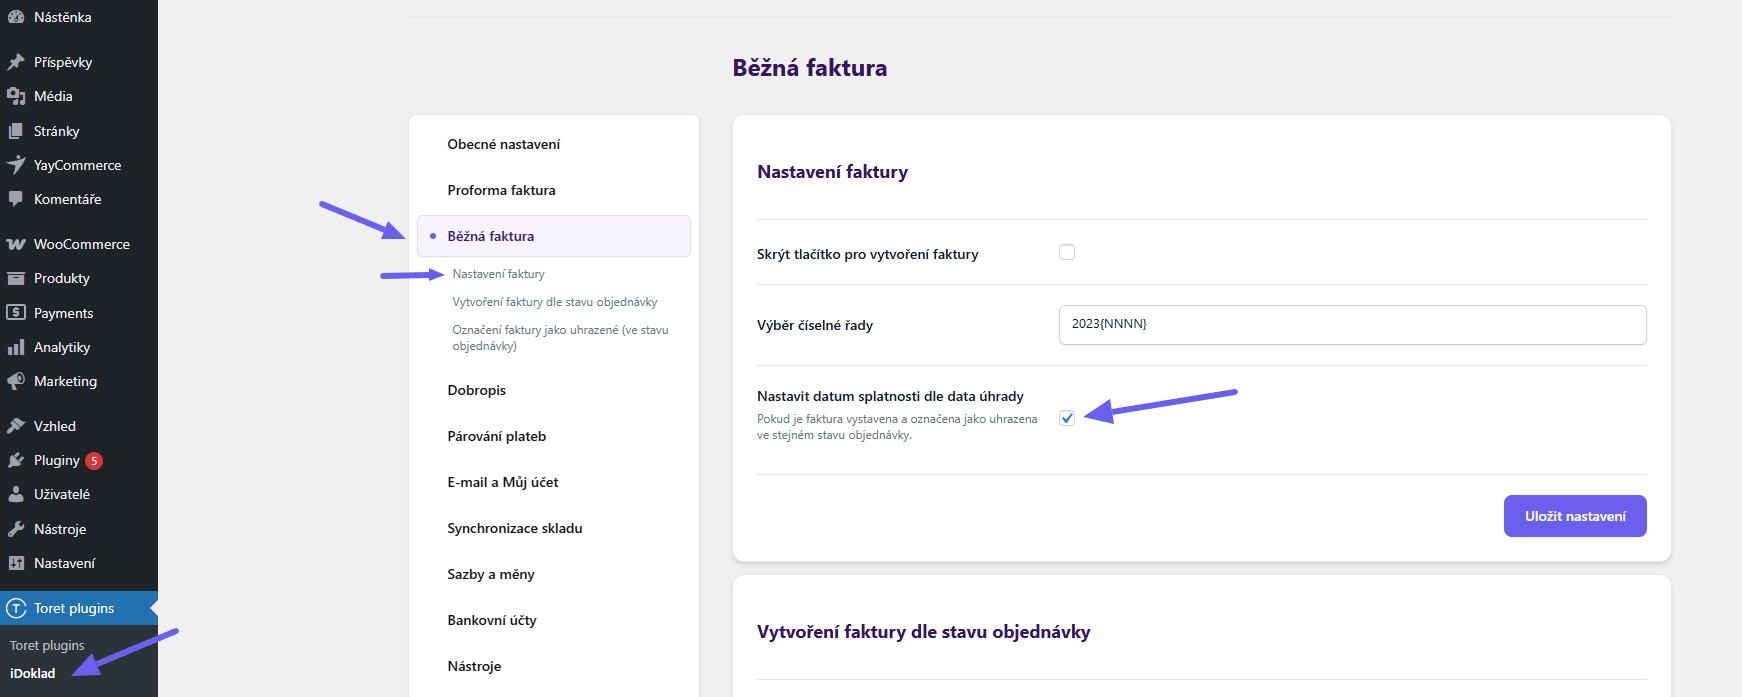
If you want to issue and pay the invoice at the same time, check the Nastavit datum splatnosti dle data úhrady (Set due date according to payment date) checkbox in the invoice settings. (Toret plugins > iDoklad > Běžná faktura > Nastavení faktury)
The only exception is if you decide to issue proforma invoices. In this case, after pairing this proforma invoice with the payment, an already paid corresponding invoice – tax document – is immediately created.
Display in Order Overview
Once a customer purchases any product in your e-shop and completes the order, this order will be immediately visible in the administration under the WooCommerce > Objednávky (Orders) tab. A confirmation email about the order is also automatically sent to the customer.
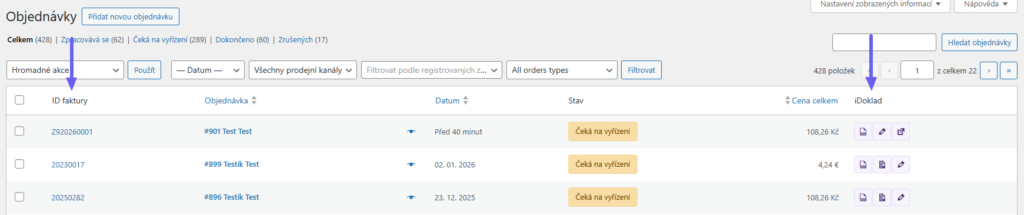
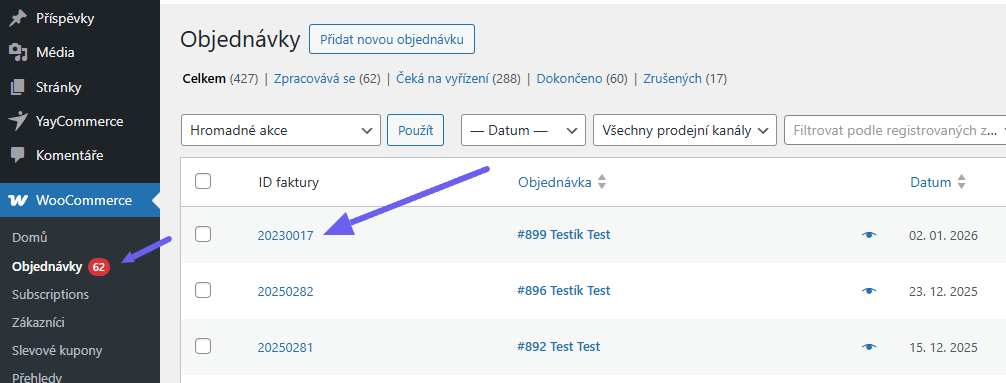
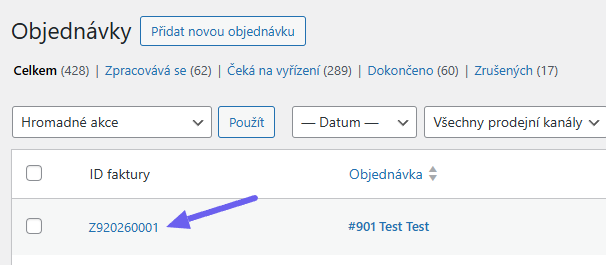
In the ID faktury (Invoice ID) column, you will find the number of the relevant invoice/proforma if it was issued for the order. Clicking on the number displays the invoice. In this column, you will also see any receipt.
In the iDoklad column, icons for issuing an invoice or proforma (square with arrow for orders without a created invoice), downloading an invoice (PDF file), editing an invoice (pencil), and issuing a credit note (two arrows) are displayed. You can also use bulk actions to send orders to iDoklad.
In the order detail, an iDoklad metabox is available, in which you can also create invoices, proformas, and credit notes, download them, or edit them.

Setting Content of Issued Documents
Displaying Variant Name on Invoice
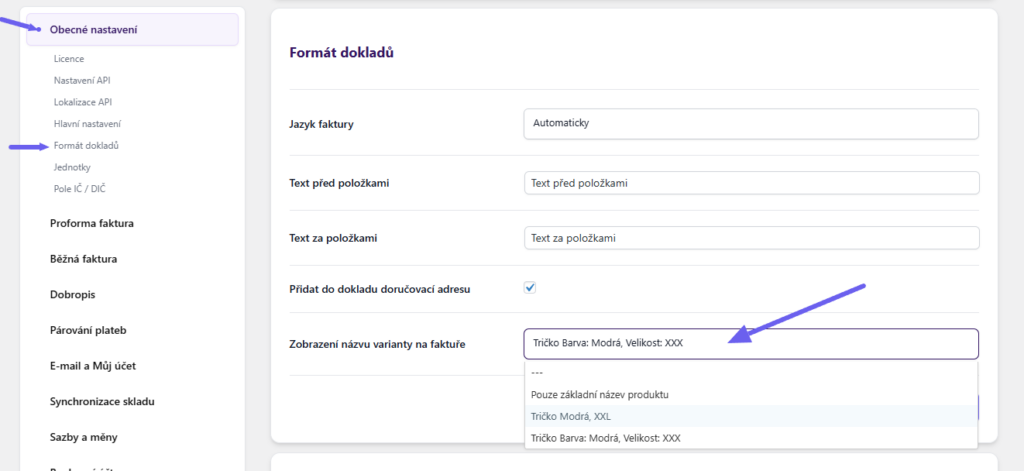
Another important element in the iDoklad plugin settings is the display of the product variant name on the invoice. That means how the product will be specified on the invoice, including its properties such as color and size.
First, it is important to have already created the primary product and its various variants according to properties. As you set up these variants in the menu under Products, you will have them available here for selecting the name that will be displayed on invoices issued to customers.
Example: Primary product is T-shirt, variants will be by color and size. A customer buys this T-shirt in blue color and size XXL. On the relevant invoice, we can display either the variant “T-shirt, Blue XXL” or including property names “T-shirt Color: Blue, Size: XXL”.
You perform the name format setting in the section Obecné nastavení (General Settings) – Formát dokladů (Document Format) (Toret plugins > iDoklad > Obecné nastavení > Formát dokladů)
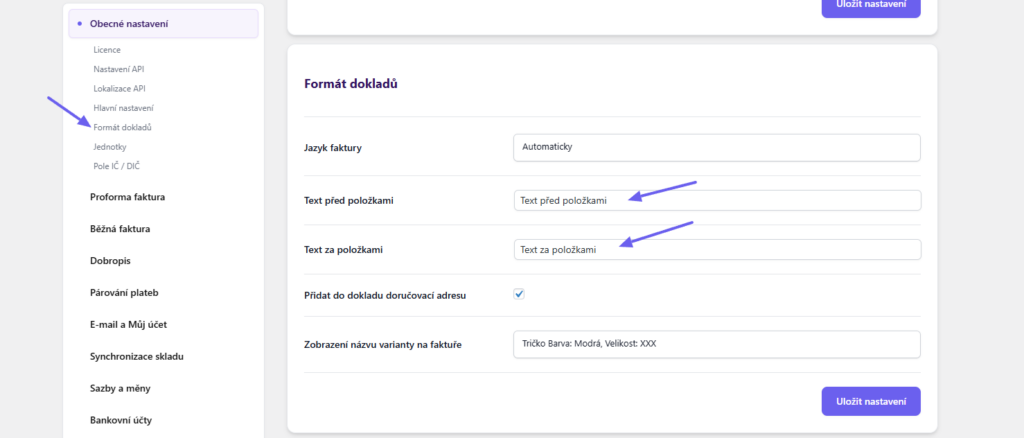
Displaying Custom Text on Invoice
It is possible to display custom texts placed before and after invoice items, see img:
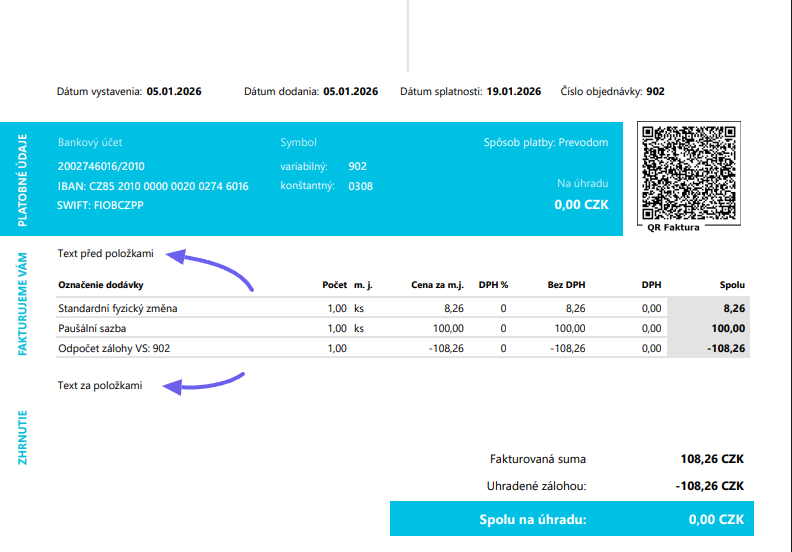
You perform the setting of custom texts in the section Obecné nastavení (General Settings) – Formát dokladů (Document Format) (Toret plugins > iDoklad > Obecné nastavení > Formát dokladů)
Displaying Unit on Invoice
In the plugin, it is possible to set a custom unit for product, shipping, or fee. Custom units will be written to the proforma invoice and the regular invoice.
If fields are not filled, the default value “ks” (pcs) will be used. The function is intended, for example, for e-shops that sell goods by meters, kg, etc.
Example setting:
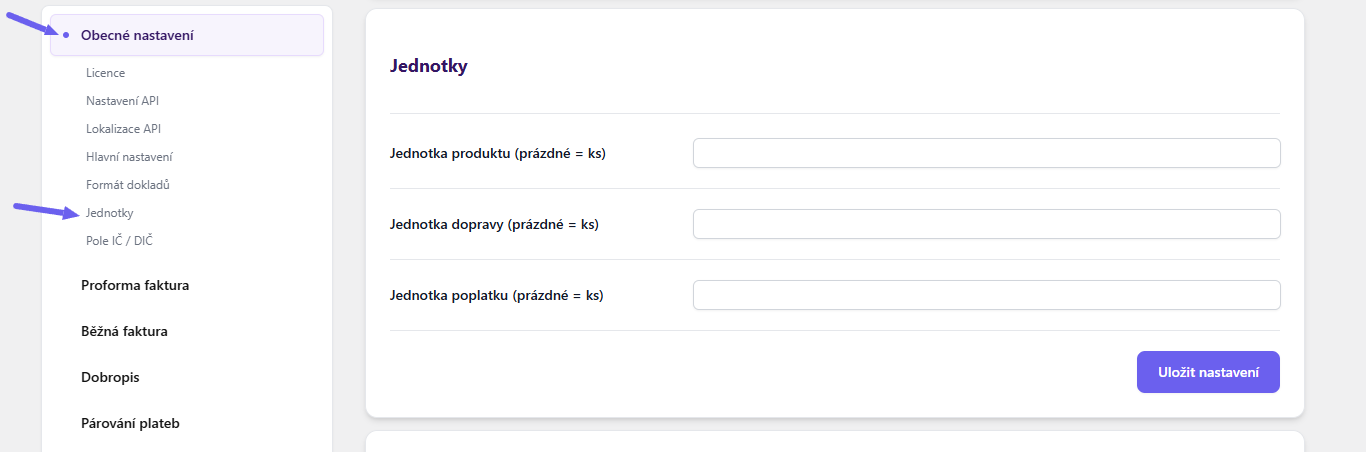
Example product on invoice:

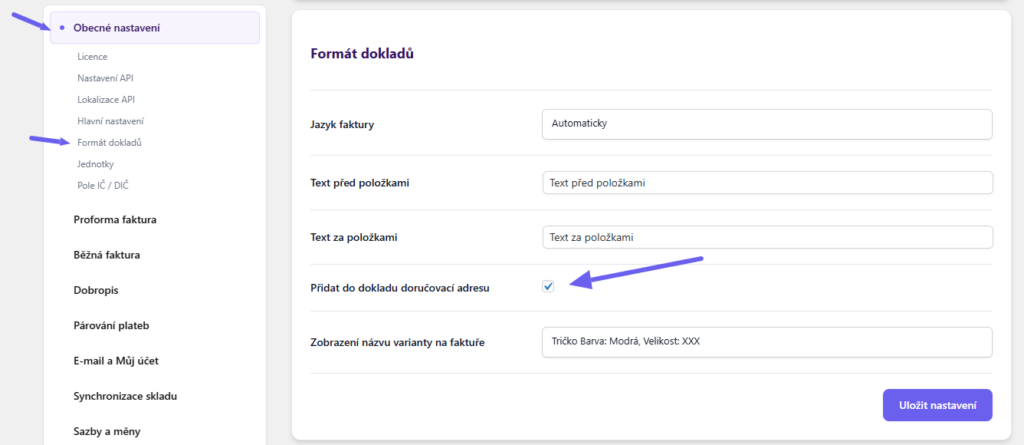
Displaying Delivery Address on Invoice
In the plugin, it is possible to set the display of the delivery address (if filled) on the invoice. You can find this option in the document format settings (Toret Plugins > iDoklad > Obecné nastavení > Formát dokladů).
Setting Invoice Language
In the document format settings (Toret plugins > iDoklad > Obecné nastavení > Formát dokladů), you can select the language in which documents will be issued. The language can be set fixed or determined automatically by order country.
Available languages are:
- Czech
- Slovak
- English
- German

Email and Thank You Page Settings
In the Email and My Account section, you can customize the sending of emails with invoices, proformas, and credit notes.
Buttons and Actions
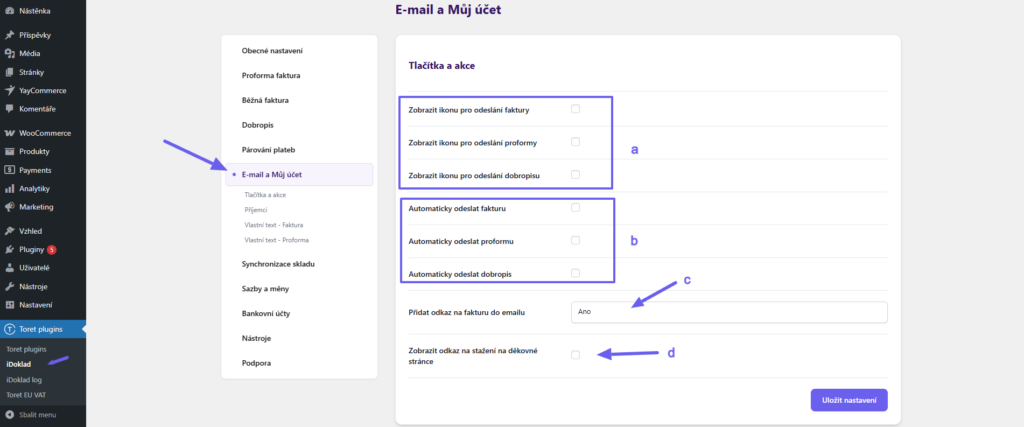
The checkboxes Zobrazit ikonu pro odeslání… (Display icon for sending…) (a) are used to display the icon for manual sending in the order overview (envelope symbol).
When checking the Automaticky odeslat… (Automatically send…) checkboxes (b), the given documents will be sent by email from the iDoklad system automatically upon their creation. You set the recipients of these emails in the Recipients section (see below).
Přidat odkaz na fakturu do e-mailu (Add invoice link to email) (c): This function adds links to invoices, proformas, and credit notes to automatic WooCommerce order emails.
Zobrazit odkaz na stažení na děkovné stránce (Show download link on thank you page) (d): Thanks to this function, the customer can download the invoice/proforma on the thank you page immediately after sending the order (if the document is already created).
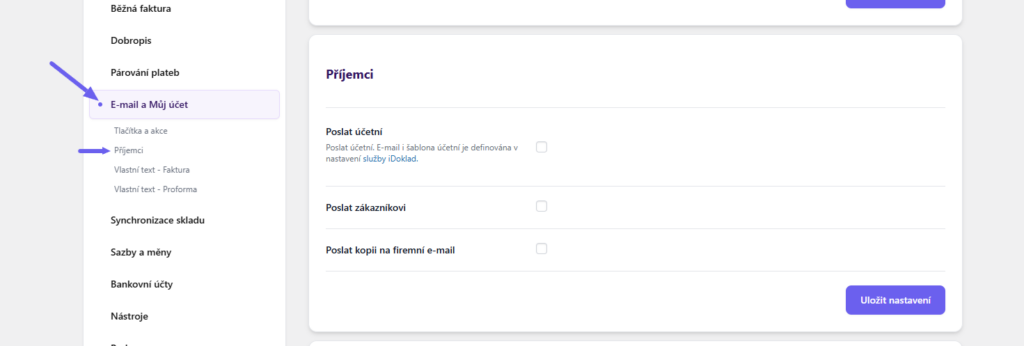
Recipients
In the Příjemci (Recipients) section, you set who you want to send emails with issued documents to (these are emails from the iDoklad system, which we enabled in the previous step, see above).
Email Content
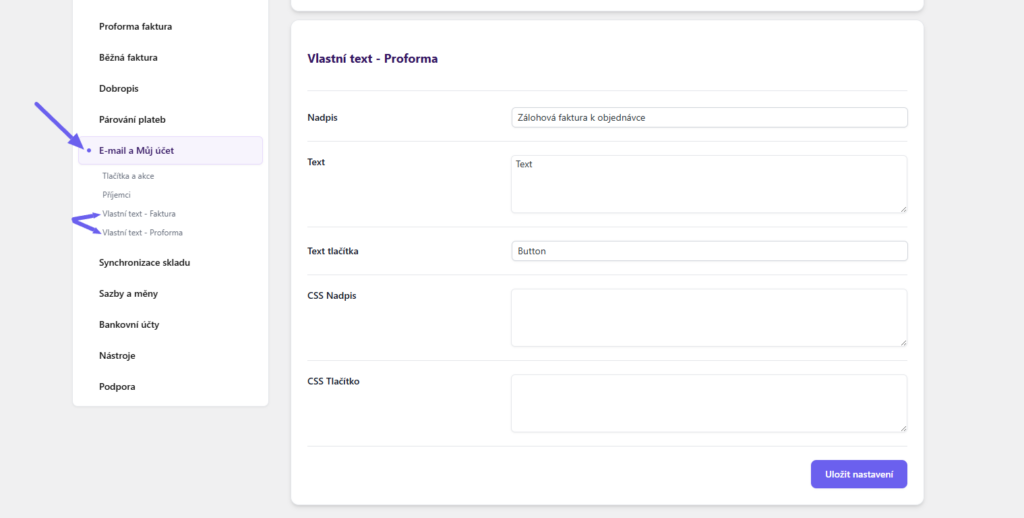
The content of emails with documents sent from the iDoklad system can be edited in the sections Vlastní text – Faktura (Custom Text – Invoice) and Vlastní text – Proforma (Toret plugins > iDoklad > E-mail a Můj účet > Vlastní text).
Stock Synchronization Settings
In the iDoklad administration, you can use the function of recording stock and connect them with invoice items. If an order is made on the website, the item is automatically deducted from the stock in the iDoklad administration.
We will go through the settings in several steps:
Function Activation in Plugin
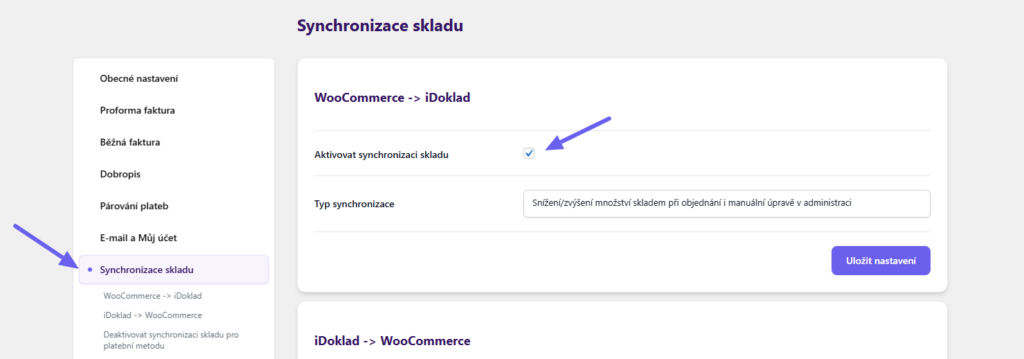
On the website, go to iDoklad settings in the plugin (Toret plugins > iDoklad > Synchronizace skladu (Stock Synchronization)).
In the plugin settings part WooCommerce -> iDoklad activate this function with a checkbox, set the synchronization type, and save. We will explain the difference between synchronization types.
Snížení/zvýšení množství skladem při objednání i manuální úpravě v administraci (Decrease/increase stock quantity upon ordering and manual adjustment in administration) – This means that the stock quantity (number of pieces in stock) for the imported product in iDoklad is adjusted when sold even if you manually adjust it for the product in WooCommerce.
E.g., you manually replenish the stock of a given product. At the same time, the number of pieces in stock will also synchronize upon order or order cancellation.
Pouze snížení množství skladem při objednání (Only decrease stock quantity upon ordering) – This function adjusts the number of pieces in stock in iDoklad only by order. When manually changing the stock status, the stock on the iDoklad side does not synchronize.
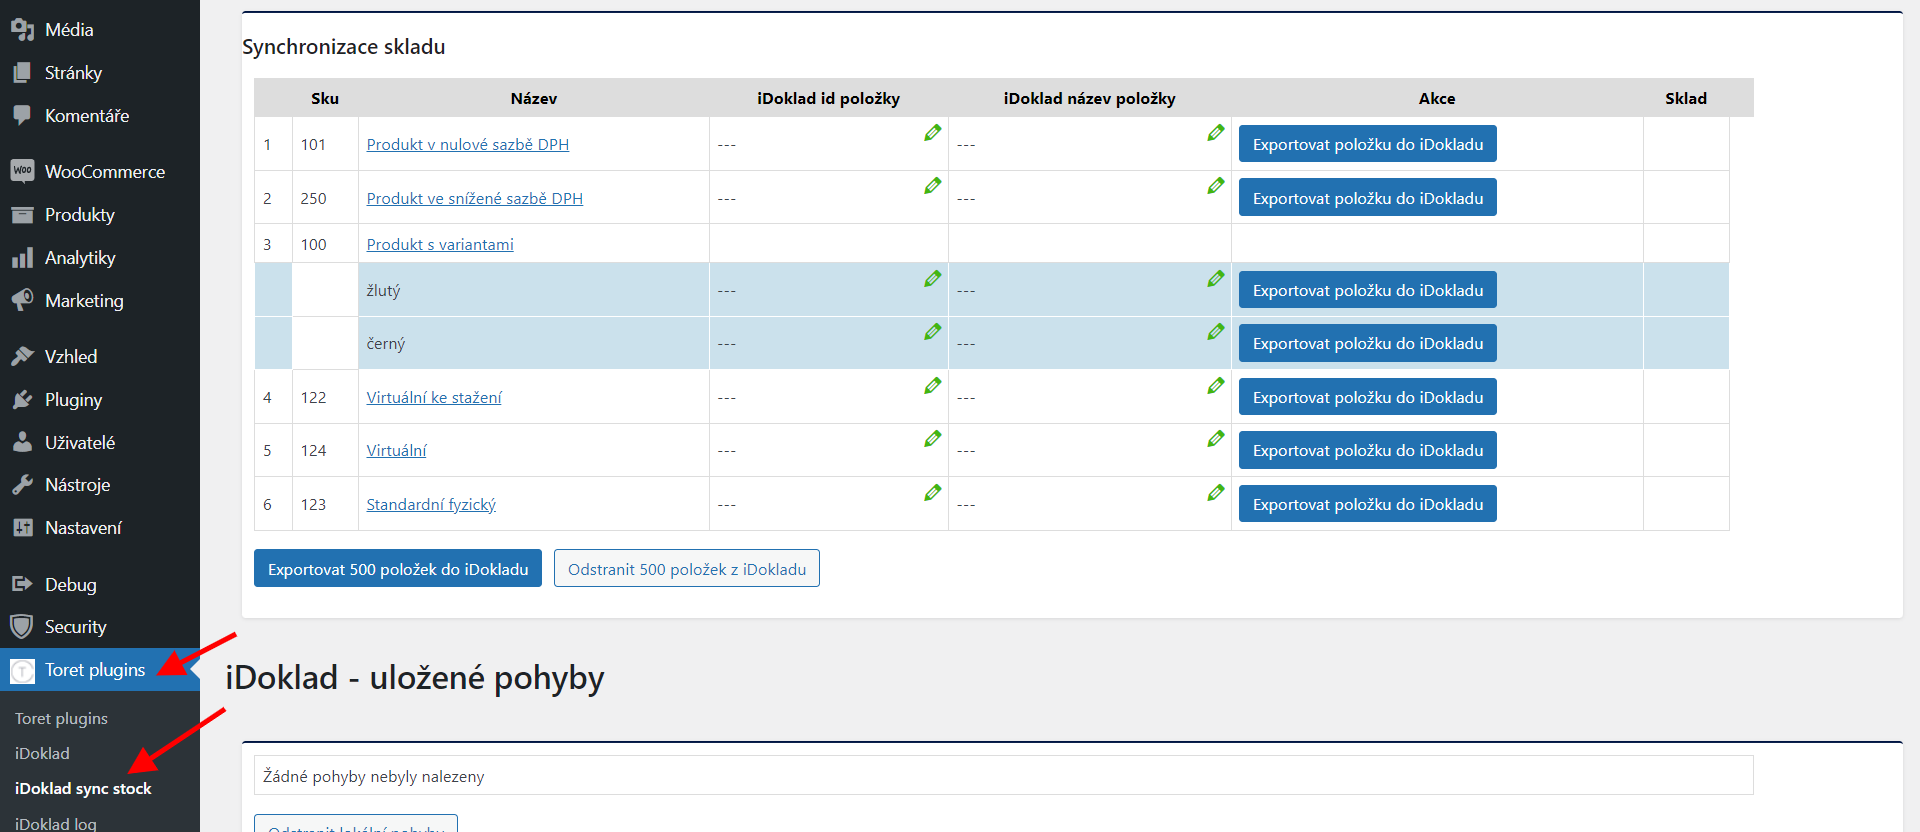
After saving settings, the tab iDoklad sync stock will appear in the left administration menu under Toret plugins – if this tab does not appear after saving, refresh the page e.g. with the F5 key.
Exporting Products from WooCommerce to iDoklad
The iDoklad sync stock page lists the list of products in WooCommerce. The “Exportovat položku do iDokladu” (Export item to iDoklad) button creates a product with stock in the iDoklad service. As the “Code” value in the iDoklad service, the product ID or catalog number (SKU) is transferred, if filled.
You can also export products from WooCommerce to iDoklad in batches of 500 using the button at the end of the table.
Pairing Products
In case you already have created products in iDoklad and want to pair them with products from WooCommerce, it is sufficient to edit “iDoklad ID položky” (iDoklad item ID) in the iDoklad sync stock table to the value of the already created product ID on the iDoklad side before exporting products.
You can find the product ID in iDoklad after the slash at the end of the URL in the iDoklad product detail (see img. below)
Copy the ID in the product detail in the iDoklad service.
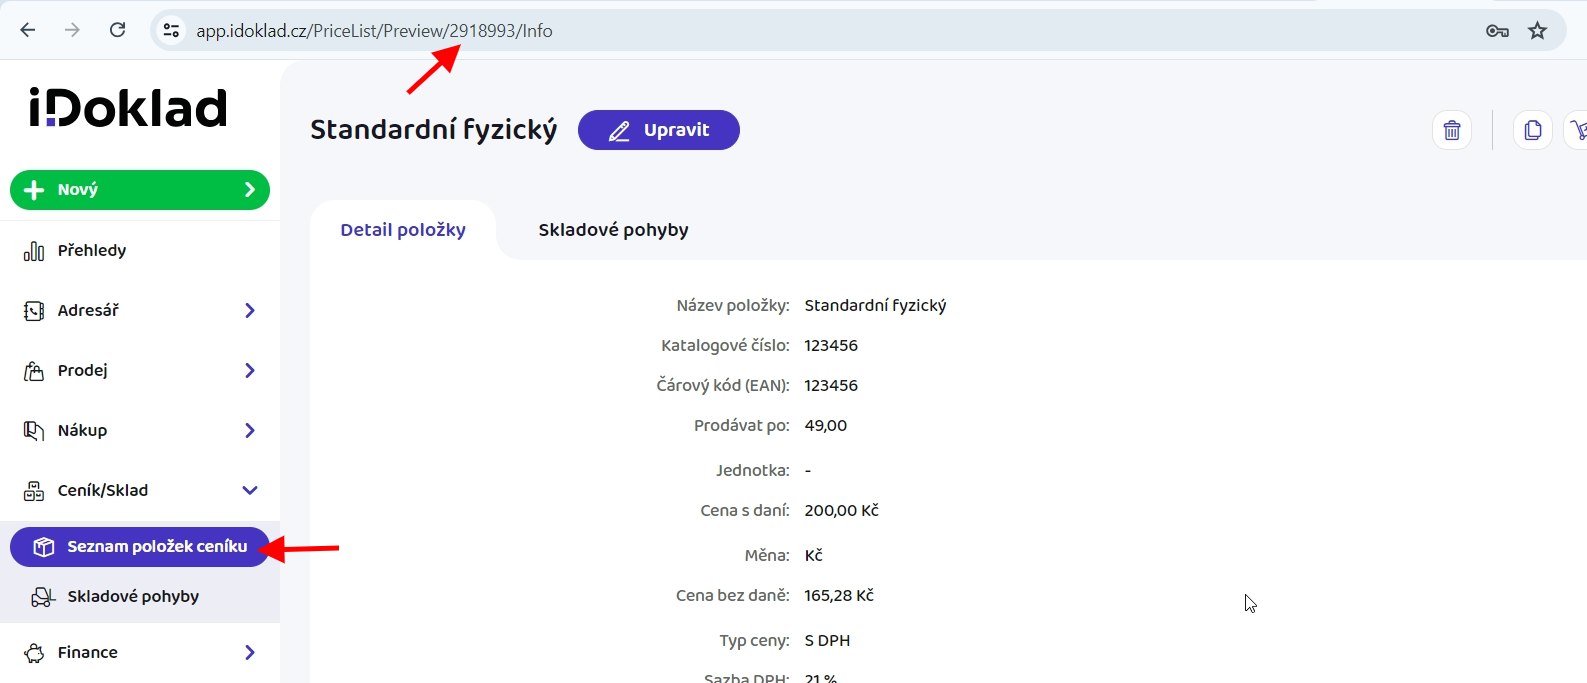
Insert the ID into the iDoklad item ID field for the product you want to pair, save, and then click the export product button.
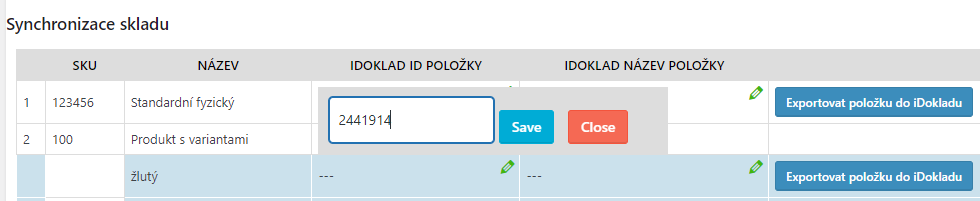
Once the product is paired, the stock value, price, and barcode in iDoklad are updated to the product values from WooCommerce.
Deleting Exported Products – IMPORTANT
ATTENTION! Always delete exported products via the iDoklad sync stock table using the red “Odstranit položku v iDokladu” (Delete item in iDoklad) button. If you deleted an exported product via the iDoklad service administration, it would no longer be possible to delete the product via the table in the plugin until the database was cleared (and this is not an operation for a regular user). In case the exported product was deleted via the iDoklad service, to re-export the product, it is necessary to delete the metadata _idoklad_id_polozky and _idoklad_nazev_polozky in the database.
Stock Synchronization from iDoklad to WooCommerce
By default, stock pairing is only one-way from WooCommerce to iDoklad. In case you want to pair stock also in WooCommerce according to product stock in iDoklad, it is necessary to have the Aktivovat synchronizaci (Activate synchronization) function active in the plugin in the section iDoklad -> WooCommerce.
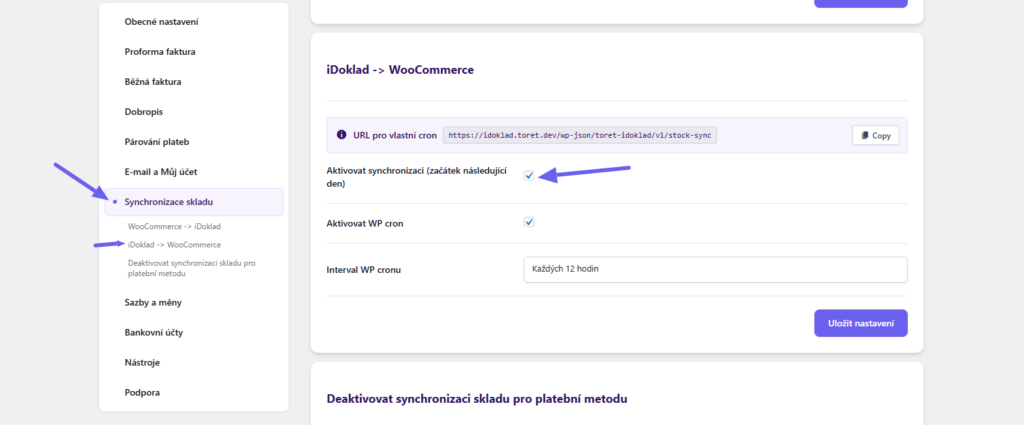
After activating the two-way synchronization function, it is necessary to wait 24 hours before the stock in WooCommerce starts synchronizing with the stock in iDoklad. This is a protection to ensure stock values match. After 24 hours, synchronization will proceed automatically once an hour.
The second option is to load the stock status in iDoklad using WP cron. In this case, it is necessary to check the checkbox Aktivovat WP cron (Activate WP cron) and set its loading interval.
You can also use custom cron. Insert the URL pro vlastní cron (URL for custom cron) into the cron on your hosting and set its repetition interval. You can set this interval according to your needs.
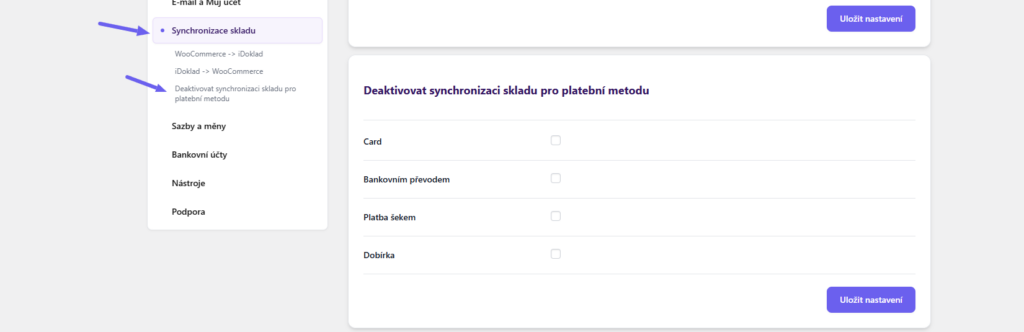
Deactivation of Stock Synchronization for Payment Method
In this section, you can select payment methods for which stock synchronization will not take place and items will not be deducted from the stock in iDoklad.
Filters
How to Change Invoice Language
Invoices are issued in the Czech language, given that the plugin is primarily intended for the Czech Republic. Although it can be used in Slovakia, a requirement appeared to make it possible to issue invoices in another language as well.
In this case, it is important information that WordPress does not handle language mutations natively. It is either in one language or the other.
However, there are plugins that allow creating mutations. Unfortunately, it is not possible to prepare the plugin so that it is compatible with all plugins.
Therefore, a filter is inserted in the plugin that allows changing the language for the sent invoice or proforma invoice.
$lang = 'cs-CZ';
$data['LanguageCode'] = apply_filters(
    'idoklad_language_code',
    $lang,
    $order_id,
     $order
);
As you can see, the default value is cs-CZ and the order id and the entire order object are added to the filter.
Warning: If you have the option to switch languages, you need to save the current language into the order post meta at the moment the order is created. Then you just get its value using the filter and return the language you need.
Example of complete language change on invoices:
add_filter( 'idoklad_language_code', 'toret_net_custom_idoklad_language', 10, 3 );
function toret_net_custom_idoklad_language( $lang, $order_id, $order ){

return 'en-US';

}

add_filter( 'idoklad_request_language_code', 'toret_net_custom_idoklad_language2', 10, 1 );
add_filter( 'idoklad_language_code_faktura', 'toret_net_custom_idoklad_language2', 10, 1 );

function toret_net_custom_idoklad_language2( $lang ){

return 'en-US';

}
Influencing Sending Invoice/Proforma to iDoklad
In case you need to somehow influence the sending of invoices and proformas to iDoklad, you can use two filters that are available:
Changing PDF Invoice and Proforma Language
Unlike the filter that determines in which language the document is issued, this filter allows changing the default language in which the pdf file is retrieved.
When creating a proforma or invoice, the plugin sends information about the language of the document. When requesting to display the pdf file, a header with default Czech is sent. If for some reason you need to change this value, use the following filter:
Setting Paid Invoice Status
If you use the control.php file for checking invoice payment, you may need to change the status to which orders change upon pairing. By default, it is completed. To change, use the following filter:
Changing Invoice and Proforma Description
In case you need to somehow influence the description of the invoice or proforma, you can use the following filters:
apply_filters('idoklad_invoice_description', $description, $order_id)
apply_filters( 'idoklad_proforma_description', $description, $order_id );
Changing Invoice Order Number
$order_id is sent to iDoklad as the order number. If you need to influence this, use this filter:
Adding Currency Rate to Invoice
The iDoklad API includes the option to add currency rate and its numerical value – ExchangeRate and ExchangeRateAmount – for invoices and proformas.
Since currencies and their switching are not in WooCommerce by default, there is a way in the plugin to add these values to invoices using filters.
ExchangeRateAmount determines whether the rate is calculated for 1, 10, or 100 currency equivalents. For example, Russian ruble will have rate amount 100.
Adding Receipt
Filter to iDoklad for receipt activation:
$stvrzenka = apply_filters( 'idoklad_pdf_with_stvrzenka', false );Postponing Invoice/Proforma Creation
idoklad_send_proforma_postpone or idoklad_send_invoice_postpone and returning value true
Changing Status at Which Document Is Marked as Paid
idoklad_pay_invoice_on_status with parameters $status, $payment_method and $order_idChanging Status at Which Document Is Created
idoklad_create_invoice_on_status with parameters $status, $payment_method, $document_type and $order_idCustom rules for stock synchronization of individual products
idoklad_skip_stock_syncPlugin testing
For testing purposes, you can use:
- the subdomain “dev.domainlicense” (with the same license as for the production website)
- localhost (127.0.0.1)
Purchased plugins will also work in these locations, and you can test their implementation and compatibility here before deploying them to the website and during its use.
FAQ
Debugging Errors
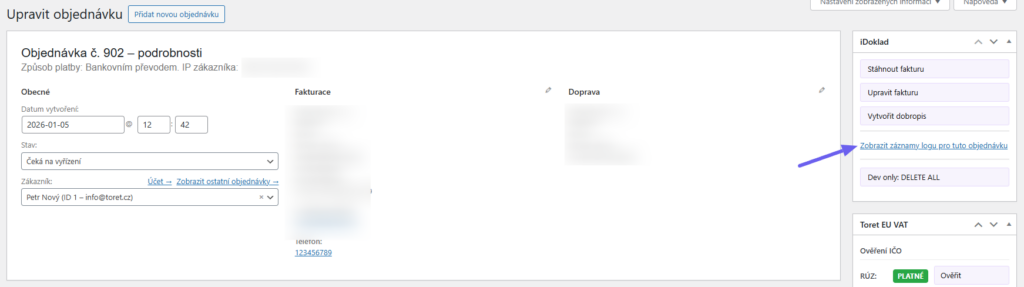
Since things can always go wrong, the plugin has a built-in way of catching errors.
In the order detail where the error occurred, you will find the iDoklad log, in the upper right corner, which applies only to the specific opened order.
In the Toret plugins overview, you will find the iDoklad log, which contains all orders at once.

Incorrectly Rounded Amounts Are Sent to iDoklad.cz
Check the WordPress settings and ensure that working with at least two decimal places is enabled in WooCommerce.
You can find the settings in WooCommerce → Settings (Nastavení), tab General (Obecné), item Number of decimals (Počet desetinných míst).