
This is the documentation for the WooCommerce plugin Ads for AI. You can purchase the plugin here: Toret Ads for AI for WooCommerce.
- What the Plugin Does
- Minimum Requirements
- Plugin Installation
- License Activation
- Basic Settings
- Product Feed
- Product, Variation and Category Settings
- External Cron (REST API)
- OpenAI Pixel
- Conversions API
- Cookie Consent
- Log
- Uninstalling and Deleting Data
- FAQ and Troubleshooting
- The feed isn't generated automatically.
- Feed generation fails or gets stuck.
- A product is missing from the feed.
- I excluded a product from ads, but it's still active in Ads Manager.
- Conversions aren't being sent via the Conversions API.
- An order created manually in the admin wasn't sent.
- Will an order be counted twice if I have both the pixel and the Conversions API enabled?
- The pixel isn't tracking on my site.
- Where do I create an ad account and campaigns?
What the Plugin Does
The plugin connects your WooCommerce store to OpenAI’s ChatGPT Ads advertising system. It consists of three independent parts, which you can use together or separately:
- Product feed – the plugin automatically generates a product file in the format required by Ads Manager and publishes it at a secret URL. All you need to do is paste that URL into Ads Manager.
- OpenAI Pixel – tracking code on your site that records visitors’ shopping behaviour (product view, add to cart, checkout started, purchase).
- Conversions API – sends completed orders directly from your server. Conversions are tracked even when a visitor uses an ad blocker or never reaches the thank-you page.
The pixel and the Conversions API send the order with the same event ID, so OpenAI automatically merges duplicate conversions and no order is counted twice.
⚠️ Your ad account, feed approval, campaigns and other Ads Manager settings are managed directly at OpenAI. The plugin handles the connection between your store and Ads Manager; it doesn’t create the ad account or the campaigns.
Minimum Requirements
- WordPress 6.0 or higher
- WooCommerce 9.2 or higher
- PHP 8.1 or higher
- MySQL 5.0 or higher
- A ChatGPT Ads (Ads Manager) account from OpenAI
The plugin is compatible with HPOS (High-Performance Order Storage) and with the WooCommerce block checkout.
Plugin Installation
- In the WordPress admin, go to Plugins → Add New Plugin → Upload Plugin (Pluginy → Instalace pluginů → Nahrát plugin).
- Select the downloaded plugin ZIP file and click Install Now (Instalovat).
- Once installed, activate the plugin.
You can also upload the plugin manually – copy the extracted toret-ai-ads folder via FTP to the /wp-content/plugins/ directory and then activate the plugin in the Plugins (Pluginy) section.
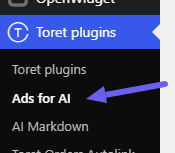
After activation, you’ll find the settings in the Toret plugins → Ads for AI menu. The settings are split into four tabs: Settings (Nastavení), Product Feed (Produktový feed), Tracking (Měření) and Log.
License Activation
- Go to Toret plugins → Ads for AI.
- In the License Key (Licenční klíč) field, enter the key you’ll find on Toret.cz in the My Account section.
- Click Verify License (Ověřit licenci).
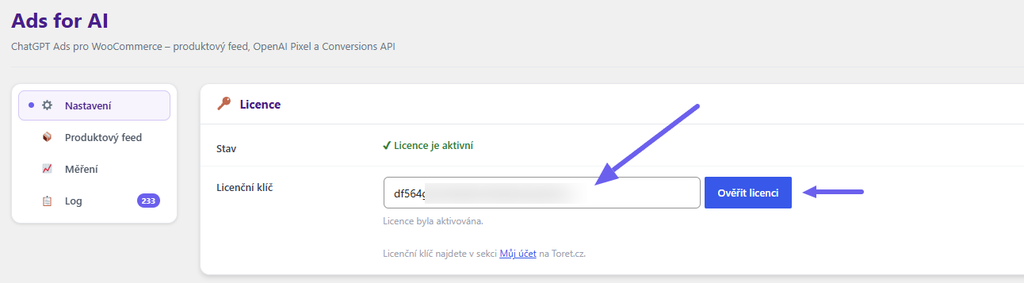
Once verified, License is active (Licence je aktivní) is displayed and the rest of the settings becomes available. Without a valid license, the plugin shows no other options.
⚠️ The plugin requires an active WooCommerce installation. If WooCommerce isn’t active, the feed and tracking settings aren’t displayed.
Basic Settings
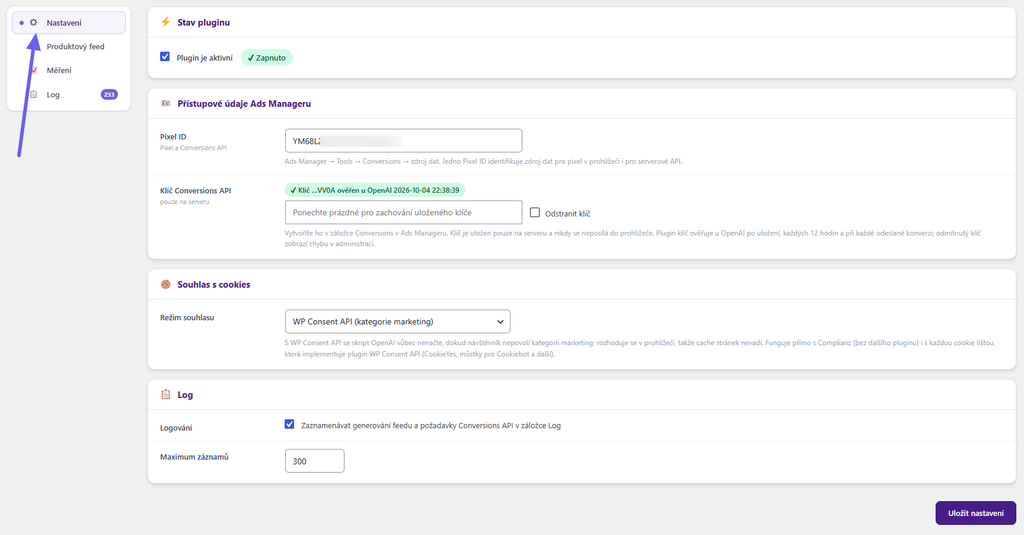
On the Settings (Nastavení) tab, enter your Ads Manager credentials and switch the plugin on.
Plugin Status
- Plugin is active (Plugin je aktivní) – the master switch. When the plugin is off, the pixel isn’t added to your site, conversions aren’t sent, and the feed file is deleted and no longer generated.
Ads Manager Credentials
- Pixel ID – you’ll find it in Ads Manager (Conversions > Data source).
- Conversions API Key (Klíč Conversions API) – create it in Ads Manager (Conversions > Conversion keys). The key is stored on the server only and is never sent to the browser. After saving, only the last four characters are shown in the field. To keep the existing key, leave the field empty. To delete the key, tick Remove key (Odstranit klíč).
The plugin verifies the key with OpenAI after saving, every 12 hours and with every conversion sent. Its status is shown next to the field:
- Key …XXXX verified with OpenAI (Klíč …XXXX ověřen u OpenAI) – the key is fine.
- Key …XXXX saved, not verified yet (Klíč …XXXX uložen, zatím neověřen) – verification hasn’t run yet.
- Key …XXXX rejected by OpenAI (Klíč …XXXX odmítnut OpenAI) – the key is invalid or has been revoked. Create a new key in Ads Manager and enter it in the plugin.
Log
- Logging (Logování) – records feed generation and Conversions API requests on the Log tab.
- Maximum entries (Maximum záznamů) – how many entries are kept in the log (50–2000). Older entries are deleted automatically.
The Cookie Consent (Souhlas s cookies) settings on the same tab are described in the Cookie Consent section.
Save any changes with the Save settings (Uložit nastavení) button.
Product Feed
The feed is a CSV file listing your products according to OpenAI’s specification. Each simple product has one row in the feed; a variable product has one row per variation. You’ll find the settings on the Product Feed (Produktový feed) tab.
Feed Status
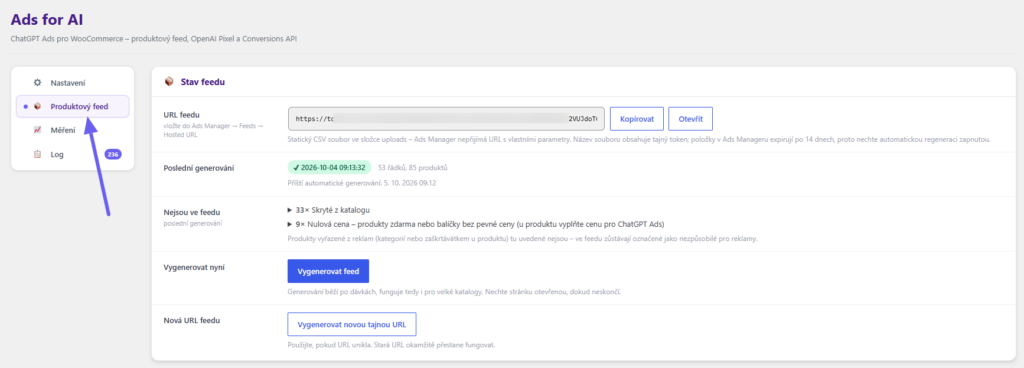
- Feed URL (URL feedu) – the address you paste into Ads Manager under Feeds → Create feed → Hosted URL. Use the Copy (Kopírovat) button to copy it, or Open (Otevřít) to download the file and check it. The file name contains a secret token, so don’t share the URL.
- Last generated (Poslední generování) – the time of the last successful generation, the number of rows and products. If generation failed, the error is described here. Below the status, you can also see when the next automatic generation is due.
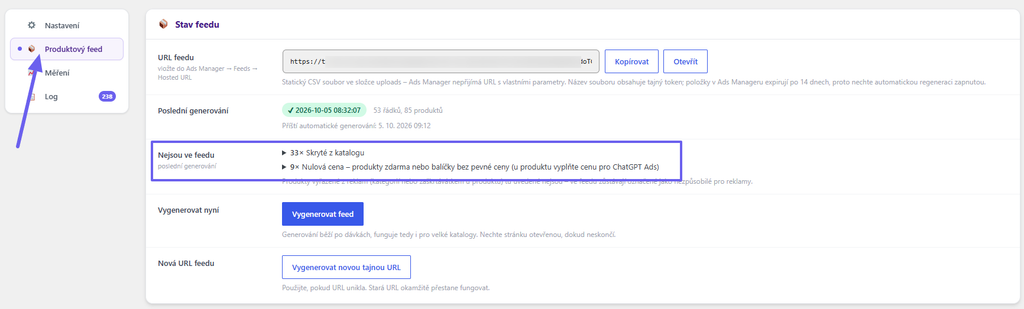
- Not in the feed (Nejsou ve feedu) – a list of products that didn’t make it into the feed during the last generation, grouped by reason. Click a product name to open it for editing.
- Generate now (Vygenerovat nyní) – the Generate feed (Vygenerovat feed) button starts generation immediately. Generation runs in batches with a progress indicator, so it works for large catalogues too. Leave the page open until generation finishes.
- New feed URL (Nová URL feedu) – use the Generate a new secret URL (Vygenerovat novou tajnou URL) button if your feed URL has leaked. The old URL stops working immediately and you need to paste the new one into Ads Manager.
⚠️ Items that Ads Manager doesn’t find in the current feed expire after 14 days. Leave automatic generation enabled.
Generation

- Automatic generation (Automatické generování) – the feed is regenerated regularly via WP-Cron. Enabled by default.
- Interval – Hourly (Každou hodinu), Twice daily (Dvakrát denně) or Once daily (Jednou denně) (default). Ads Manager fetches the feed on its own schedule, usually once a day, so the daily interval is normally enough. The feed interval has no effect on the pixel or the Conversions API.
- Batch size (Velikost dávky) – how many products are processed in one batch (default 200). If generation fails on shared hosting because of a time limit, lower this value.
Products
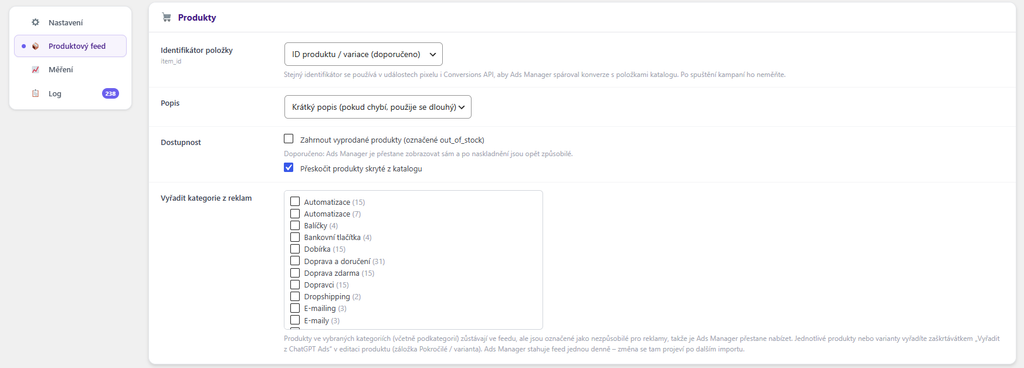
- Item identifier (Identifikátor položky) – Product / variation ID (ID produktu / variace) (recommended) or SKU (if the SKU is empty, the ID is used). The plugin uses the same identifier in pixel and Conversions API events so that Ads Manager can match conversions to products.
- Description (Popis) – whether the feed uses the short description (krátký popis) (falling back to the long one if missing) or the long description (dlouhý popis) (falling back to the short one if missing).
- Availability (Dostupnost)
- Include out-of-stock products (Zahrnout vyprodané produkty) – out-of-stock products stay in the feed marked as
out_of_stock. We recommend leaving this enabled: Ads Manager stops showing them on its own and starts offering them again once they’re back in stock. - Skip products hidden from the catalog (Přeskočit produkty skryté z katalogu) – products with the “Hidden” visibility aren’t included in the feed.
- Include out-of-stock products (Zahrnout vyprodané produkty) – out-of-stock products stay in the feed marked as
- Exclude categories from ads (Vyřadit kategorie z reklam) – products in the selected categories (including subcategories) stay in the feed but are marked as not eligible for ads (
is_ads_eligible = false), so Ads Manager stops offering them.
⚠️ Don’t change the Item identifier (Identifikátor položky) once your campaigns are running. Conversions would stop matching the products in your catalogue.
Merchant and Brand
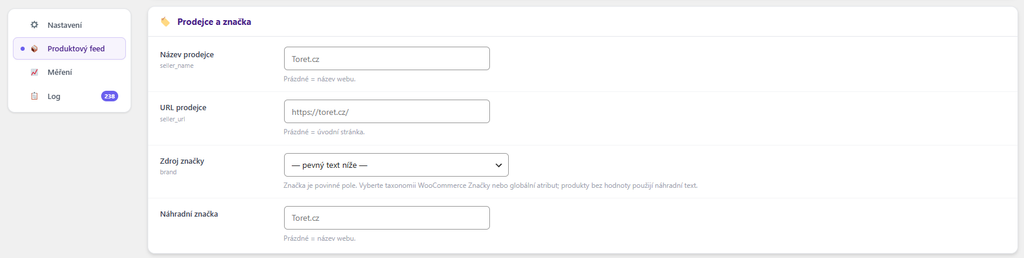
- Merchant name (Název prodejce) – if you leave the field empty, the site name is used.
- Merchant URL (URL prodejce) – if you leave the field empty, the site’s home page is used.
- Brand source (Zdroj značky) – the brand is required in the feed. Select the WooCommerce Brands (WooCommerce Značky) taxonomy or the global product attribute where you store the product brand. The — fixed text below — (— pevný text níže —) option uses the text from the Fallback brand field for all products.
- Fallback brand (Náhradní značka) – used for products that have no brand filled in. If you leave the field empty, the site name is used.
Countries, Returns and Eligibility
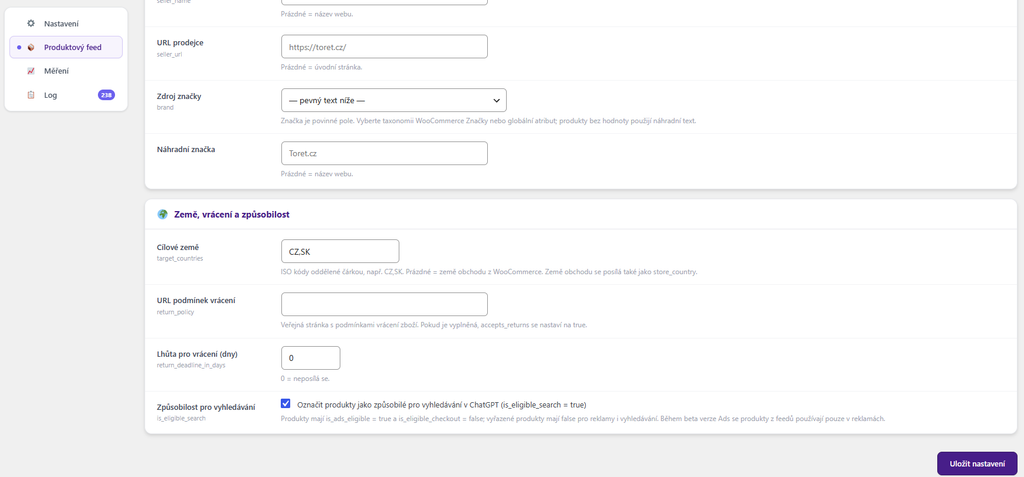
- Target countries (Cílové země) – ISO country codes separated by commas, e.g.
CZ,SK. If you leave the field empty, the store country from the WooCommerce settings is used. - Return policy URL (URL podmínek vrácení) – a public page with your return policy. Once filled in, the plugin marks products as returnable.
- Return window (days) (Lhůta pro vrácení (dny)) – the number of days customers have to return goods. A value of 0 means the window isn’t sent.
- Search eligibility (Způsobilost pro vyhledávání) – marks products as eligible for search in ChatGPT as well. Excluded products are always ineligible for both ads and search. During the ChatGPT Ads beta, feed products are used in ads only.
What Doesn’t Make It into the Feed
A product that doesn’t meet the required data isn’t included in the feed and is listed in the Not in the feed (Nejsou ve feedu) overview.
| Reason | Solution |
|---|---|
| Zero price | Free products or bundles with no fixed price. Fill in the ChatGPT Ads price on the product. |
| Missing product image | Upload a main image for the product. |
| Out of stock | Only shown when Include out-of-stock products is disabled. |
| Hidden from the catalog | Only shown when Skip products hidden from the catalog is enabled. |
| Grouped product | A grouped product isn’t sent to the feed; the individual products in the group are. |
| Removed by a custom filter | The product was excluded by custom code on your site (a developer filter). |
Products excluded from ads (by category or by the checkbox on the product) are not in this overview – they stay in the feed, just marked as not eligible for ads.
Prices are sent to the feed exactly as customers see them in your store (including or excluding VAT, depending on your WooCommerce settings). If a product is on sale, both the regular and the sale price are sent. The GTIN (EAN) is taken from the GTIN, UPC, EAN, or ISBN field in the product settings.
Product, Variation and Category Settings
For individual products, the settings are on the product edit screen under Product data → Advanced (Data produktu → Pokročilé).
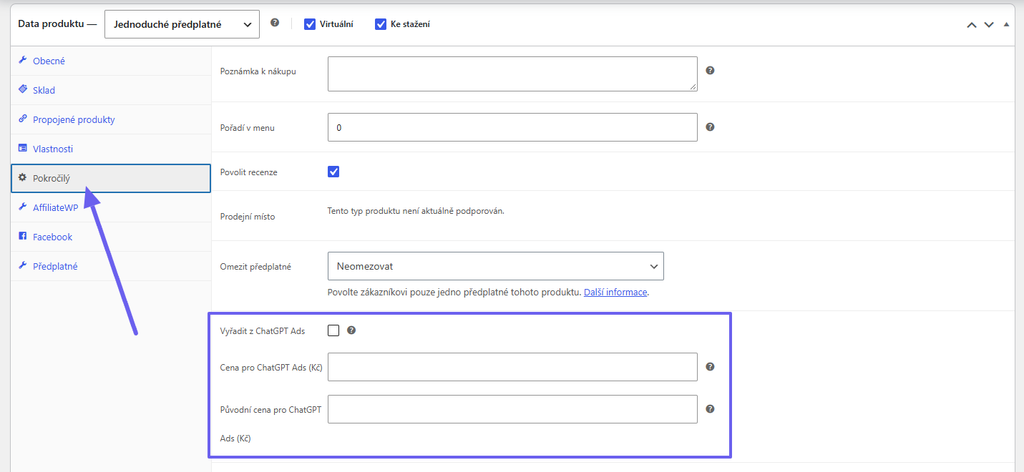
- Exclude from ChatGPT Ads (Vyřadit z ChatGPT Ads) – the product (including all of its variations) is sent to the feed as not eligible for ads.
- ChatGPT Ads price (Cena pro ChatGPT Ads) – an optional price sent to the feed instead of the WooCommerce price. Useful for products priced at 0 in WooCommerce, such as bundles priced per individual item. Enter it the same way as a regular product price. It applies to all variations.
- ChatGPT Ads original price (Původní cena pro ChatGPT Ads) – an optional pre-discount price. If it’s higher than the ChatGPT Ads price, the ad shows the product as discounted.
On variable products, the Exclude from ChatGPT Ads (Vyřadit z ChatGPT Ads) checkbox is also available on each variation, so you can exclude selected variations only.
To exclude entire categories, use the plugin settings under Product Feed → Products → Exclude categories from ads (Produktový feed → Produkty → Vyřadit kategorie z reklam).
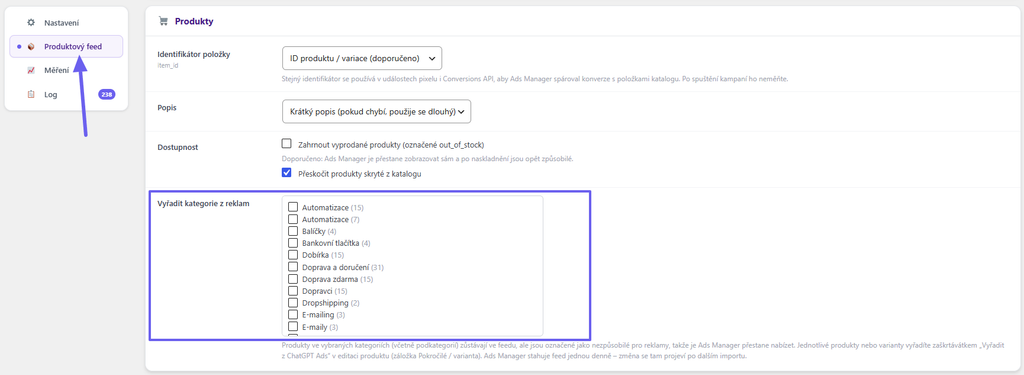
TIP: Ads Manager usually fetches the feed once a day. Changes to product exclusions only take effect there after the next feed fetch.
External Cron (REST API)
WP-Cron only runs when someone visits your site, so it may not run reliably on low-traffic sites. Instead, you can trigger feed generation with a server cron or an external cron service. You’ll find the URLs on the Product Feed (Produktový feed) tab in the External Cron (REST API) (Externí cron (REST API)) section.
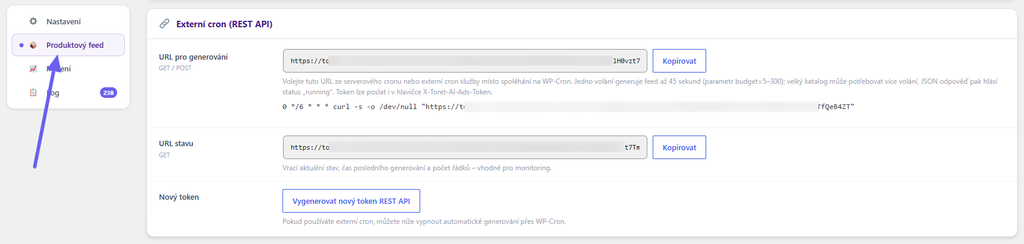
- Generation URL (URL pro generování) – calling this URL (GET or POST) starts or continues feed generation. One call generates the feed for up to 45 seconds. With a large catalogue, you may need to call the URL several times – the response then contains the status
running. You can change the length of a single run with thebudgetparameter (5–300 seconds). - Status URL (URL stavu) – returns the current status, the time of the last generation and the number of rows. Useful for monitoring.
- New token (Nový token) – the Generate a new REST API token (Vygenerovat nový token REST API) button creates a new secret token. The original URLs stop working immediately.
An example server cron entry that generates the feed every 6 hours:
0 */6 * * * curl -s -o /dev/null "GENERATION_URL"Instead of a URL parameter, you can also send the token in the X-Toret-AI-Ads-Token header.
TIP: If you use an external cron, you can disable Automatic generation (Automatické generování) via WP-Cron.
OpenAI Pixel
The OpenAI Pixel tracks visitor behaviour directly in the browser. You’ll find the settings on the Tracking (Měření) tab in the OpenAI Pixel (browser) (OpenAI Pixel (prohlížeč)) section.
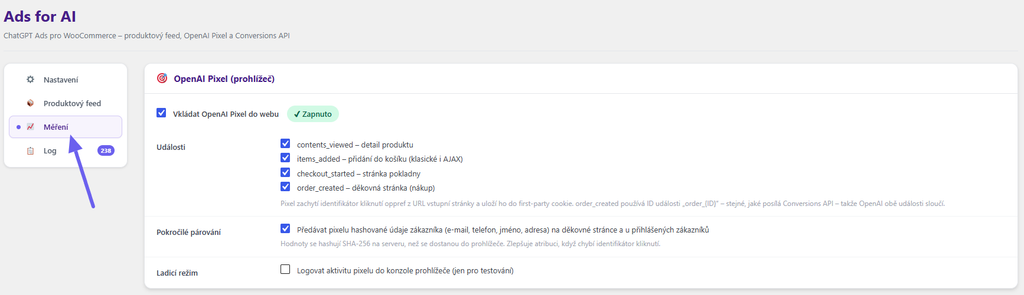
⚠️ The pixel only works with a Pixel ID filled in on the Settings (Nastavení) tab. Without it, a warning is shown and the pixel isn’t added to your site.
- Add the OpenAI Pixel to the site (Vkládat OpenAI Pixel do webu) – turns pixel insertion on or off.
- Events (Události) – select which events to track. All are enabled by default.
- Advanced matching (Pokročilé párování) – on the thank-you page and for logged-in customers, passes hashed customer data (email, phone, name, address) to the pixel. The data is hashed with SHA-256 on the server, so it never reaches the browser in readable form. This improves the matching of conversions to campaigns when the click identifier is missing.
- Debug mode (Ladicí režim) – logs pixel activity to the browser console. Use it only for testing.
Tracked events
| Event | When it’s sent |
|---|---|
contents_viewed | A product page is viewed |
items_added | An item is added to the cart (classic and AJAX, including block templates) |
checkout_started | The checkout is viewed with a non-empty cart |
order_created | The thank-you page is viewed after an order is completed |
When a visitor arrives from an ad in ChatGPT, the URL contains the oppref parameter (the click identifier). The pixel stores it in a cookie, and the plugin also saves it to the order when the order is completed. This lets OpenAI attribute the purchase to the right campaign.
TIP: To check that the pixel works, enable Debug mode (Ladicí režim). Open your site in a private window, allow marketing cookies and watch the events being sent in the browser console (F12). Turn debug mode off when you’re done testing.
Conversions API
The Conversions API sends order information (the order_created event) directly from your store’s server to OpenAI. Unlike the pixel, it doesn’t depend on ad blockers in the customer’s browser or on whether the customer sees the thank-you page. It respects marketing cookie consent just like the pixel (see Cookie Consent). You’ll find the settings on the Tracking (Měření) tab in the Conversions API (server) section.
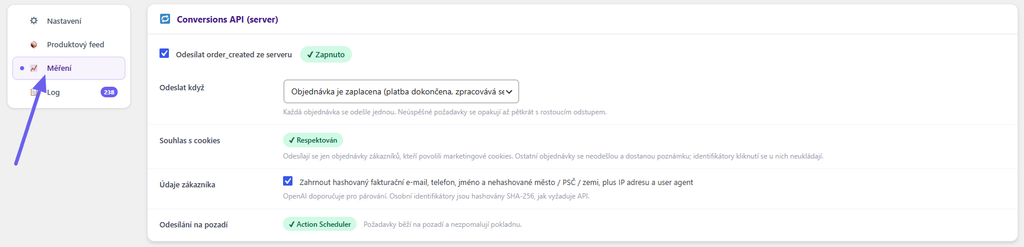
⚠️ To send conversions, both the Pixel ID and the Conversions API Key (Klíč Conversions API) must be filled in on the Settings (Nastavení) tab.
- Send order_created from the server (Odesílat order_created ze serveru) – turns order sending on or off. If OpenAI rejects the key, Key rejected by OpenAI (Klíč odmítnut OpenAI) is shown next to the switch.
- Send when (Odeslat když)
- The order is created (Objednávka je vytvořena) (default) – the order is sent as soon as it’s completed at checkout. Recommended for cash on delivery and bank transfer.
- The order is paid (Objednávka je zaplacena) – the order is sent once payment is received or when the status changes to Processing or Completed.
- Customer data (Údaje zákazníka) – the order is sent with the hashed billing email, phone and name, plus city, postcode and country, IP address and browser identification. OpenAI recommends sending this data for more accurate matching. Personal data is hashed with SHA-256, as the API requires.
- Background sending (Odesílání na pozadí) – information about how requests are sent. With Action Scheduler (part of WooCommerce), sending runs in the background and doesn’t slow down the checkout. If Action Scheduler isn’t available on your site, WP-Cron is used.
Each order is sent only once. After a successful send, the plugin adds the order note ChatGPT Ads: conversion sent via Conversions API (ChatGPT Ads: konverze odeslána přes Conversions API).
If sending fails because of a connection outage or a temporary error on OpenAI’s side, the plugin retries automatically – up to five times in total, with increasing delays (after 2 minutes, 10 minutes, 30 minutes and 2 hours). If sending still doesn’t succeed, or if the error is one that retrying won’t fix (an invalid key, for example), the plugin adds the order note ChatGPT Ads: conversion sending failed (ChatGPT Ads: odeslání konverze selhalo) with the error code. You’ll find the details in the Log.
Deduplication with the Pixel
Both the pixel on the thank-you page and the Conversions API send the order with the same event ID in the format order_{order number}. OpenAI recognises both events as a single conversion and merges them. So you can have the pixel and the Conversions API enabled at the same time – and we recommend it.
Conversions API Test
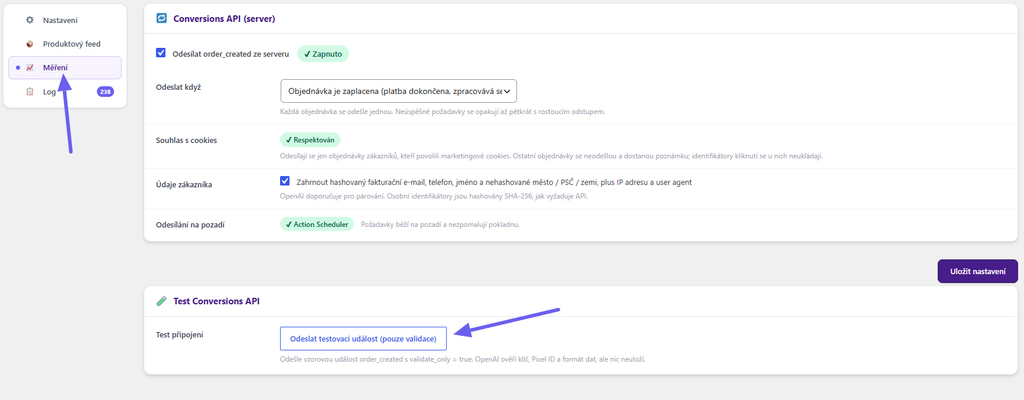
The Send a test event (validation only) (Odeslat testovací událost (pouze validace)) button in the Conversions API Test (Test Conversions API) section sends a sample order_created event in test mode. OpenAI checks the key, the Pixel ID and the data format but stores nothing – the test doesn’t appear in Ads Manager as a conversion. The result is shown at the top of the page along with OpenAI’s response.
The button is only active when both the Pixel ID and the Conversions API key are filled in.
Cookie Consent
The plugin can load the OpenAI Pixel and send conversions only after the visitor consents to marketing cookies. You’ll find the settings on the Settings (Nastavení) tab in the Cookie Consent (Souhlas s cookies) section, in the Consent mode (Režim souhlasu) field.
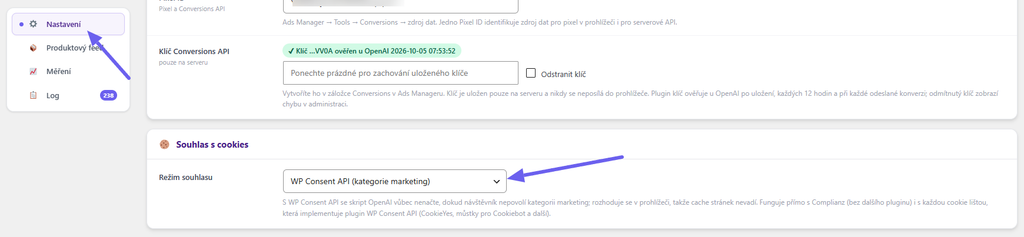
⚠️ By default, the No consent handling (Bez řešení souhlasu) mode is set, where the pixel always tracks. If your site uses a cookie banner, choose one of the following two modes.
- No consent handling – the pixel always tracks (Bez řešení souhlasu – pixel měří vždy) – the OpenAI script loads on every page regardless of consent. Use this only if your site doesn’t need consent for marketing tools.
- WP Consent API (marketing category) (WP Consent API (kategorie marketing)) – the OpenAI script doesn’t load at all until the visitor allows the marketing category. It works directly with the Complianz plugin (no additional plugin needed) and with any cookie banner that supports the WP Consent API plugin (e.g. CookieYes, the Cookiebot integration and others).
- Manual – wait for a JavaScript call from your cookie banner (Ručně – čekat na JavaScriptové volání z vaší cookie lišty) – the OpenAI script doesn’t load until your cookie banner allows it. Use this mode for banners that don’t support the WP Consent API.
In manual mode, call the following once the visitor has consented to marketing cookies:
window.toretAiAdsConsent(true);   // consent granted
window.toretAiAdsConsent(false);  // consent withdrawn
Alternatively, you can dispatch an event:
document.dispatchEvent(new CustomEvent("toret_ai_ads_consent", {detail: {granted: true}}));Consent is evaluated in the visitor’s browser, so the setting works correctly with caching plugins too.
The consent mode applies to both the OpenAI Pixel and the Conversions API. If a customer hasn’t consented to marketing cookies, the plugin won’t send their order to OpenAI from the server either.
Log
The Log tab contains records of feed generation, conversions sent via the Conversions API and license verification. Entries are only stored when Logging (Logování) is enabled on the Settings (Nastavení) tab.
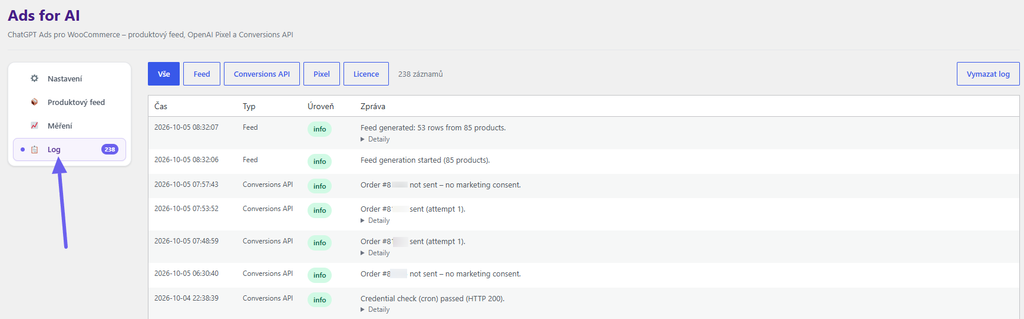
- Use the All (Vše), Feed, Conversions API, Pixel and License (Licence) buttons to filter entries by type.
- Each entry shows the time, type, level (info / error) and message. The Details (Detaily) link reveals technical data, such as OpenAI’s response or the click identifier.
- The Clear log (Vymazat log) button deletes all entries.
TIP: When contacting support about an error, please attach a screenshot of the Log with the details expanded.
Uninstalling and Deleting Data
Deactivating the plugin stops automatic feed generation and any scheduled conversion sending. Your settings are kept.
Deleting the plugin in the WordPress admin removes all of the plugin’s data:
- plugin settings, license and log,
- feed files in the
wp-content/uploads/toret-ai-adsfolder, - scheduled tasks,
- data stored on orders (click identifiers, conversion-sent flags),
- product settings (Exclude from ChatGPT Ads, ChatGPT Ads price, ChatGPT Ads original price).
⚠️ Deletion can’t be undone. If you just don’t need the plugin for a while, simply deactivate it or switch it off with the Plugin is active (Plugin je aktivní) option.
FAQ and Troubleshooting
The feed isn’t generated automatically.
Automatic generation runs via WP-Cron, which is only triggered by site visits. Check that Automatic generation (Automatické generování) is enabled and that the Product Feed (Produktový feed) tab shows the next generation time. If WP-Cron isn’t reliable on your site, set up an external cron.
Feed generation fails or gets stuck.
On shared hosting, the time limit may be exceeded. Lower the Batch size (Velikost dávky) and generate the feed again. If you see the error The uploads folder is not writable (Do složky uploads nelze zapisovat), ask your hosting provider to check the permissions of the wp-content/uploads folder.
A product is missing from the feed.
Check the Not in the feed (Nejsou ve feedu) overview on the Product Feed (Produktový feed) tab. The most common reasons are a zero price and a missing product image. You’ll find the full list of reasons in What Doesn’t Make It into the Feed.
I excluded a product from ads, but it’s still active in Ads Manager.
Ads Manager fetches the feed on its own schedule, usually once a day. The change takes effect after the next feed fetch.
Conversions aren’t being sent via the Conversions API.
Check the following in turn:
- The Pixel ID is filled in on the Settings (Nastavení) tab and the key shows Key verified with OpenAI (Klíč ověřen u OpenAI). If the key was rejected, create a new one in Ads Manager.
- Send order_created from the server (Odesílat order_created ze serveru) is enabled on the Tracking (Měření) tab.
- The Send a test event (validation only) (Odeslat testovací událost (pouze validace)) button returns a successful result. If you use a consent mode, orders from customers who haven’t consented to marketing cookies aren’t sent – that’s expected behaviour.
- The order notes and the Log (filter Conversions API) tell you whether the order was sent or an error occurred.
An order created manually in the admin wasn’t sent.
With Send when: The order is created (Odeslat když: Objednávka je vytvořena), the plugin only sends orders completed by a customer at checkout. Orders created in the admin are sent with the The order is paid (Objednávka je zaplacena) option, once they move to the Processing or Completed status.
Will an order be counted twice if I have both the pixel and the Conversions API enabled?
No. Both events have the same ID and OpenAI merges them into a single conversion.
The pixel isn’t tracking on my site.
Check that the Pixel ID is filled in and that Add the OpenAI Pixel to the site (Vkládat OpenAI Pixel do webu) is enabled. If you use a consent mode, the pixel only loads after marketing cookies are allowed. Enable Debug mode (Ladicí režim) and check in the browser console whether events are being sent. Tracking can also be blocked by an ad blocker in the browser.
Where do I create an ad account and campaigns?
Your ad account, feed approval and campaigns are all managed in OpenAI’s ChatGPT Ads Manager. We can’t advise on account and campaign setup – for that, please contact OpenAI support.