You are on the documentation page for the WooCommerce Fakturoid plugin, which connects the e-shop and the Fakturoid invoicing system.
To use the plugin, an account in the Fakturoid system is required. You can purchase the Fakturoid plugin here: Toret Fakturoid for WooCommerce
- Plugin Installation
- Plugin Activation
- Video Tutorial
- Connecting to Fakturoid
- Variable Symbol
- Number Series Settings
- Payment Methods
- Issuing Invoices and Proforma Invoices
- Paying Invoices (Marking as Paid)
- Issuing Tax Documents
- Issuing Credit Notes
- Displaying Company ID (IČ) and VAT ID (DIČ)
- Other Settings
- Automatic Pairing of Bank Transfer Payments (Notification and Webhook)
- Bank Accounts for Different Currencies
- VAT
- Displaying Invoice Link in Custom Email
- Settings Information in Email and My Account Section
- Settings for Emails Sent from Fakturoid
- Displaying Invoice Link on Thank You Page
- Stock Synchronization Settings
- FAQ
- Debugging Errors
- Setting tax amount for COD for shops using multiple tax rates
- Invoice is not issued for one order, but for others it is
- Non-VAT payer is set everywhere, but Fakturoid issues invoice with VAT
- Invoice is not issued and there is Create user problem/Failed to create contact in order log
- Reverse Charge Settings
- Invoice was not saved with error: {“errors”:{“client_name”:[“is a mandatory item”],”subject_id”:[“Contact does not exist.”]}}
- Filters
- Testování pluginu
Plugin Installation
Upon purchasing the plugin, you will receive a license key and a download link for the plugin zip file via email. You can find detailed instructions on how to install the plugin from your computer into WordPress here.
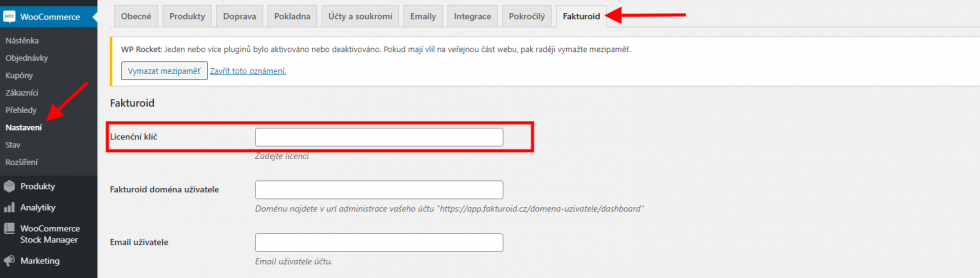
Plugin Activation
After installing the plugin, find its settings in WooCommerce → Settings → Fakturoid. Insert the license key into the appropriate field and save with the button.
Video Tutorial
Connecting to Fakturoid
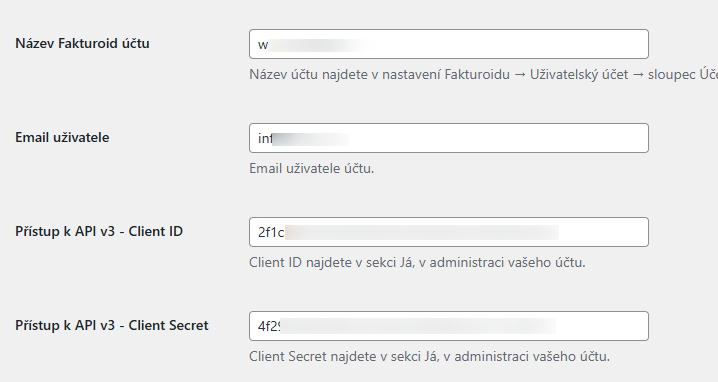
For the plugin to work correctly, you must connect it with Fakturoid. Implementation data is used for connection:
- Fakturoid account name
- email of the user registered on Fakturoid
- Client ID (for API v3)
- Client Secret (for APIv3)
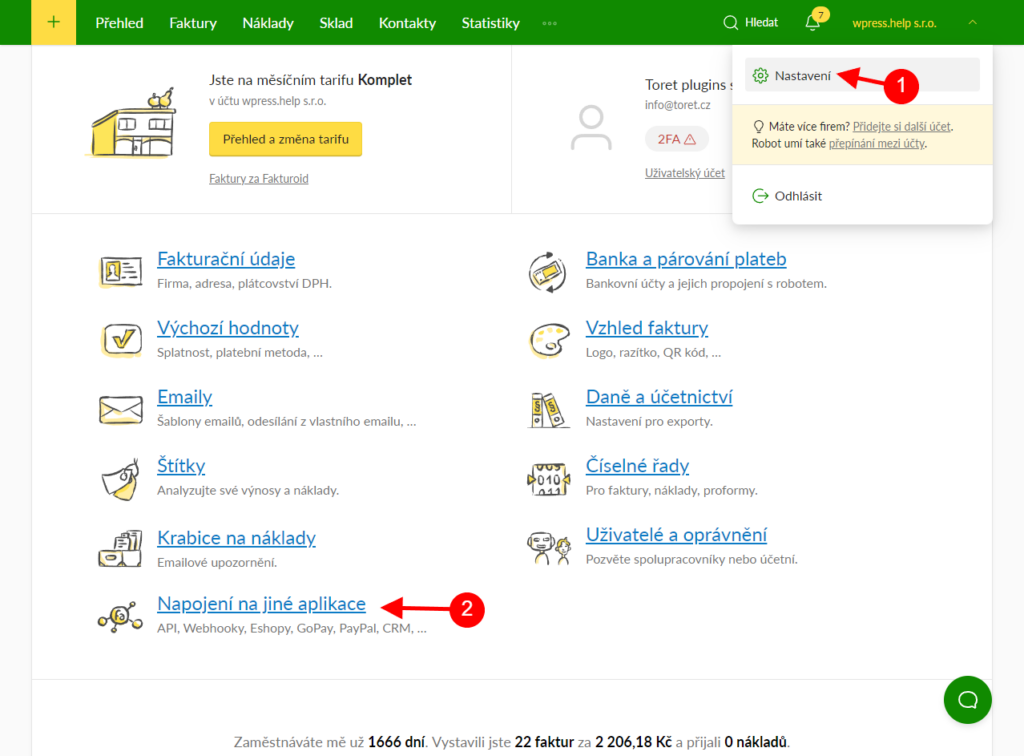
You can get these details in your user account in Fakturoid. Click on the arrow in the top right (1) and then on Nastavení (Settings) (2).
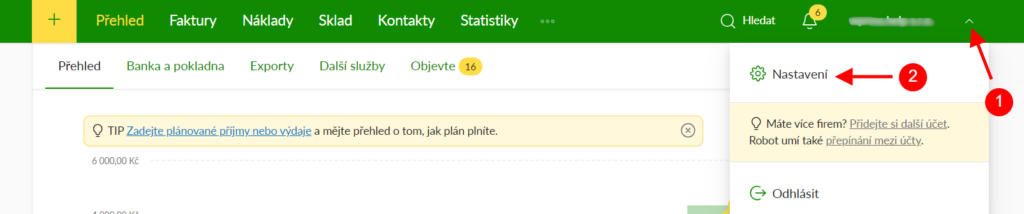
On the following page, click on Uživatelský účet (User account).
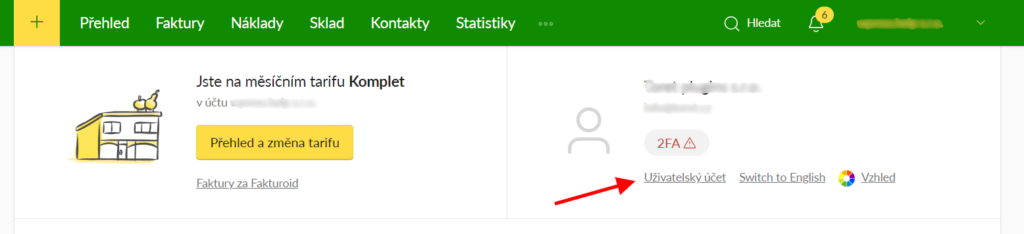
Now you are in your user account. Here you will find the email and account name items. To obtain Client ID and Client Secret, click on Vygenerovat API přístupové údaje (Generate API access credentials).
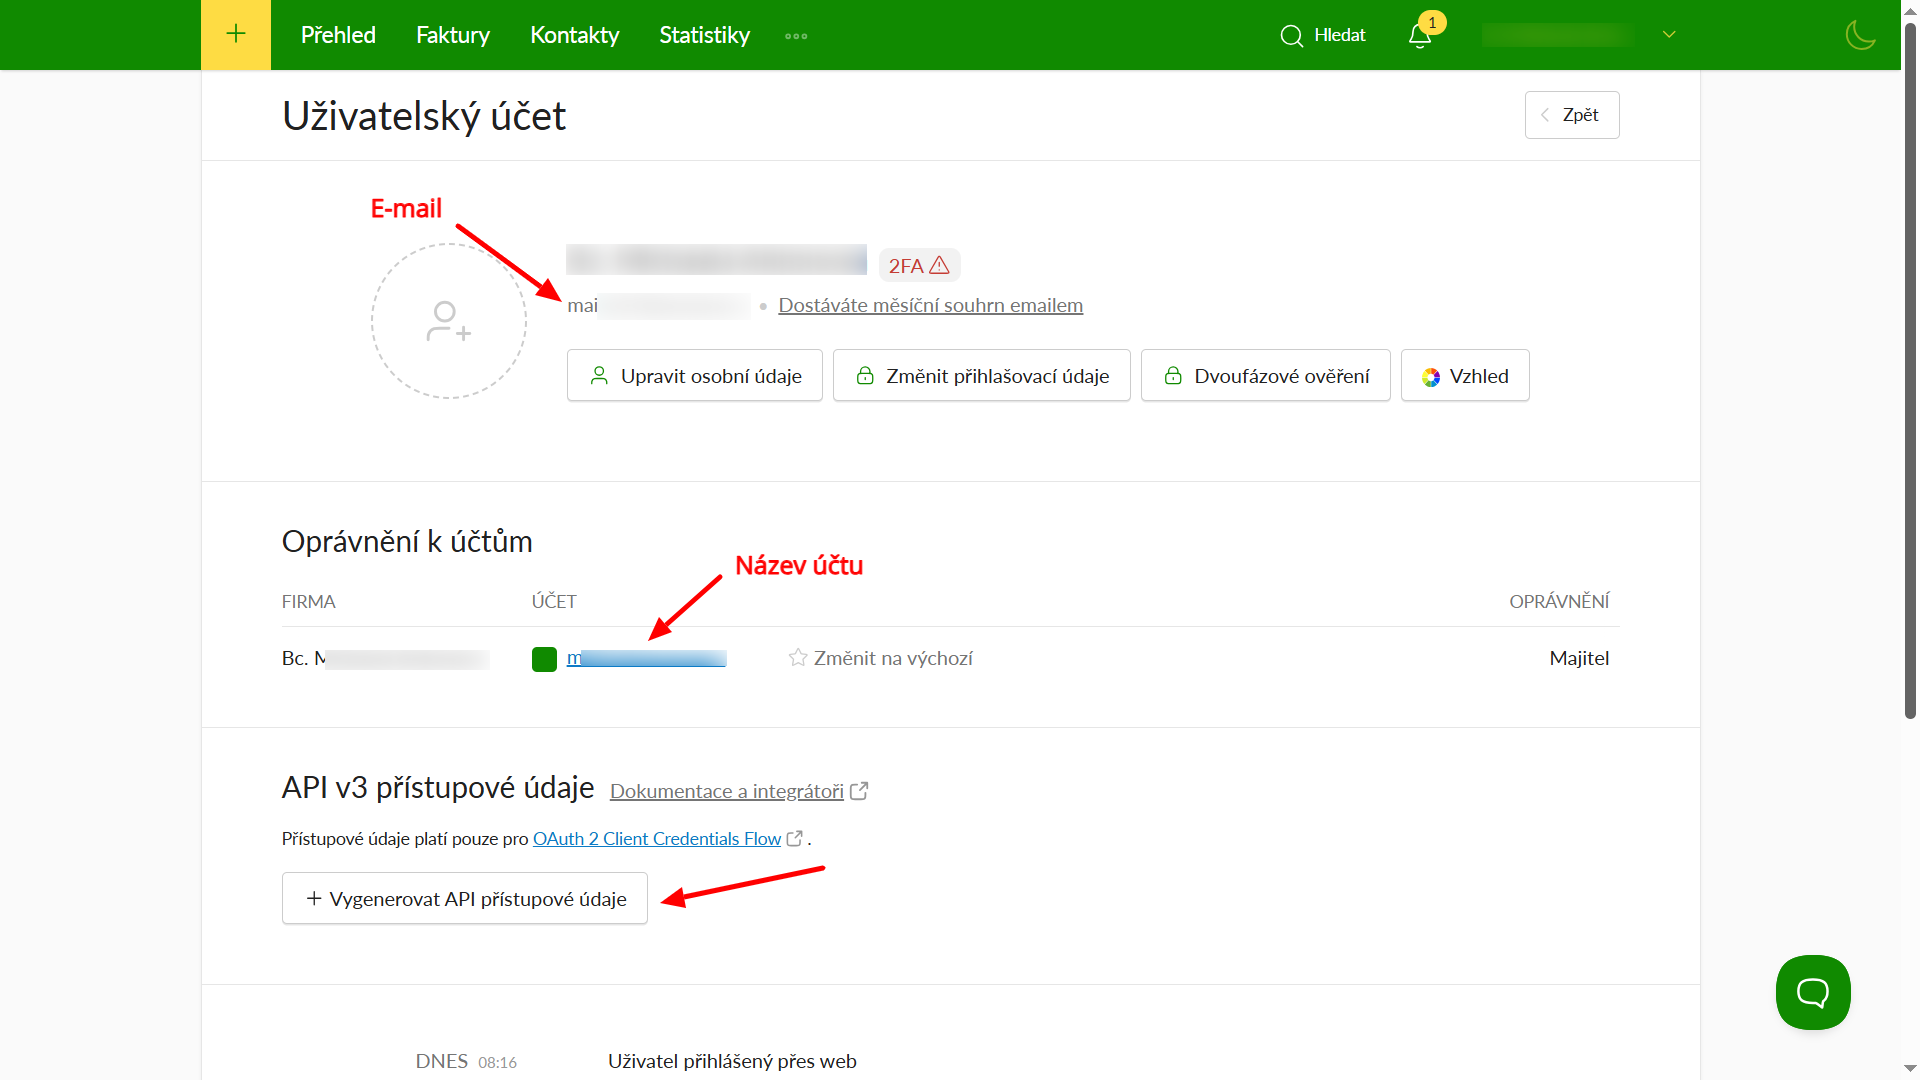
A text field will appear; enter a name (for orientation only) and click Vygenerovat API přístupové údaje (Generate API access credentials) again.

Now it is necessary to enable Webhook management via API. Click on Upravit (Edit)…

…enable webhook management with the toggle and click Uložit (Save).
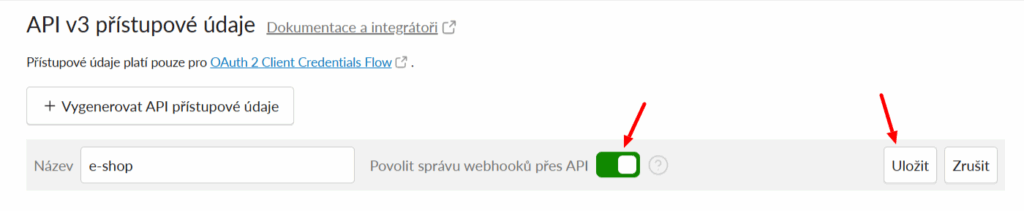
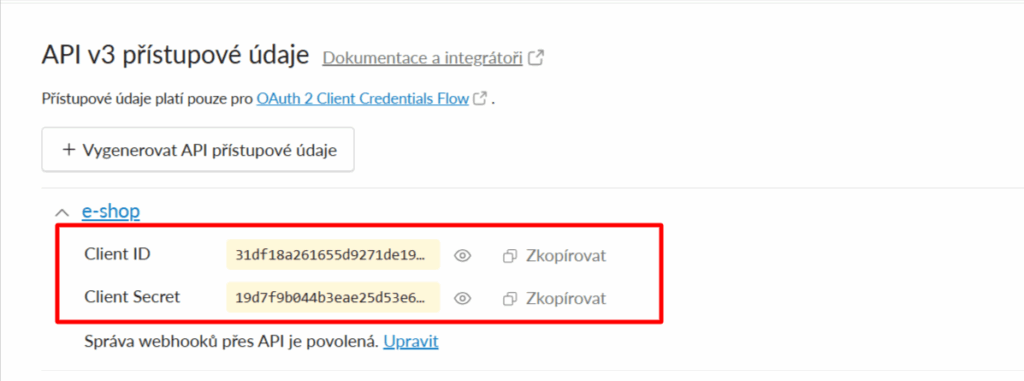
Now you can copy the access credentials.
In the plugin settings (WooCommerce > Settings > Fakturoid), paste the implementation data into the appropriate fields. After inserting the data, do not forget to save the changes (at the bottom).
Variable Symbol

If checked, the WooCommerce order number is used as the variable symbol.
If not, the variable symbol is set as the internal invoice number from Fakturoid.
Changing variable symbol using a filter:
add_filter( 'fakturoid_variabilni_symbol', 'toret_fakturoid_vs' );
function toret_fakturoid_vs( $order_id ){
$order = wc_get_order( $order_id );
return $order->get_order_number();
}
Number Series Settings
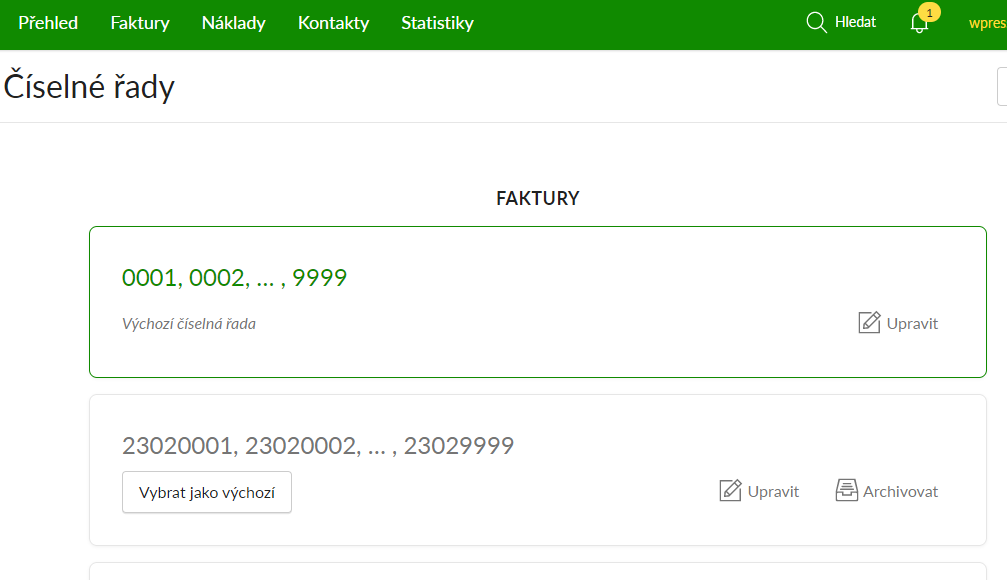
In the plugin, it is possible to select one of the created number series in the Fakturoid service administration.

The selected number series can only be used for generating invoices, provided that a proforma invoice does not precede the invoice. In case a proforma is generated, the default series set in the Fakturoid service is used for the invoice number, regardless of the number series set in the plugin.
Payment Methods
For correct invoice creation, you must pair your payment methods with payment methods used by Fakturoid. The plugin lists all your payment methods, and you define the payment mapping using the form.

Issuing Invoices and Proforma Invoices
Invoices and proformas can be created manually or automatically using the Fakturoid plugin.
Manual Invoicing
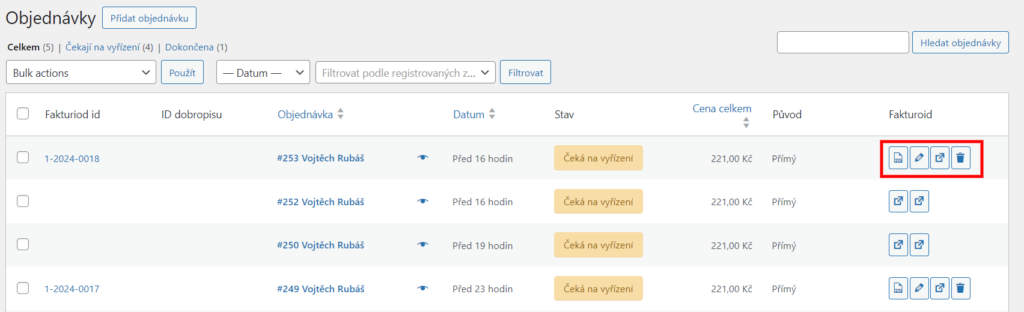
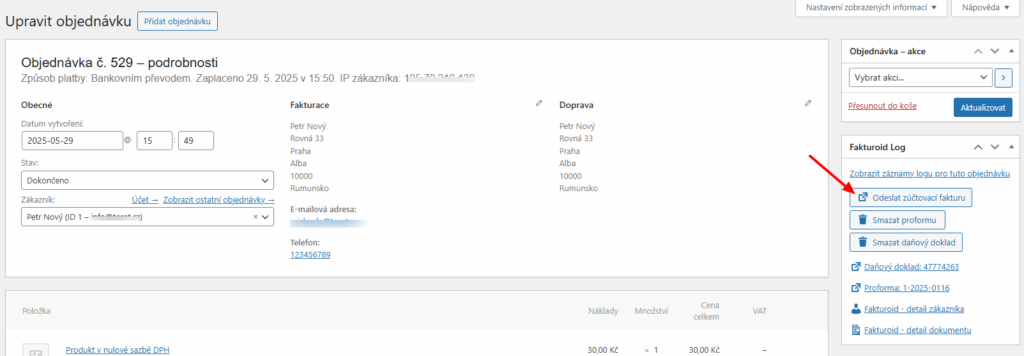
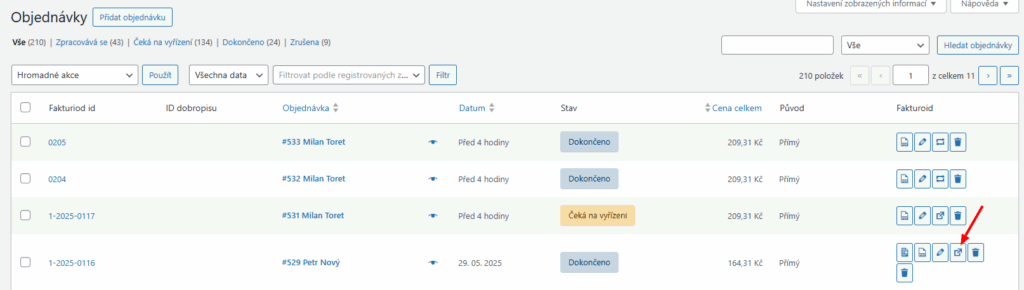
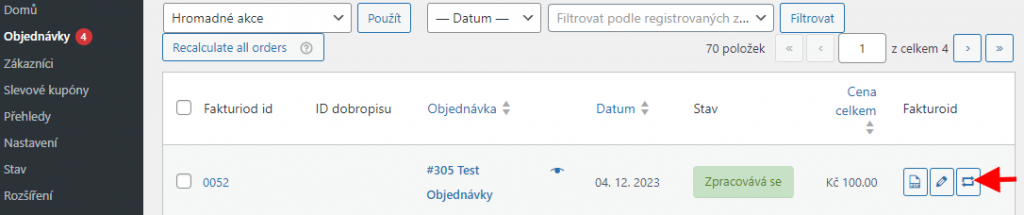
You can manually issue an invoice for an order from the order overview. In the Fakturoid column, you will find buttons for issuing a proforma and an invoice (1). The issued document can then be found in the Fakturoid id column (2).
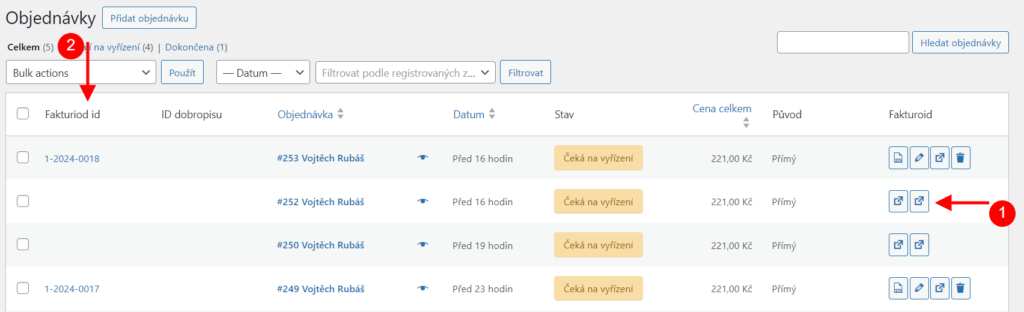
For orders with an already issued document, you will find buttons for its management in the Fakturoid column – download, edit, send, delete.
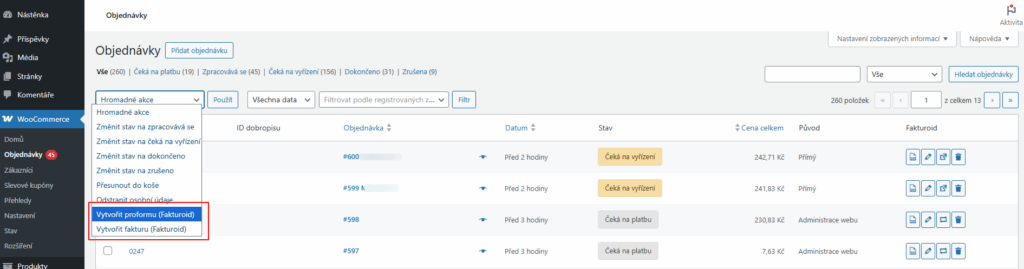
In the order overview, you can also use bulk actions to issue invoices and proformas.
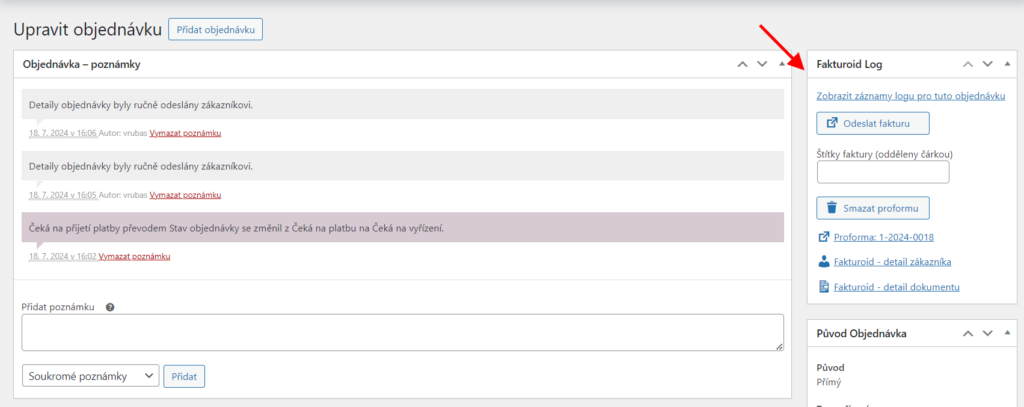
The same functions for issuing/managing documents can also be found in the metabox in the detail of each order.
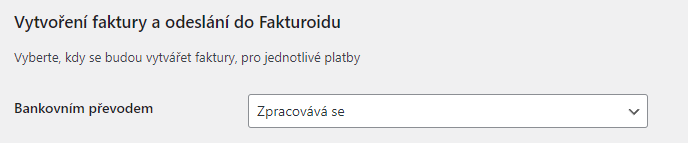
Automatic Invoicing
Invoices and proformas can also be issued automatically by the plugin based on the order status change. In the plugin settings (WooCommerce > Settings > Fakturoid), assign order statuses for individual payment methods in which proformas and invoices will be generated.
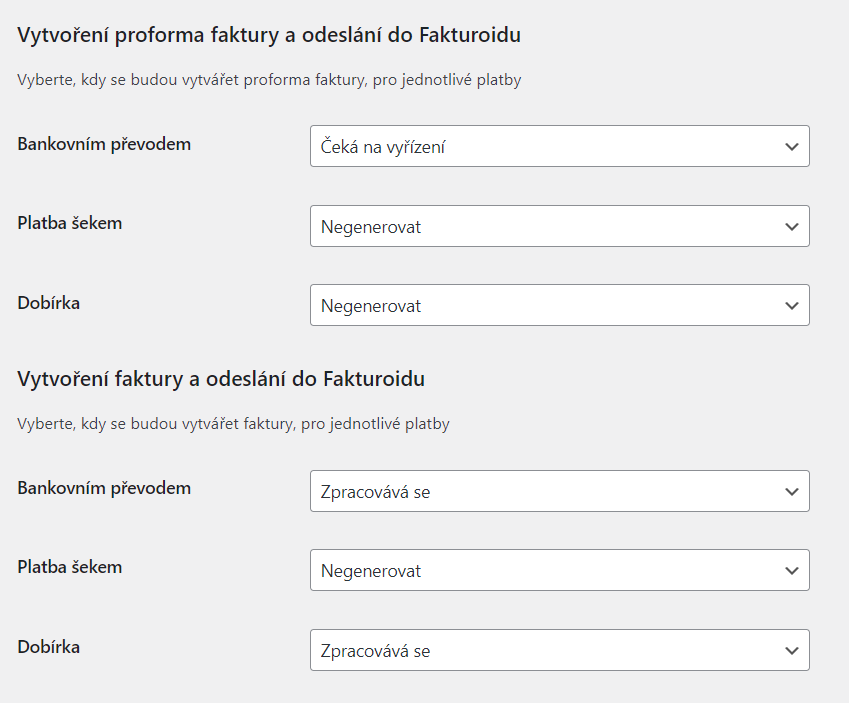
Paying Invoices (Marking as Paid)
To automatically mark your invoices as paid, the plugin allows you to set order statuses for individual payment methods. The invoice is marked as paid the moment the given order switches to the set status.
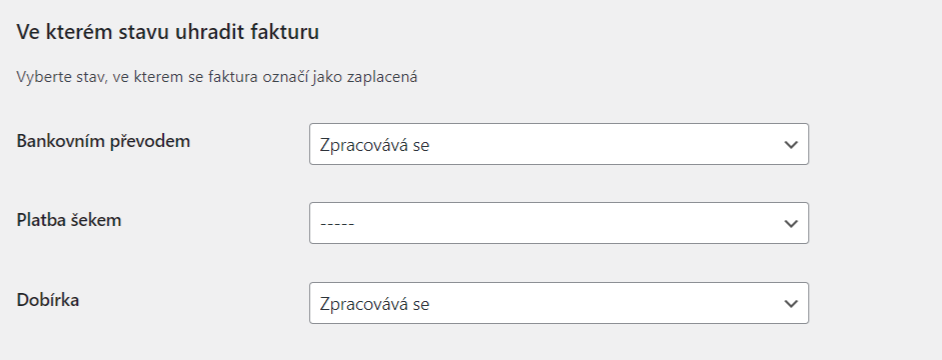
For bank transfer payments, automatic pairing of received payments and invoices can be set up, see below.
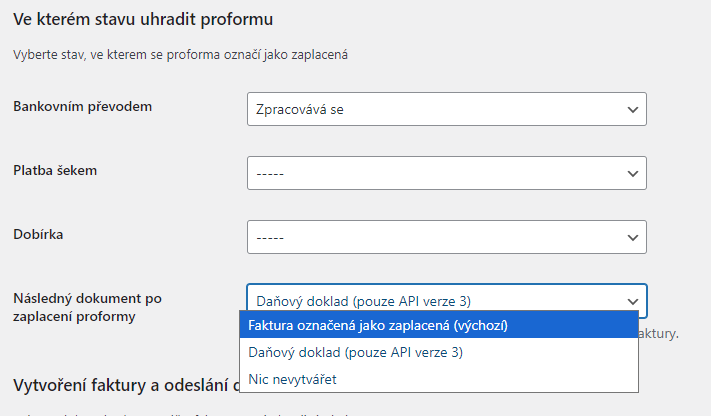
Issuing Tax Documents
In the plugin settings, you can choose the type of document that will be created after paying a proforma invoice – regular invoice, tax document, or do not create anything. Tax documents can only be created via API version 3.
You can create tax documents manually in the order overview and detail. Created tax documents can also be downloaded here.

After issuing a tax document, it is possible to issue a settlement invoice. This can be issued manually from the order overview or detail.
Issuing Credit Notes
Using the Fakturoid plugin, it is possible to create credit notes for issued invoices.
Number Series Settings
First, it is necessary to create a number series for credit notes in the Fakturoid account administration (Nastavení → Číselné řady / Settings → Number Series). You set the format according to your own preferences.
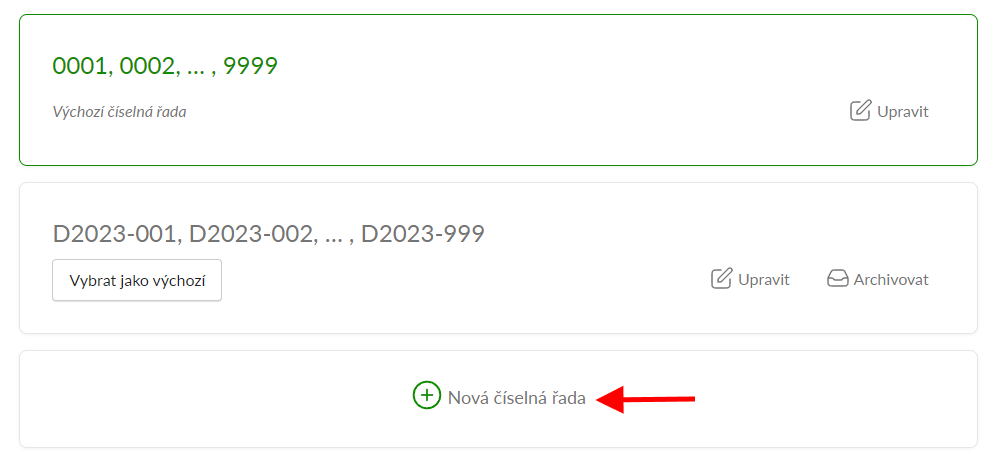
Subsequently, it is necessary to assign the number series for the credit note in the Fakturoid plugin settings.

Issuing a Credit Note
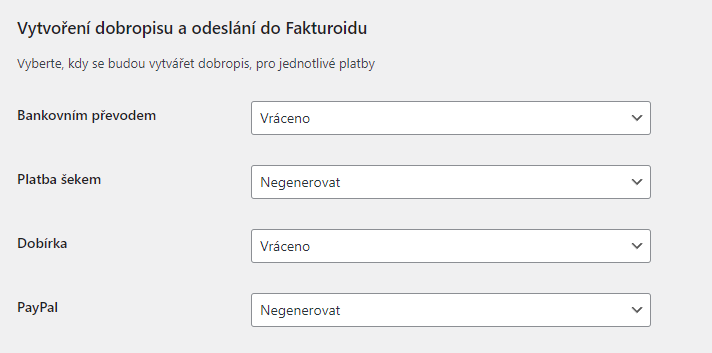
A credit note can be issued automatically when the order status changes or manually by clicking a button.
Automatic Issuing
For automatic issuance of a credit note, it is necessary to set order statuses for individual payment methods in the Fakturoid plugin, at which the credit note will be issued. The “Refunded” (Vráceno) status, which is directly in WooCommerce, is ideal for issuing a credit note. As soon as the order switches to the set status, a credit note is issued.
Manual Credit Note Issuance
A credit note can also be issued manually via buttons that the Fakturoid plugin adds to the order overview or to the detail of each order.
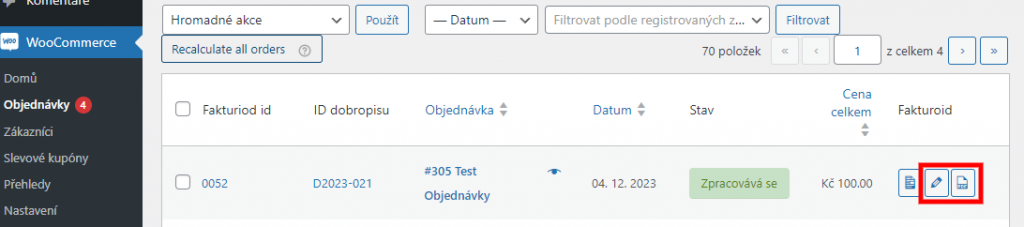
In the order overview, there is a two-arrow icon in the column, using which a credit note can be manually issued.
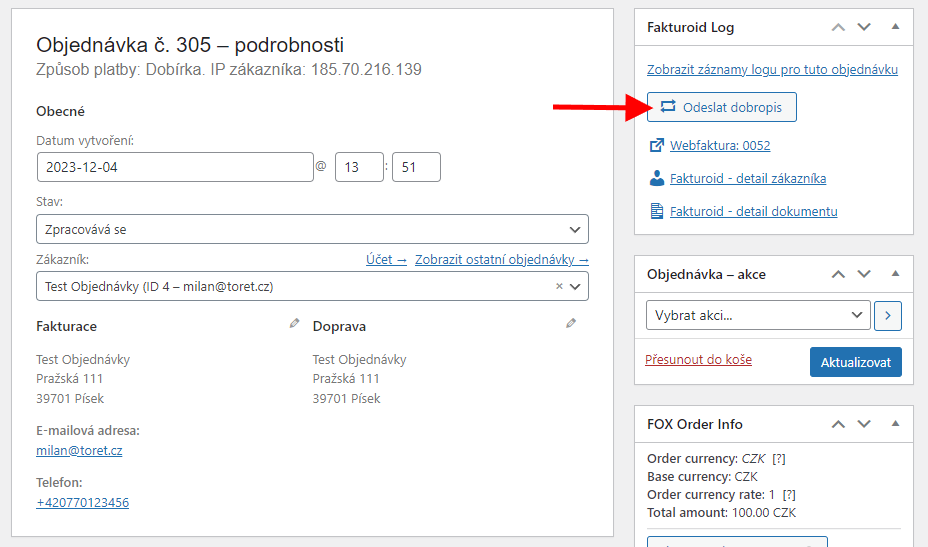
In the order detail in the Fakturoid box, a credit note can be issued using a button.
Once the credit note is issued, there will be a new document icon in the order overview, under which the credit note can be viewed and downloaded, and a pencil icon will also be added, via which it is possible to go to the credit note detail in the Fakturoid service administration.
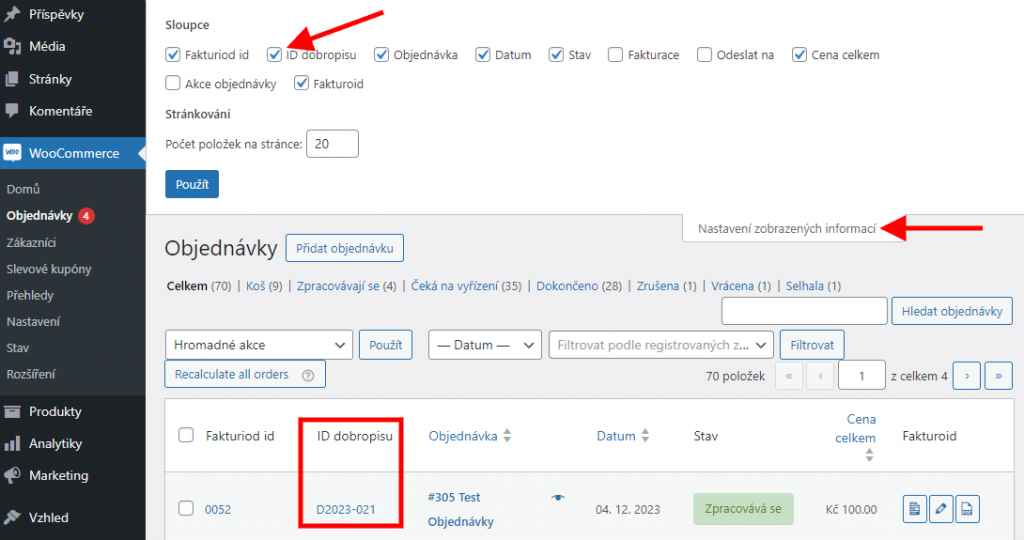
The order overview also contains the “Credit Note ID” (ID dobropisu) column, where there is a link to the issued credit note under the credit note number. The column can be freely turned on or off in the order overview via “Screen Options” (Nastavení zobrazených informací).
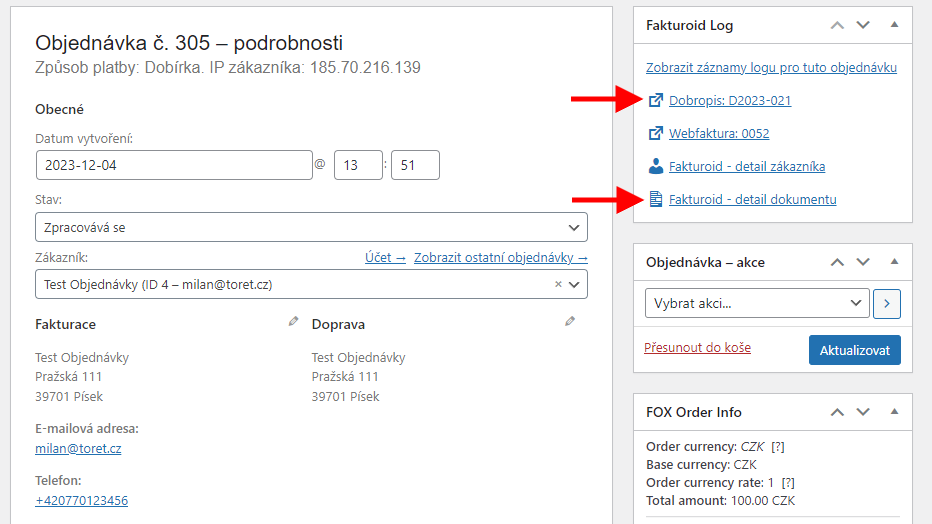
After issuing a credit note, it is possible to view and download the credit note also from the order detail. Likewise, it is possible to go to the credit note detail in the Fakturoid service administration via a button.
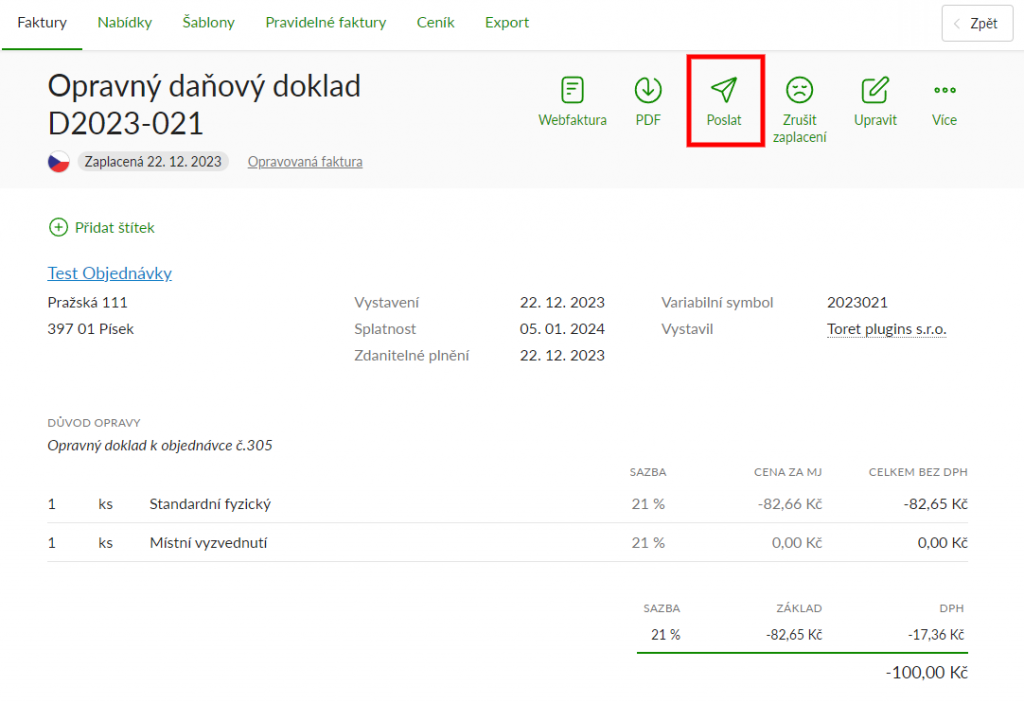
The issued credit note can be sent to the customer via the Fakturoid service administration. To send the credit note, there is a “Send” (Poslat) icon in its detail.
Displaying Company ID (IČ) and VAT ID (DIČ)
In the Fakturoid plugin, it is possible to pair the Company ID (IČ) / VAT ID (DIČ) fields that you use in the checkout so that the filled values are inserted into the invoice.
To add the Company ID / VAT ID field, you can use custom fields, add them with a third-party plugin, or use our free plugin: Toret IČ/DIČ.
In all cases, however, it is necessary to set the Company ID / VAT ID meta fields from the checkout in the Fakturoid plugin settings in the “Mapping fields for IČ and DIČ” (Přiřazení polí pro IČ a DIČ) function. Meta fields will vary with each plugin or custom modification. Our plugin Toret IČ/DIČ uses, for example, these meta fields:
Company ID (IČ): _billing_company_number
Tax ID (DIČ): _billing_vat_number
VAT ID (IČ DPH): _billing_vat_number_2
The Fakturoid plugin settings when using our Toret IČ/DIČ plugin would look as follows:

Other Settings
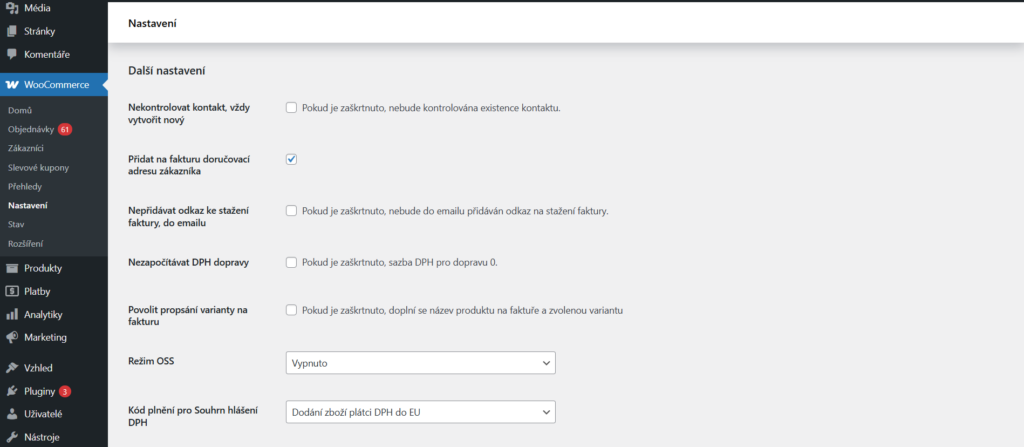
In the other settings section, you will find the following functions:
- Do not check contact, always create new: A new contact is automatically created in the Fakturoid system for each invoiced customer.
- Add customer’s delivery address to invoice: Displays both billing and delivery addresses on invoice/proforma/credit note
- Do not add invoice download link to email: The invoice/proforma link will not be displayed in automatic WooCommerce emails
- Do not include shipping VAT: Shipping will have zero VAT on the invoice
- Enable variant writing on invoice: In addition to the product name, the name of the selected variant will also be displayed on the invoice (for variable products)
- OSS Mode: Activates/deactivates One Stop Shop mode for goods or services
- Fulfillment code for VAT summary report
Automatic Pairing of Bank Transfer Payments (Notification and Webhook)
The Fakturoid plugin allows fully automating the payment pairing process with subsequent order status change for orders paid by bank transfer.
You can set up the plugin for automatic payment pairing in a few easy steps.
1. Pairing the bank account with the Fakturoid service. Guide from Fakturoid here: https://www.fakturoid.cz/podpora/automatizace/parovani-plateb-s-bankou
2. Webhook Setting, which you can find in the plugin settings (WooCoommerce > Settings > Fakturoid > Notifikace – stav objednávky / Notification – order status).

Set the Webhook in the Fakturoid service administration Fakturoid > Nastavení > Napojení na jiné aplikace > Webhooky (Settings > Connection to other applications > Webhooks).
3. Setting the order status to which the order switches after pairing payment with the document. The status is set at the same function where the Webhook is listed: Notification – order status

4. Proforma Creation Setting. For the whole process to work, it is necessary to set the plugin to first create a proforma when the order is created. This is created by default for orders paid by transfer. A proforma is not necessary for other payment methods.

5. Automatic Invoice Creation Setting. In the last step, we recommend setting invoice generation for orders with bank transfer to the status you set in the “Notification – order status” function. This will automatically create an invoice after the status of the paired order changes.
How does it work?
The customer creates an order with the bank transfer payment method. This order is in the “On hold” (Čeká na vyřízení) status by default. The plugin automatically creates a proforma. As soon as the customer pays the order, the Fakturoid service pairs the payment with the proforma and marks the proforma as paid. Information that the proforma is paid is sent from Fakturoid to the web using a webhook. The plugin then switches the order to the status set in the “Notification – order status” function. If invoice generation for orders with the bank transfer payment method is set for this order status in the plugin, an invoice is automatically issued.
For the status change to occur after marking the proforma as paid, it is necessary that the order be in the “On hold” status. If the order is in a status other than “On hold”, the status change after pairing the payment will not occur.
Bank Accounts for Different Currencies
Bank accounts for different currencies can be set in the plugin settings. The plugin automatically loads bank accounts set in the Fakturoid system. By checking the corresponding checkbox, you determine which account will be used for the given order currency.

The account number according to the order currency will then be displayed on the invoice.
VAT
Fakturoid calculates VAT of items itself when generating an invoice. It is important that two decimal places are set in WooCommerce settings on the General tab. If zero decimal places are set here, Fakturoid will calculate VAT from the rounded amount, and the total amount on the invoice will not match the amount in the WooCommerce order.
If you do not want to display decimal places for prices on the web when two decimal places are set in WooCommerce, insert a script to hide zeros after the decimal point into the child theme.
add_filter( 'woocommerce_price_trim_zeros', '__return_true' );Setting Price Entry Excluding/Including Tax in WooCommerce
If you have product price entry set to excluding tax in WooCommerce, this setting may cause an incorrectly issued invoice in some cases. Due to the different rounding methods of WooCommerce and Fakturoid, a penny difference may occur. We recommend changing the product price entry setting to including tax, where this incompatibility does not occur.
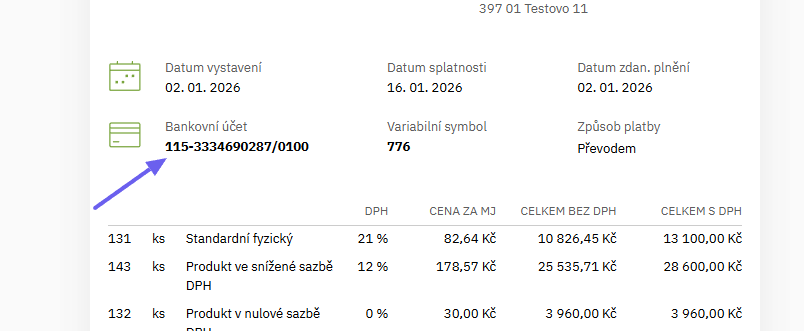
Example: See the order screen from WooComerce, where the calculated VAT price of 21% is incorrectly rounded by WooCommerce, and the invoice screen, where the correct VAT is calculated by Fakturoid. Two decimal places are set in WooCommerce.
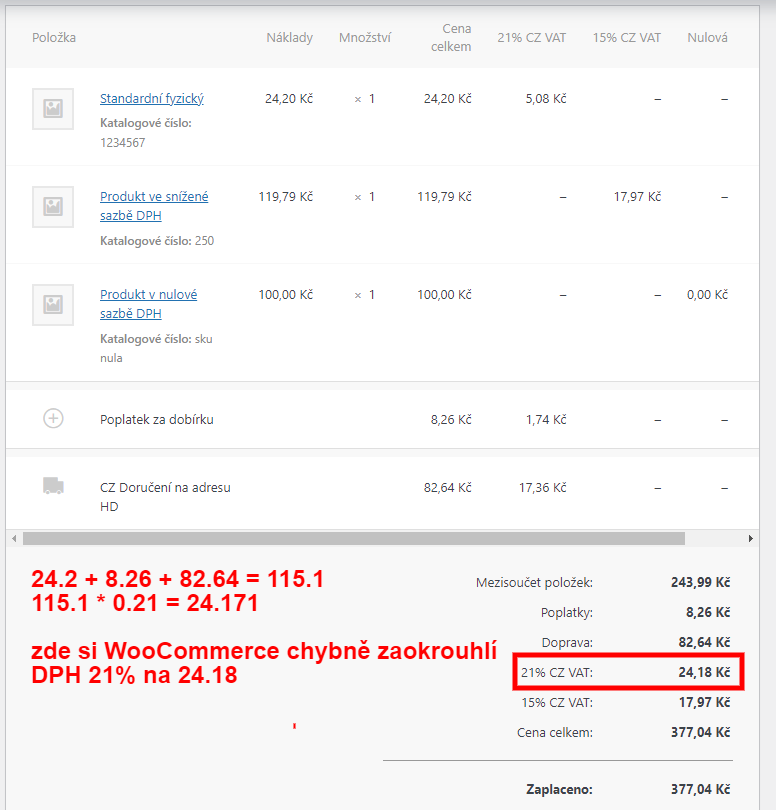
In the case of setting prices excluding VAT in WooCommerce, prices excluding VAT are sent to Fakturoid, and Fakturoid calculates VAT itself. Here is an invoice for an incorrectly rounded order.
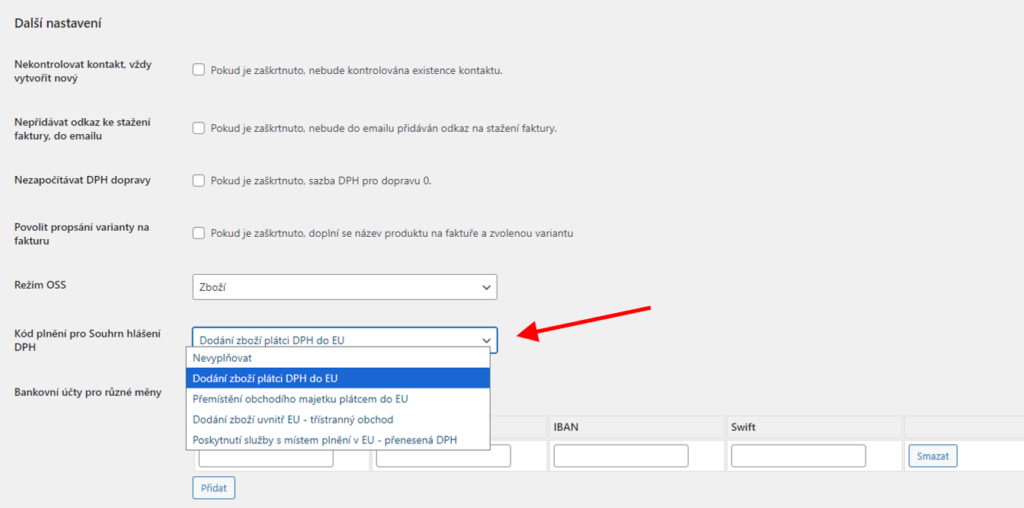
Fulfillment Code Settings
In the plugin administration (WooCommerce > Settings > Fakturoid), you can also set the Fulfillment Code for the VAT Summary Report.
Displaying Invoice Link in Custom Email
The Fakturoid plugin adds an invoice link (button) to WooCommerce emails. If the e-shop uses emails created by a third-party plugin or custom emails, it is necessary to use the woocommerce_email_after_order_table hook in the custom email for the invoice button to appear.
Adding an invoice link can be disabled in the plugin settings.

Settings Information in Email and My Account Section
Customers can find links to download proformas and invoices in the email and in the My Account section. You can customize their display in the plugin settings (WooCommerce > Settings > Fakturoid). You can modify:
- heading (including CSS)
- button text (including CSS)
- description
If you leave the fields empty, the default text set in the plugin is used.

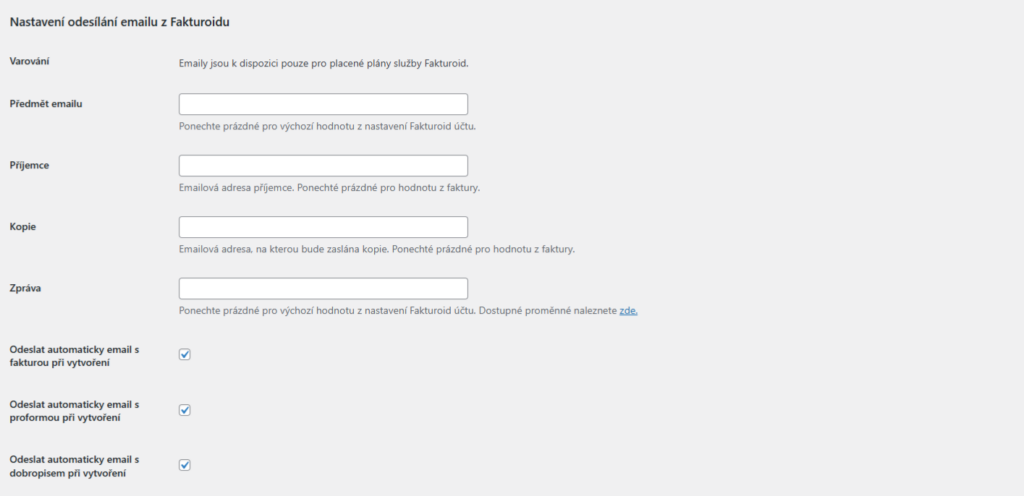
Settings for Emails Sent from Fakturoid
In addition to adding an invoice link to automatic emails sent from WooCommerce, you can also set up emails sent directly by the Fakturoid system in the plugin. These emails with an invoice link are sent immediately after the relevant document is created. This sending can be set for an invoice, proforma, and credit note.
In the plugin settings, simply check the document type for which you want to send these invoices. You can modify the email subject, set the recipient, cc, and email body. If you leave the fields empty, default values will be used.
Displaying Invoice Link on Thank You Page
A link to download invoices can be displayed on the thank you page – if the document is issued at this moment. Showing/hiding the link on the thank you page can be set in the plugin settings – checkbox Hide download link on thank you page.
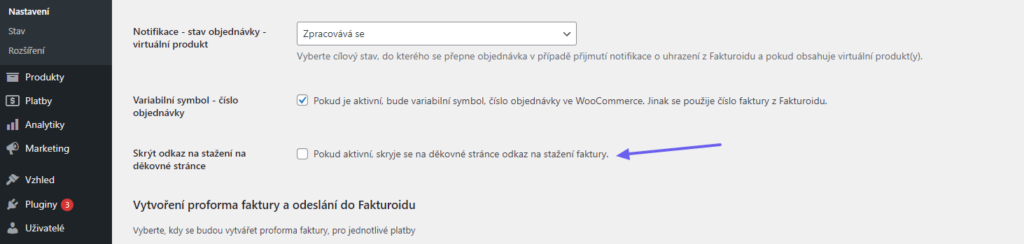
When using a custom thank you page, it is possible to place a download link using the shortcode [fakturoid_invoice_link]
Stock Synchronization Settings
Using the Fakturoid plugin, it is possible to import WooCommerce items into the stock in the Fakturoid service. In case an order is made on the web, the item is automatically deducted from the stock in the Fakturoid administration.
We will go through the settings in several steps:
Function Activation in Plugin
On the web, go to the Fakturoid plugin settings (WooCommerce → Settings → Fakturoid).
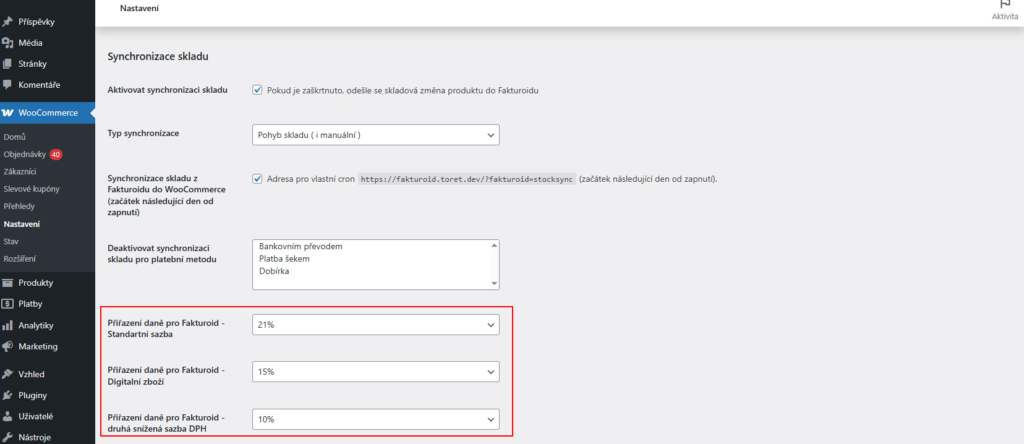
In the plugin settings section Synchronizace skladu (Stock synchronization) activate this function with the checkbox and set the synchronization type.
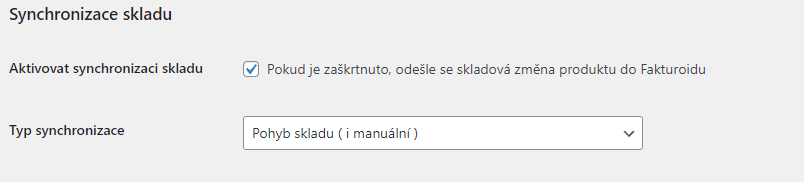
Stock movement (including manual): Stock quantity (number of pieces in stock) for the imported product in Fakturoid is adjusted even if you manually adjust it for the product in WooCommerce, e.g., manually replenish the stock of the given product. At the same time, the number of pieces in stock will also synchronize during an order or order cancellation.
Decrease stock level (uses order): This function adjusts the number of stock pieces in Fakturoid only by order. Manual stock status change does not synchronize the stock on the Fakturoid side.
Furthermore, it is possible to set payment methods for which stock synchronization will not take place and assign VAT rates so that it is correct for stock items in Fakturoid.
After saving settings, the tab Fakturoid sklad (Fakturoid Stock) will appear in the left administration menu under Toret plugins – if this tab does not appear after saving, refresh the page e.g. with the F5 key.
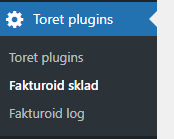
Exporting Products from WooCommerce to Fakturoid
The Fakturoid Stock page lists WooCommerce products. The “Exportovat položku do Fakturoidu” (Export item to Fakturoid) button creates a product with stock in the Fakturoid service. The “Code” value in the Fakturoid service is transferred as the product ID or catalog number (SKU) if filled in. You can also export products from WooCommerce to Fakturoid in batches of 500 using the button at the end of the table.
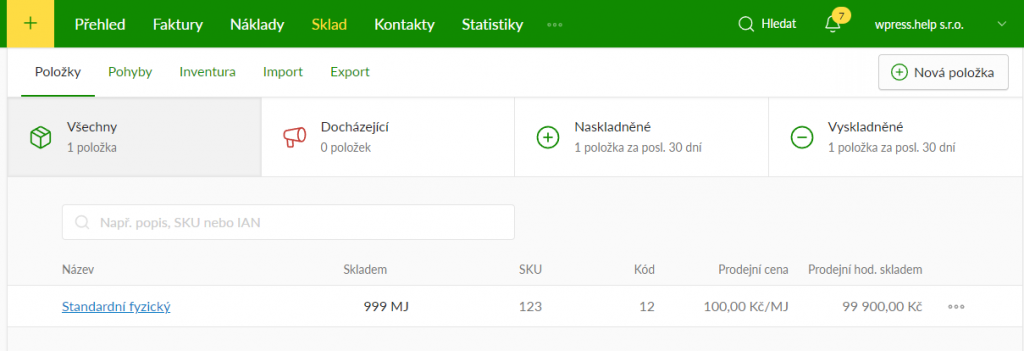
Importing Stock Status from Fakturoid
If stock levels in WooCommerce do not match stock levels in Fakturoid, you can use the “Importovat sklad z Fakturoidu” (Import stock from Fakturoid) function. Clicking the button updates the stock for products in WooCommerce according to values in Fakturoid. (Toret plugins > Fakturoid sklad)
Pairing Products
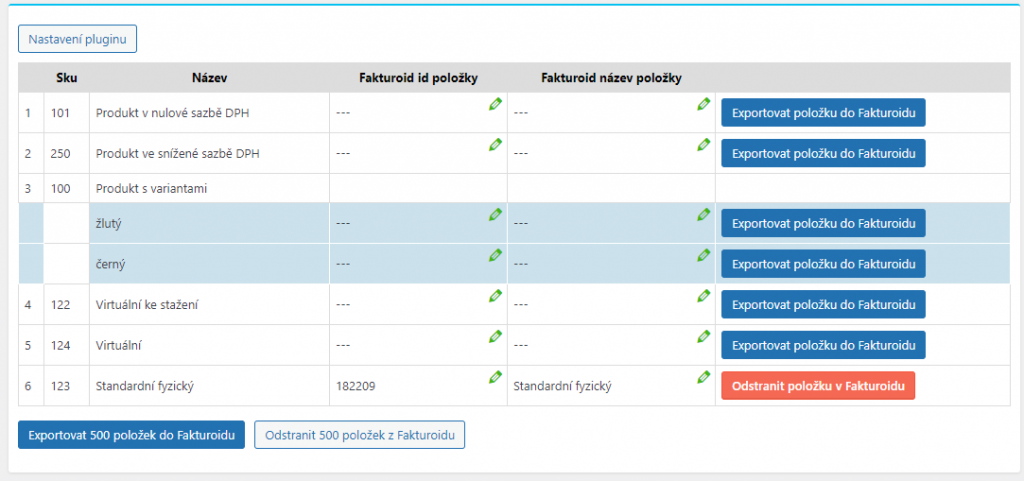
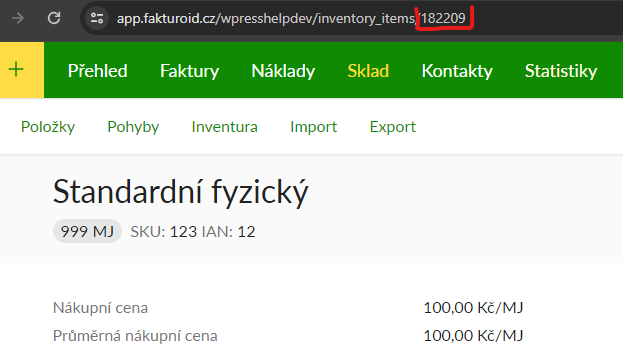
In case you already have created products in Fakturoid and want to pair them with products from WooCommerce, it is sufficient to edit the value in the “Fakturoid ID položky” (Fakturoid item ID) column to the already created product ID on the Fakturoid side before exporting products. The product ID is after the slash at the end of the URL in the Fakturoid product detail (see screen below).
Copy the ID in the product detail in the Fakturoid service.
Paste the ID into the Fakturoid ID item field for the product you want to pair, save, and then click the export product button.

Once the product is paired, the stock value, price, and barcode in Fakturoid are updated to the product values from WooCommerce.
Deleting Exported Products – IMPORTANT
Always delete exported products via the Fakturoid Stock table using the red “Odstranit položku ve Fakturoidu” (Delete item in Fakturoid) button. If you deleted an exported product via the Fakturoid service administration, it would no longer be possible to delete the product via the table until the database was cleared (and this is not an operation for a regular user). In case the exported product was deleted via the Fakturoid service, to re-export the product, it is necessary to delete the metadata _fakturoid_nazev_polozky and _fakturoid_id_polozky in the database.
Two-Way Stock Pairing
By default, stock pairing is only one-way from WooCommerce to Fakturoid. In case you want to pair stock also in WooCommerce according to product stock in Fakturoid (e.g., when issuing an invoice directly in the Fakturoid service administration), it is necessary to have the “Synchronizace skladu z Fakturoidu do WooCommerce” (Stock synchronization from Fakturoid to WooCommerce) function active in the plugin.

After activating the two-way synchronization function, it is necessary to wait until the next day (after midnight of the day the function was turned on) for the stock in WooCommerce to start synchronizing with the stock in Fakturoid. This is a protection to ensure stock values match. After the following day, it is necessary to set up CRON on the hosting and run it regularly so that synchronization can proceed automatically.
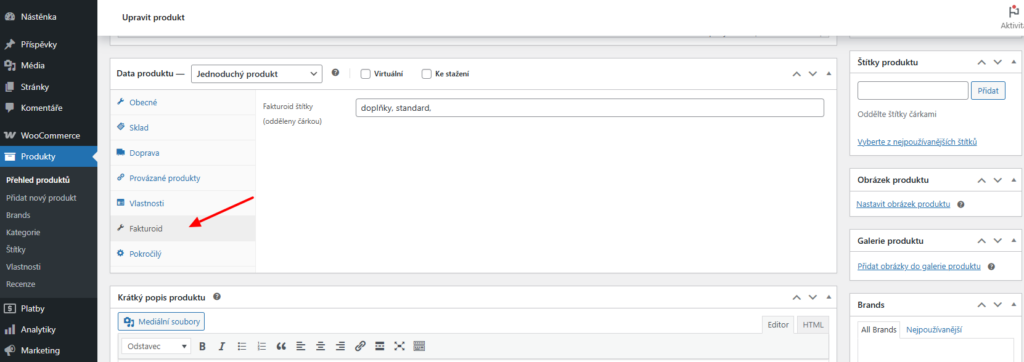
Product Tags
In the product detail, you can enter Fakturoid tags, which will be propagated to Fakturoid during synchronization.
Testování pluginu
Pro účely testování můžete využít:
- subdoménu “dev.doménalicence” (se stejnou licencí jako pro produkční web)
- localhost (127.0.0.1)
Na těchto umístěních budou zakoupené pluginy fungovat také a můžete zde otestovat implementaci a kompatibilitu před ostrým nasazením na web i v průběhu jeho užívání.
FAQ
Debugging Errors
Since things can always go wrong, the plugin has two built-in ways of catching errors.
The first is the notify_log.txt file, which is located on FTP in the plugin folder.
Not only errors are written to it, but also data sent to Fakturoid or saved by the plugin. By browsing through them, your developer can find out at what stage the problem occurred.
The second way is saving order notes
In case sending to the Fakturoid system fails, the response is saved as an order note. This allows you to quickly detect if the problem is in bad order data.
The basic identification of the problem is the absence of an invoice id in the first column of the order listing.
You can find the notes here:

Setting tax amount for COD for shops using multiple tax rates
In case you sell products in multiple tax rates and want to automatically set the amount of the applied tax rate for COD from Toret.cz plugins according to items in the cart, you need to use the filter below:
- Packeta (Zásilkovna): zasilkovna_taxclass_dobirka
Subsequently, use the filter to set the COD tax rate amount according to products in the order.
Example for Zásilkovna plugin, where three tax rates are defined: standard, reduced, and zero.
add_filter('zasilkovna_taxclass_dobirka', 'zasilkovna_taxclass_dobirka_fce', 10,1);
function zasilkovna_taxclass_dobirka_fce($TaxClass){
$CartTaxes = WC()->cart->get_cart_item_tax_classes();
$TaxStandart = false;
$TaxReduced = false;
$TaxZero = false;
foreach ($CartTaxes as $ct){
    if($ct == ''){
        $TaxStandart = true;
    }elseif ($ct == 'snizena-sazba'){
        $TaxReduced = true;
    }elseif ($ct == 'nulova-sazba'){
        $TaxZero = true;
    }
}

if($TaxStandart === true){
    $TaxClass = '';
}elseif ($TaxReduced === true){
    $TaxClass = 'snizena-sazba';
}elseif ($TaxZero === true){
    $TaxClass = 'nulova-sazba';
}
return $TaxClass;
}
Invoice is not issued for one order, but for others it is
Check the information entered for the order. The customer may have filled in some data incorrectly, and an error occurred while sending to the Fakturoid system, and the invoice was not created. Most often, the Company ID / Tax ID fields are filled in incorrectly.
Non-VAT payer is set everywhere, but Fakturoid issues invoice with VAT
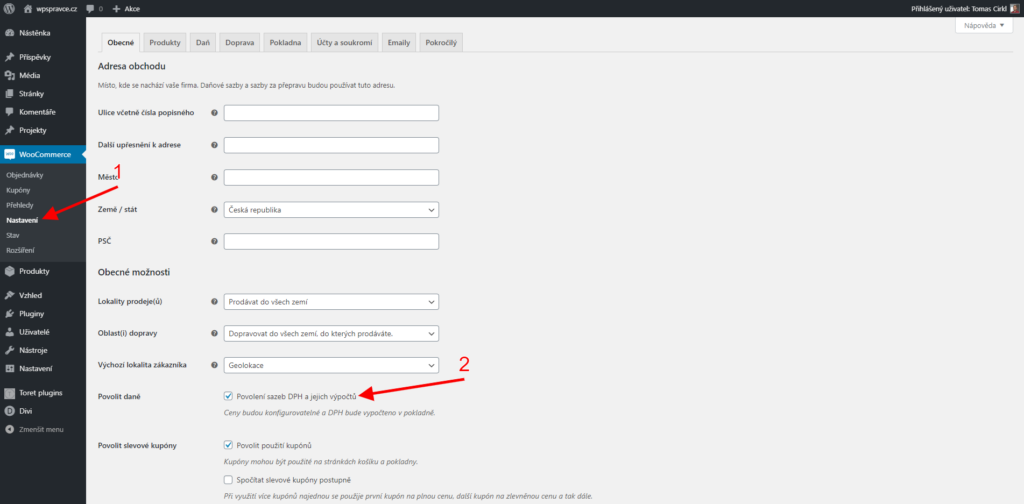
Enable Enable taxes in WooCommerce settings → Settings (by checking Enable tax rates and calculations).
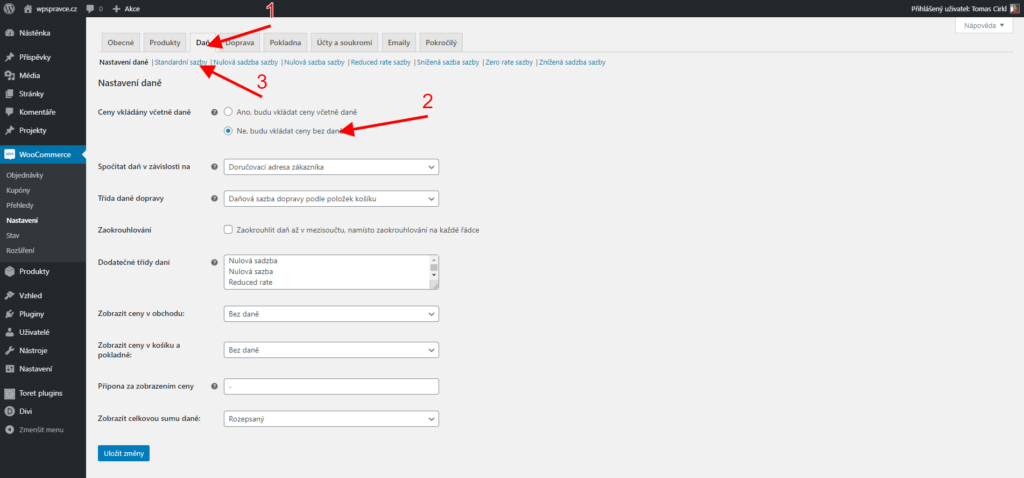
Then go to the Tax tab (1) and set Prices entered with tax to No, I will enter prices exclusive of tax (2) and check + possibly delete entered Standard rates (3).
Finally, disable Enable taxes in WooCommerce again.
Invoice is not issued and there is Create user problem/Failed to create contact in order log
This error appears if Fakturoid failed to create a customer.
In the plugin settings, check the “Fakturoid user domain” field; only the domain should be here, not the entire URL address.
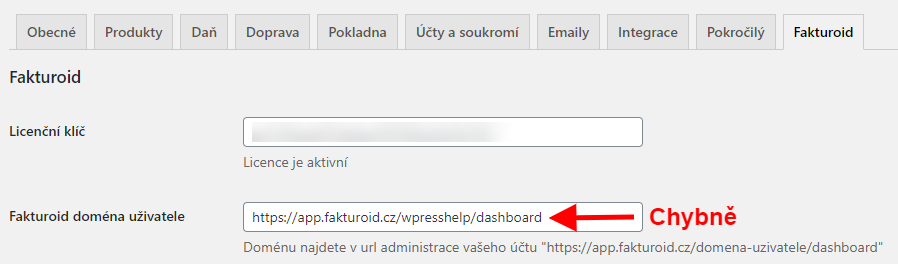
If you have the user domain correct, check if you have free space in Fakturoid for creating a customer. For example, the Fakturoid Free variant has a limit of only 5 customers.)
Reverse Charge Settings
Described in the article Fakturoid: How to set up reverse charge in WooCommerce.
Invoice was not saved with error: {“errors”:{“client_name”:[“is a mandatory item”],”subject_id”:[“Contact does not exist.”]}}
The error Invoice was not saved with error: {“errors”:{“client_name”:[“is a mandatory item”],”subject_id”:[“Contact does not exist.”]}} may be caused by deleting a contact in the Fakturoid administration that is already saved with a WordPress account. Then an invoice cannot be created for this account because it cannot pair with a contact on the Fakturoid side.
Go to the WordPress account detail from the order where the invoice cannot be issued with this error and find the Fakturoid ID field. Delete the value in the field, save the contact, and then you can issue an invoice for the order.
Filters
Adjusting VAT for Fees
The filter is intended for setting a fixed VAT value of 21% for surcharges (e.g. COD)
add_filter( 'fakturoid_fee_vat_rate', 'fakturoid_fee_vat_rate_fce', 10, 2 );
function fakturoid_fee_vat_rate_fce( $fee_tax, $order ) {
return 21;
}
Adjusting VAT for Shipping
The filter is intended for setting a fixed VAT value of 21% for the shipping price.
add_filter( 'fakturoid_shipping_vat_rate', 'fakturoid_shipping_vat_rate_fce', 10, 2 );
function fakturoid_shipping_vat_rate_fce( $shipping_tax, $order ) {
return 21;
}
Adjusting VAT for Product
The filter is intended for setting a fixed VAT value of 21% for the product price.
add_filter( 'fakturoid_custom_vat_rate_item', 'fakturoid_custom_vat_rate_item_fce', 10, 2 );
function fakturoid_custom_vat_rate_item_fce( $product_dph, $data ) {
return 21;
}
Function to mark invoice as paid during online payment
The plugin contains the function fakturoid_pay_invoice.
The function sends the order ID to the order, takes the order with the invoice, and sends them to Fakturoid to pay the invoice.
Hand over the function to your programmer; they will implement it according to your personal requirements.
The function can be called from anywhere.
The function is part of the plugin since version 1.5.16
Filter for using custom number series
The plugin contains the fakturoid_number_format function.
The filter allows changing the sent invoice number format.
Hand over the filter to your programmer; they will implement it according to your personal requirements.
The function can be called from anywhere.
The function is part of the plugin since version 1.5.18
Example of use with the Sequential Order Number for WooCommerce plugin and custom number series
Function used to adjust the invoice number:
add_filter( 'fakturoid_number_format', 'custom_fakturoid_number_format', 10, 2 );
function custom_fakturoid_number_format( $number, $order ){
$order_number = $order->get_order_number();
$lenght = strlen( $order_number );
if ( $lenght == 1 ) {
$number = '000' . $order_number;
} elseif ( $lenght == 2 ){
$number = '00' . $order_number;
} elseif ( $lenght == 3 ){
$number = '0' . $order_number;
} elseif ( $lenght == 4 ){
$number = $order_number;
}
return '8133' . $number;
}
Used filter:
if ( !empty( $number_format ) && false === $proforma_status ) {
$number = str_replace( '{order_id}', $order->get_order_number(), $number_format );
$invoice_array['number'] = apply_filters( 'fakturoid_number_format', $number, $order );
}
Changing invoice language by country
If you want to adjust the invoice language according to the country language and the default setting does not suit you, you can use a filter.
Example with SK language setting for an order to Slovakia below:
add_filter( 'fakturoid_invoice_lang' , 'fakturoid_invoice_lang_fce', 10, 2);
function fakturoid_invoice_lang_fce( $lang, $order ){
if( strtolower( $order->get_billing_country() ) == 'sk' ){
return 'sk';
}else{
return $lang;
}
}
One product has a price difference of 1 cent/penny, total price matches
In isolated cases, due to the diverse VAT settings in WooCommerce, it may happen that for one of the products, the price on the invoice after VAT calculation is 1 cent higher or lower. The total order price will be correct.
In this case, you can try using a filter.
add_filter( 'fakturoid_vat_mode', 'fakturoid_vat_mode_fce', 10, 1 );
if( !function_exists( 'fakturoid_vat_mode_fce' ) ){
function fakturoid_vat_mode_fce($VatMode){
return 'without_vat';
}
}
Insert the filter into the child theme’s functions.php or into an empty plugin e.g. https://toret.cz/produkt/boilerplate/.
If you have wrong prices on the invoice for almost all products, the problem is likely in the decimal places setting in WooCommerce. The problem again concerns only e-shops with VAT configured. If you use VAT, it is necessary to have two decimal places set in WooCommerce → Obecné (General) → Počet desetinných míst (Number of decimals). If zero or one decimal place is set, values rounded by WooCommerce are passed to Fakturoid, and Fakturoid calculates VAT from that – then the amounts do not match.