You are on the documentation page for the GO balík plugin for WooCommerce, which implements this shipping service into your e-shop. You can purchase the GO balík plugin here: Toret GO balík for WooCommerce
- Plugin Installation
- Plugin Activation
- Connecting to Go balík
- Carrier Settings
- Main Plugin Settings
- Shipment Submission from Web to Go balík
- Printing Labels
- Shipment Status Tracking
- Automatic Order Status Change Based on Shipment Status
- Free Shipping
- Cash on Delivery (COD)
- Exchange Rate Settings
- Settings at Product, Variant, or Category Level
- Testování pluginu
Plugin Installation
Upon purchasing the plugin, you will receive a license key and a download link for the plugin zip file via email. You can find detailed instructions on how to install the plugin from your computer into WordPress here.
Plugin Activation
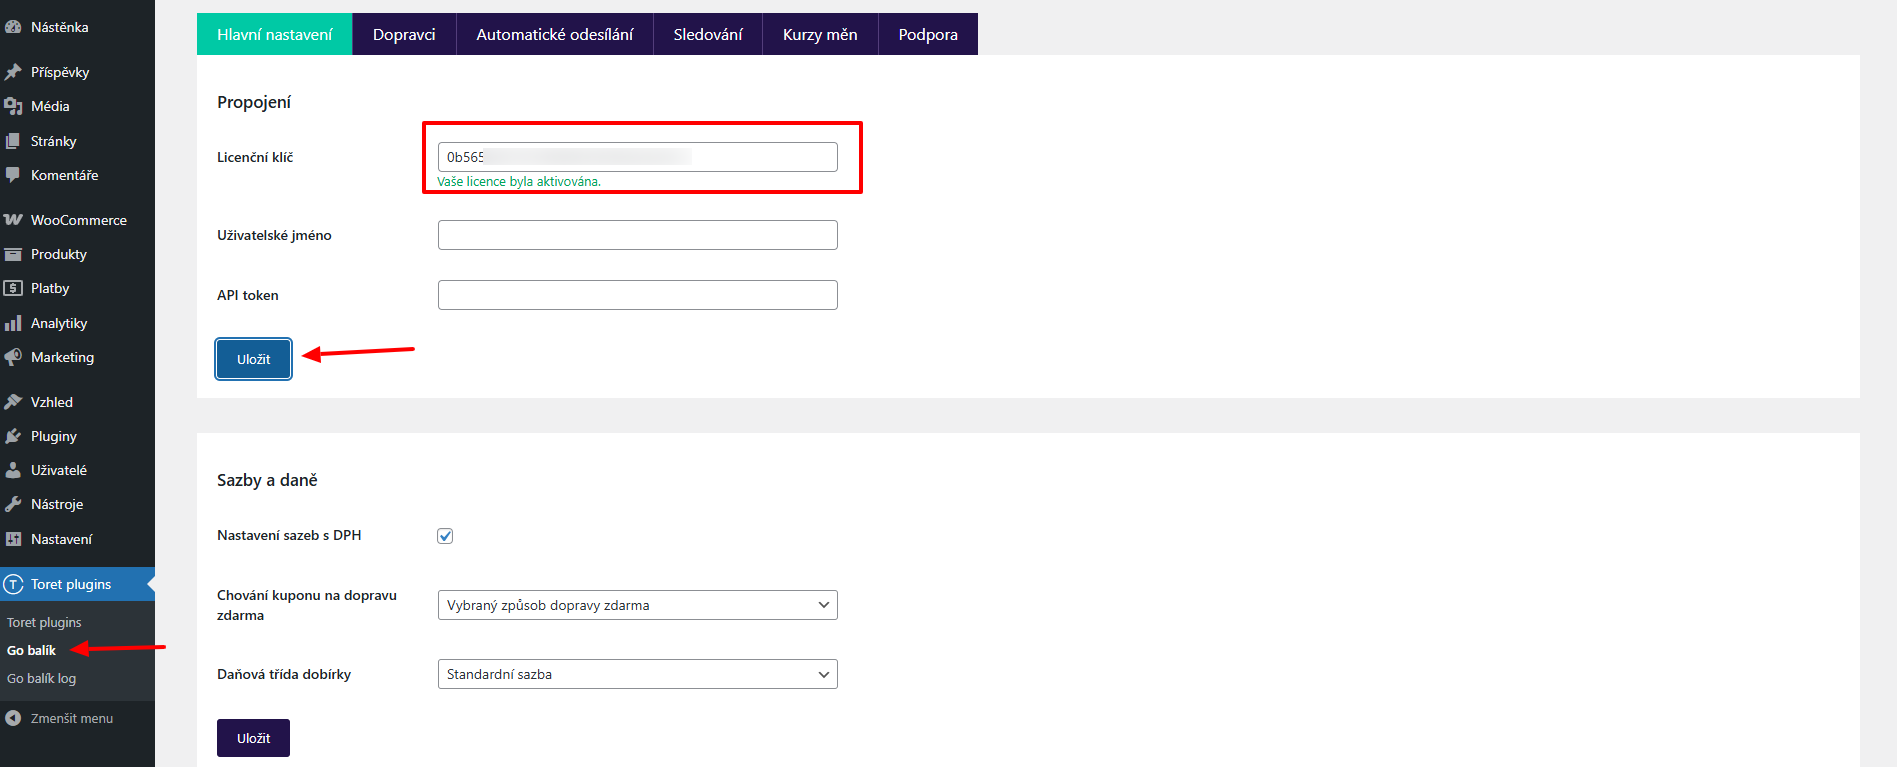
After installing the plugin, open the Go balík plugin, insert the license key into the appropriate field, and click the Uložit (Save) button to activate.
Connecting to Go balík
To use the Go balík plugin, you must have an account created with Go balík. You can register at go-balik.cz/sign
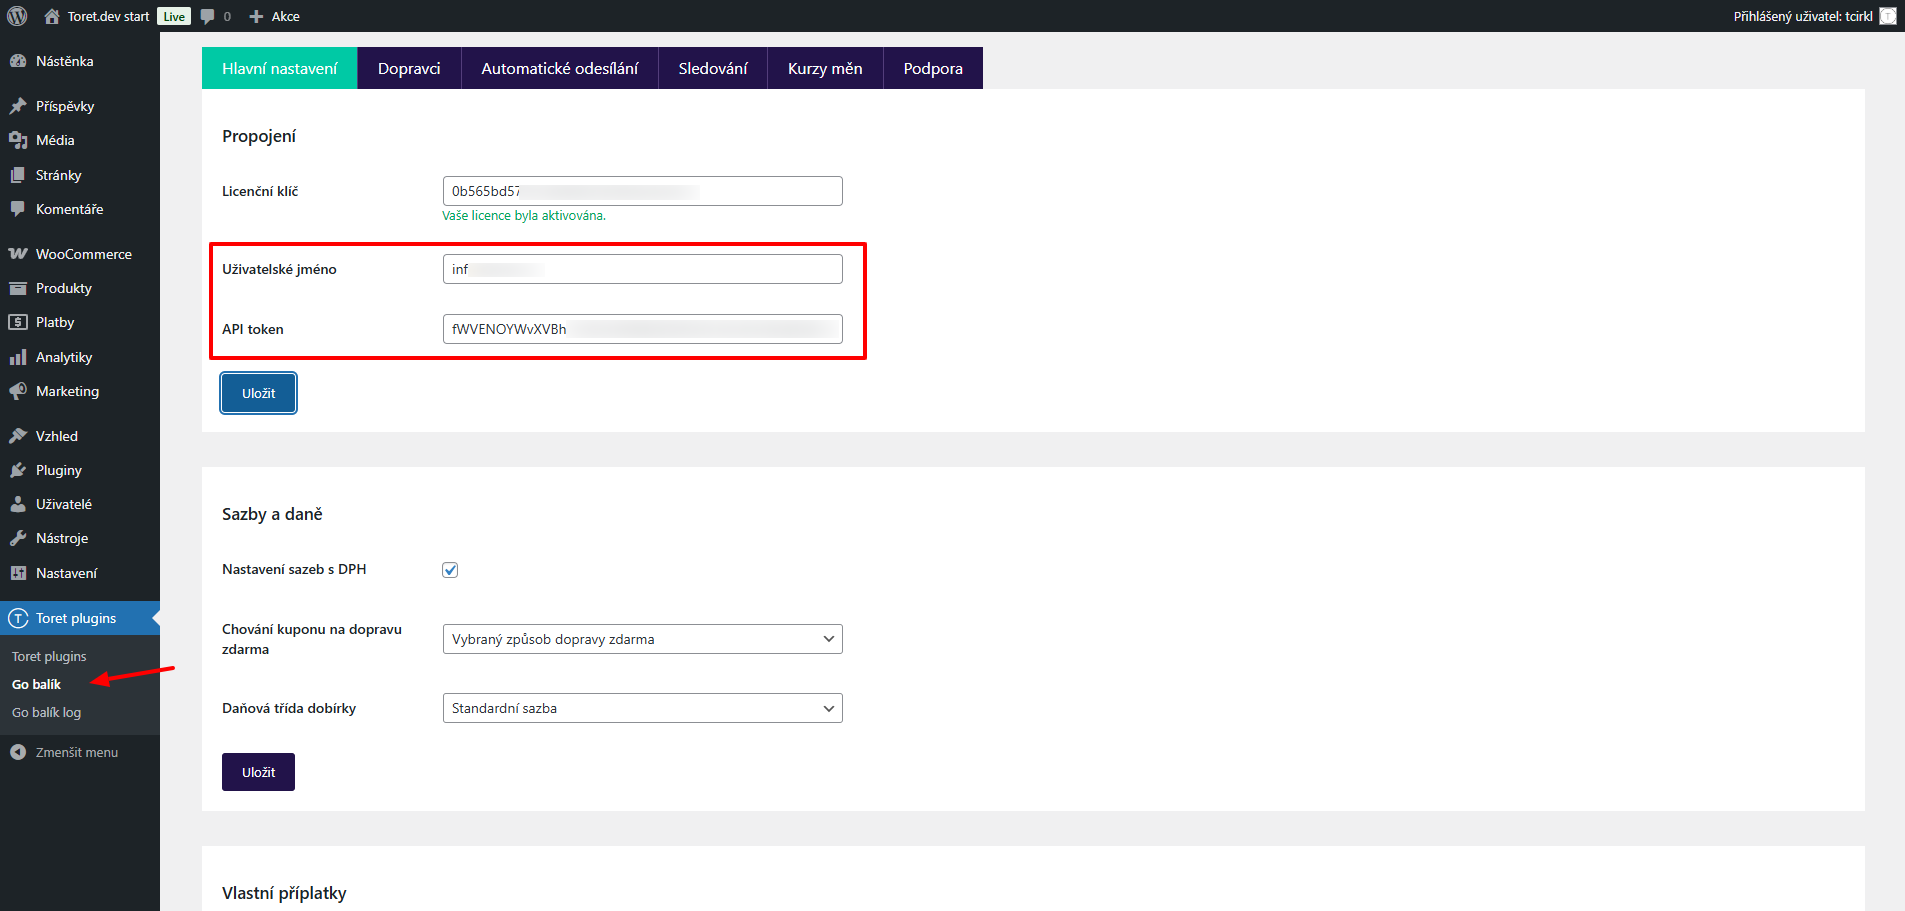
After installing and activating the plugin, proceed to its settings. This is found in the section Toret plugins → Go balík. To connect the plugin with your account, you need to fill in:
- Username (Uživatelské jméno)
- API token
You can get implementation data in your account in the Go balík system. Log in with your access credentials at https://go-balik.cz/sign and enter the Nastavení (Settings) section. Here copy the email and API key data.
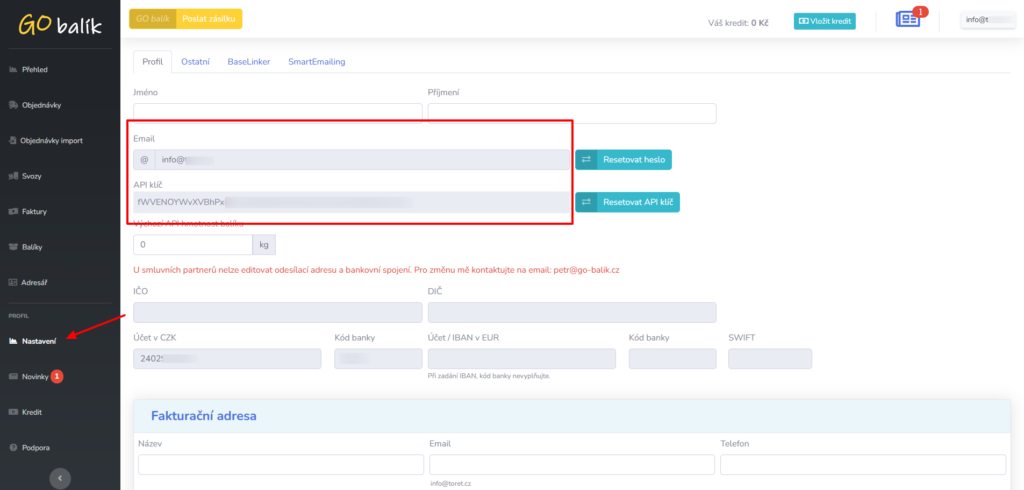
Subsequently, paste these data into the designated fields in the plugin and save.
Now your e-shop is connected to the Go balík service. Continue with carrier settings.
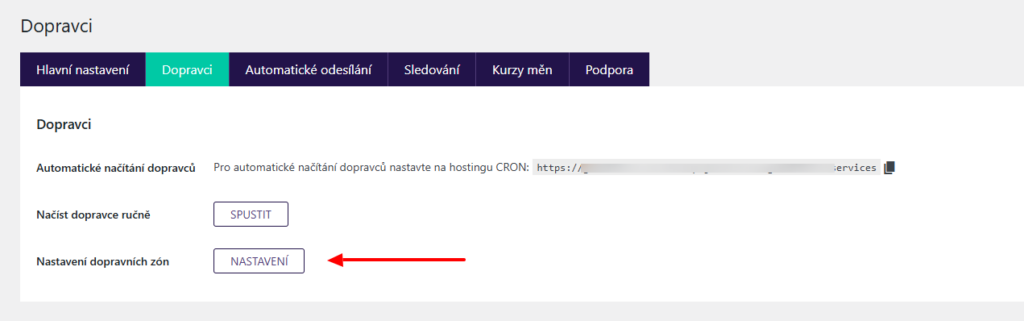
Carrier Settings
Loading Available Carriers
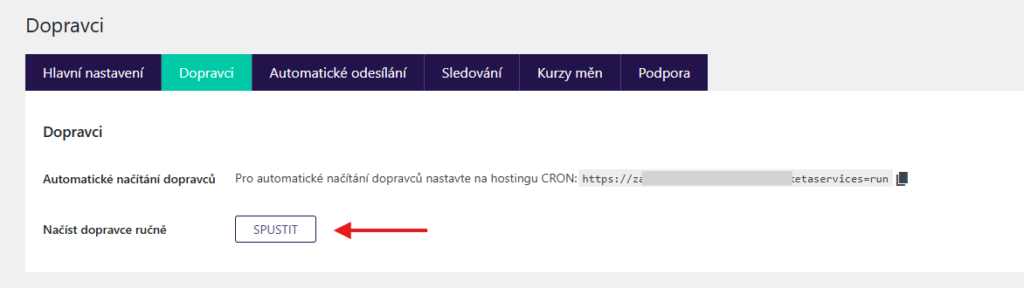
Now go to the Dopravci (Carriers) tab, where you must first load the list of available carriers.

You have two loading options:
- Automatic loading via CRON
- Manual loading via button
For regular carrier updates, we recommend setting up a CRON job on your website hosting. We recommend setting the CRON execution interval to once every 12 hours.
For the first time, load the carriers manually using the button.
After loading carriers, you must set up shipping methods in WooCommerce shipping zones. Click through to this setting using the button below.
WooCommerce Shipping Zones Settings
Before setting up shipping in the Go balík plugin, you need to set up identically named shipping methods in WooCommerce shipping zones. Without setting them in shipping zones, carriers from the Go balík plugin will not appear at checkout.
(WooCommerce > Settings > Shipping > your shipping zone (e.g. Czech Republic) > Add shipping method)
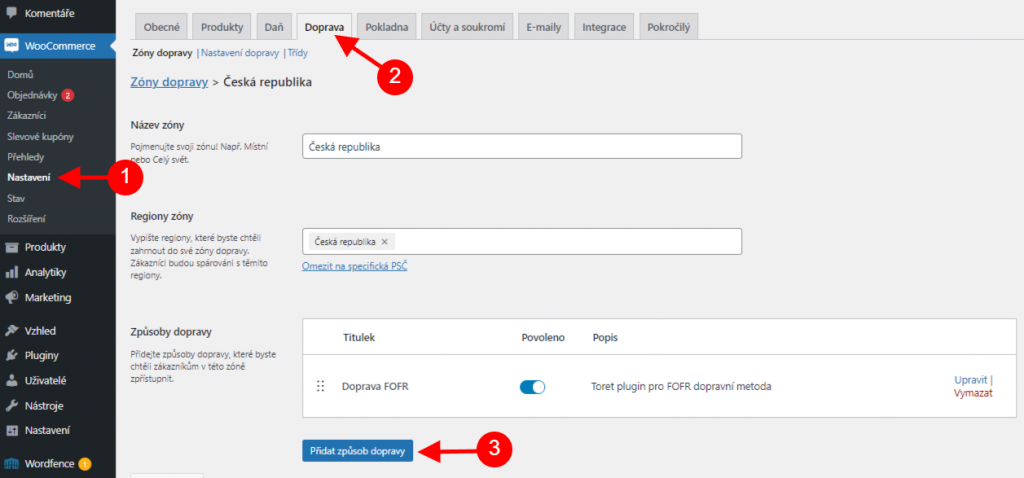
Select the required one from the offered shipping methods and click Continue.
Now you have created a new shipping method. To configure it, return to the carrier settings in the Go balík plugin.
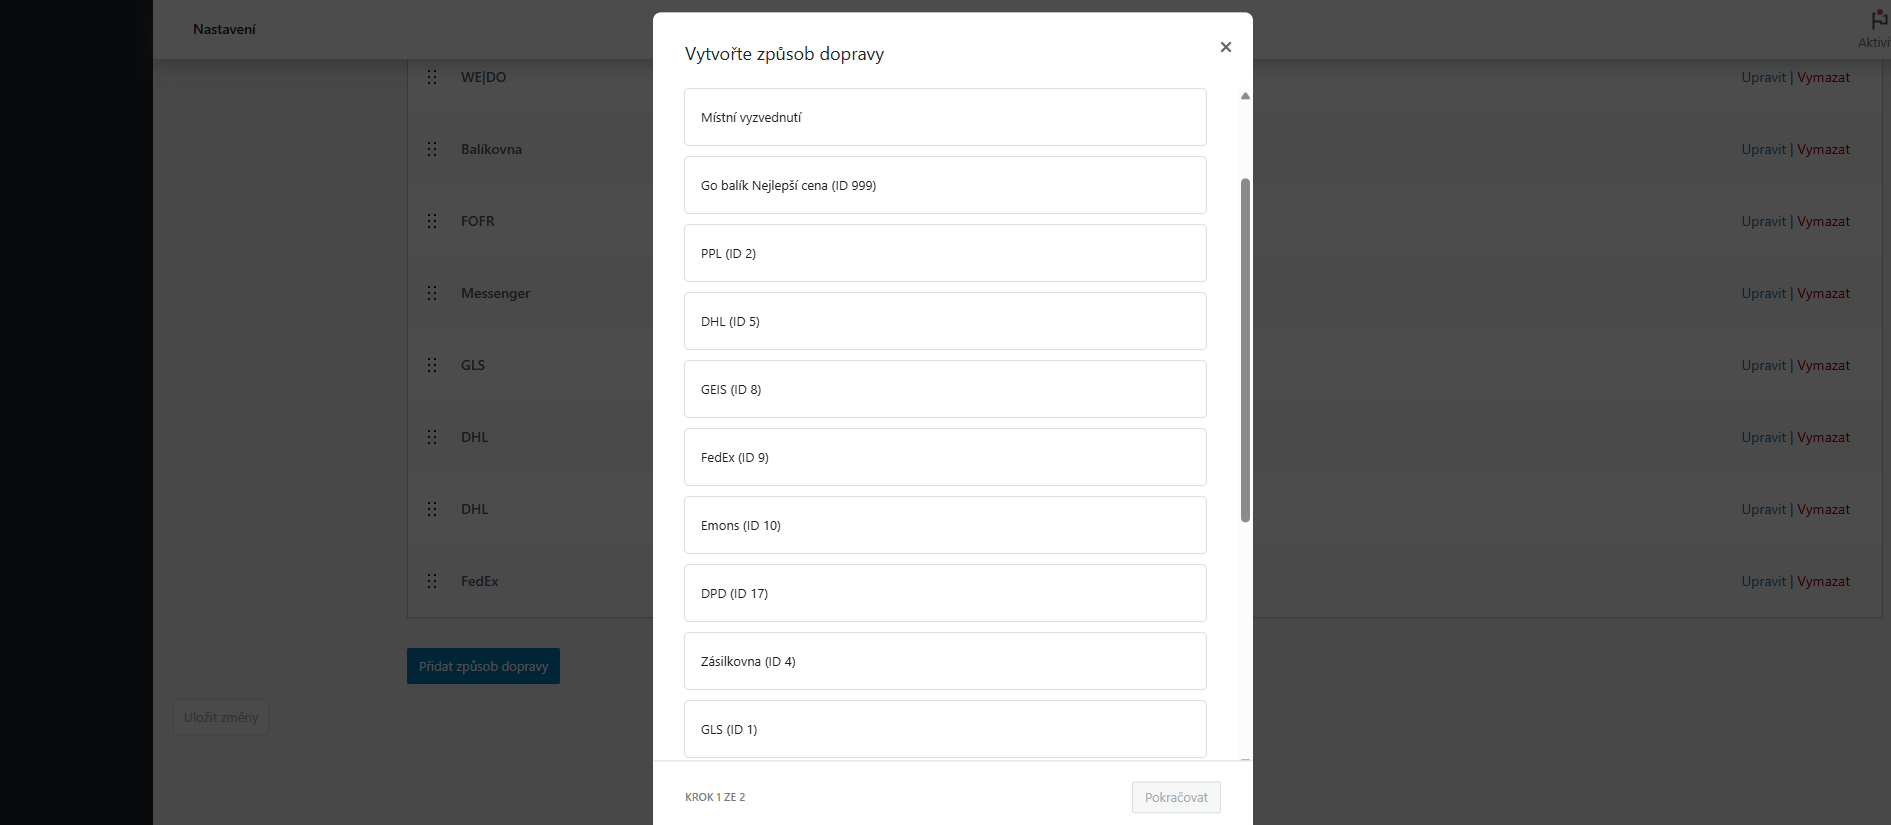
Explanation of Available Shipping Methods
Nejlepší cena (Best Price): With this shipping method, Go balík selects the carrier based on the most favorable price.
GLS ID 1, GLS ID 16: Two shipping methods are available for the carrier GLS. GLS with ID 16 is the standard connection to the GLS carrier. GLS ID 1 allows using more favorable shipping prices.
DPD ID 17, DPD ID 3: DPD ID 17 is standard shipping for most packages, DPD ID 3 for delivery via zaslat.cz.
You can get more detailed information on which shipping method to choose directly from Go balík.
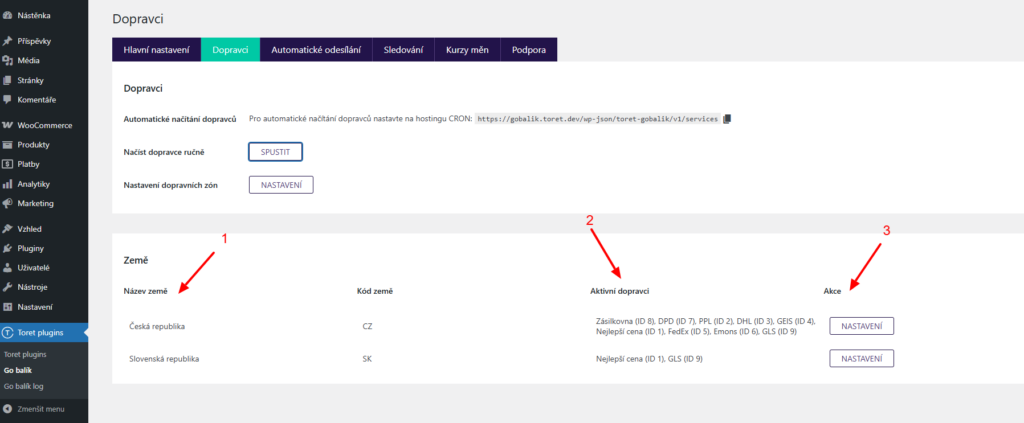
Carrier Settings in Go balík Plugin
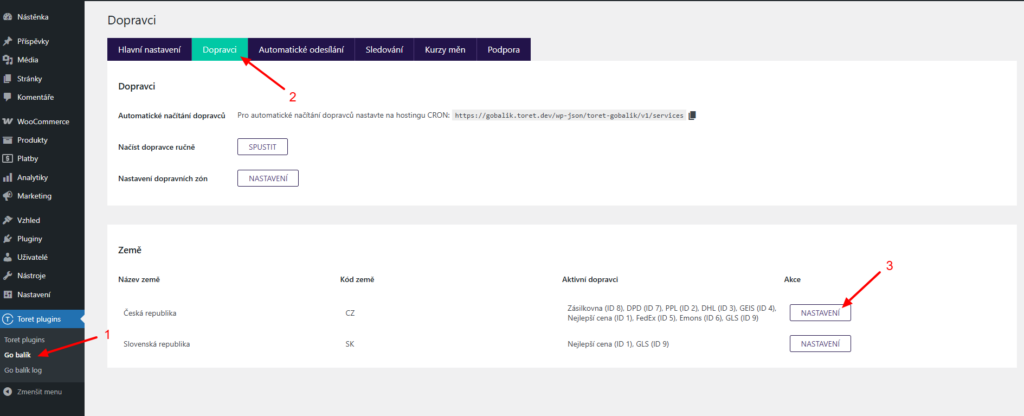
After loading carriers and setting up shipping zones, the available countries for delivery will appear below on the Dopravci (Carriers) tab in the Země (Countries) box. In the next step, we will activate and specify individual shipping methods offered by the Go balík plugin.
The first column (1) lists country names. The Active Carriers column (2) shows carriers you have enabled in the e-shop. In the Actions column (3), you will find a Settings button that takes you to the carrier settings for the given country.
In the Go balík plugin, you can set up the following carriers for delivery:
- Zásilkovna (Packeta)
- DPD
- PPL
- DHL
- GEIS
- FedEx
- Emons
- GLS
- One by Allegro
- Balíkovna
- FOFR
- Messenger
For delivery at the best price regardless of the carrier, shipping named Nejlepší cena (Best Price) is available.
You perform carrier settings in the plugin on the Dopravci (Carriers) tab in the settings of the given country (Toret plugins > Go balík > Dopravci > Nastavení).
After clicking on the settings of a given country, carriers you have added in WooCommerce shipping zones will be displayed.
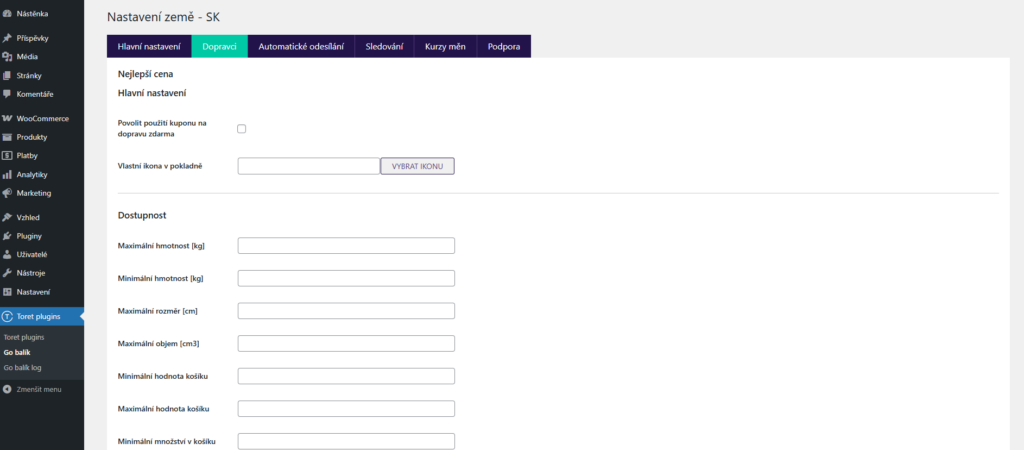
For individual carriers, it is possible to set:
- enable coupons for free shipping
- shipping method availability (conditions for its display to the customer at checkout)
- by minimum and maximum order value
- by minimum and maximum quantity of products in the cart
- by minimum and maximum product price
- by minimum and maximum cart weight
- by maximum dimension
- by maximum volume
- shipping price
- flat price
- scale shipping prices by total order value
- free shipping over amount
- cash on delivery (COD)
- flat surcharge
- scale COD surcharge by total order price
- maximum allowed COD value
- free COD over amount
Tip: if you want to trigger free shipping or free COD at checkout e.g. from 500, set the value 500 in the plugin.
Main Plugin Settings
On the “Hlavní nastavení” (Main Settings) tab in the Go balík plugin, you set values common to all types of shipping. These settings can be found in Toret plugins > Go balík > Hlavní nastavení.
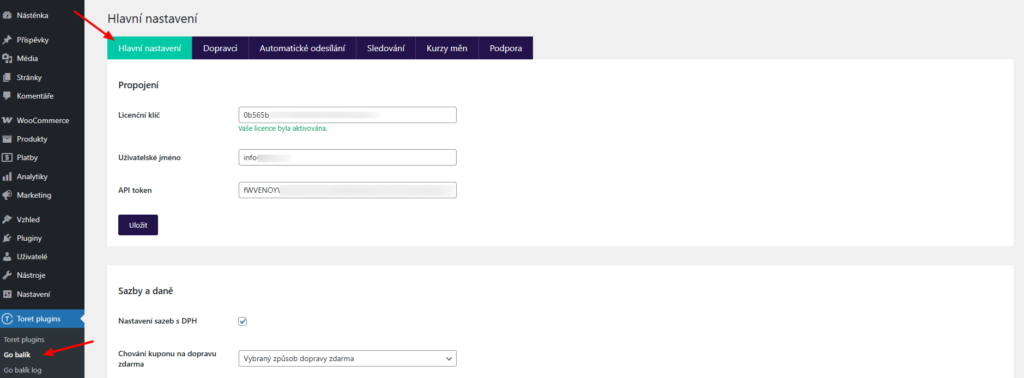
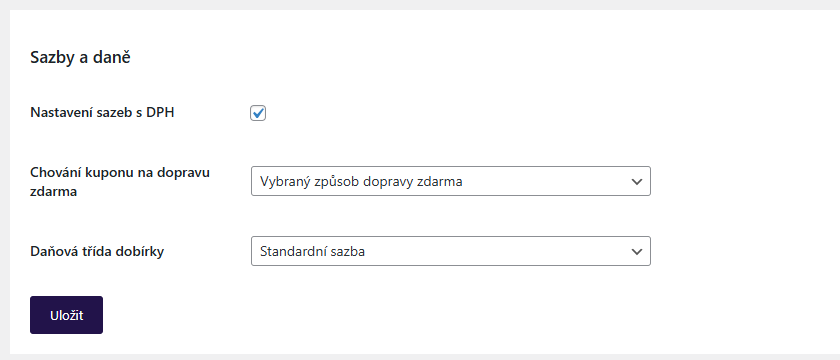
Rates and Taxes
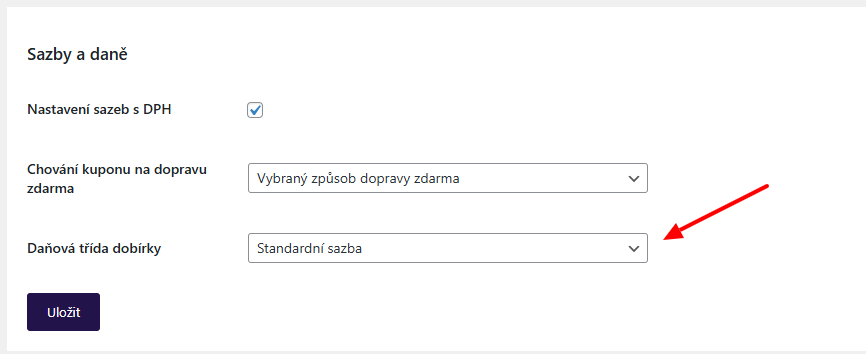
Here you set:
- rates for shipping with/without VAT
- behavior of free shipping coupons (all shipping methods, selected, or do not apply). If you want to apply coupons only to some shipping methods, it is necessary to enable them directly in the carrier settings (see above).
- COD tax class (for CZ recommended based on cart items)
Custom Shipping Surcharges
Here it is possible to set custom surcharges to shipping prices in various scopes:
- for all carriers
- for specific carriers
- for product or product variant
- for product category
Surcharges can be visible in checkout or hidden. They can also be multiplied by quantity or counted only once.

Surcharges linked to a specific product, variant, or category must be activated in the detail of the specific product/variant/category after setting in the plugin.
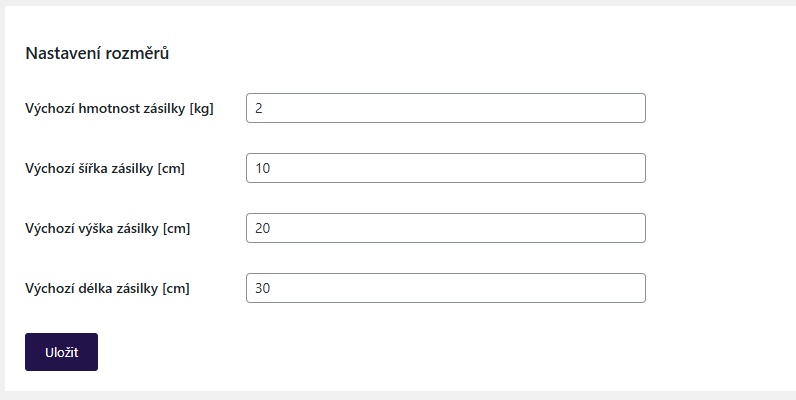
Default Shipment Dimensions
Here you set the default shipment dimensions. These are used if you do not have dimensions set for products or in the settings of individual carriers.
Shipment Label
In this section, it is possible to set the wording of the note for the driver and modify the shipment reference number. For both fields, it is possible to use variables:
- {order_id} – Order ID
- {order_number} – Order number
- {customer_note} – Customer note
- {idoklad_invoice_nr} – iDoklad document number
- {idoklad_invoice_id} – iDoklad invoice ID
- {idoklad_proforma_nr} – iDoklad proforma document number
- {idoklad_proforma_id} – iDoklad proforma ID
- {idoklad_proforma_vs} – iDoklad proforma variable symbol

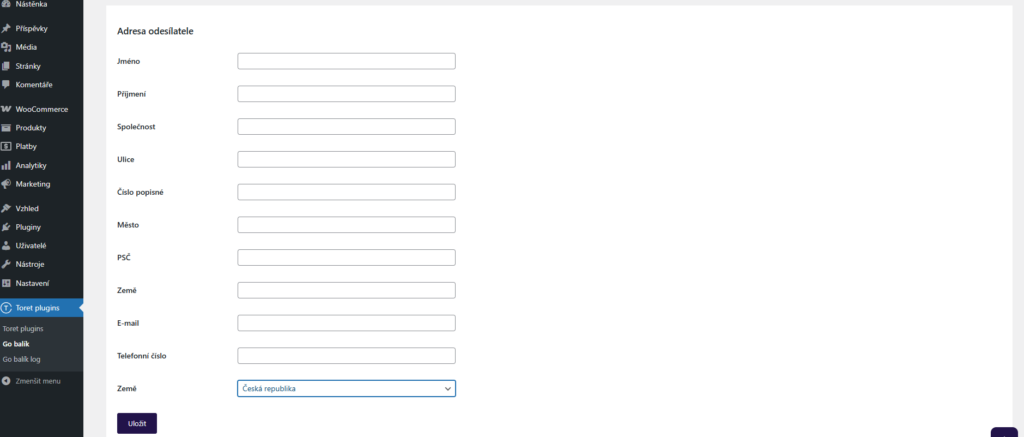
Sender Address
The sender’s address also serves as the shipment pickup address. Filling it in is essential for sending shipments.
Dialogs (Pop-up Windows)
In the dialogs section, you set the display of pop-up windows that open when sending a shipment and printing a label. In these windows, submission/printing details can be set. When disabled, values entered in the plugin settings are used.

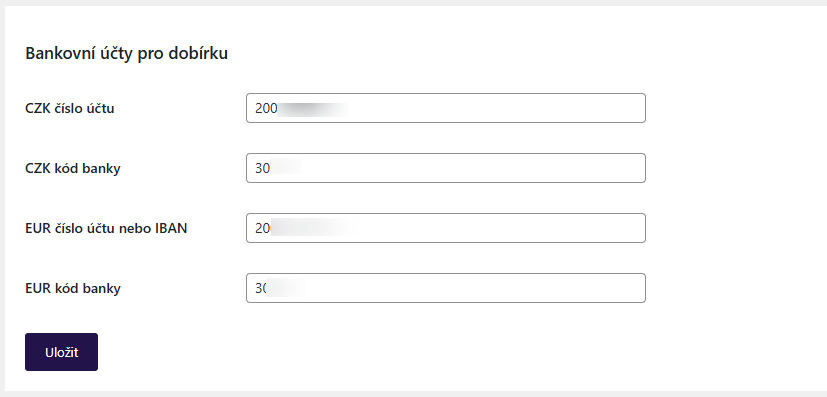
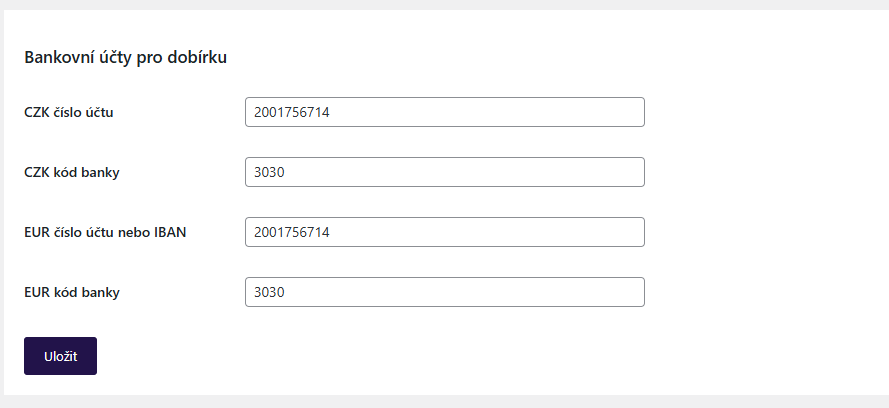
Bank Accounts for COD
Here you can enter accounts for COD payouts. It is possible to enter an account for Czech crowns and for Euros.
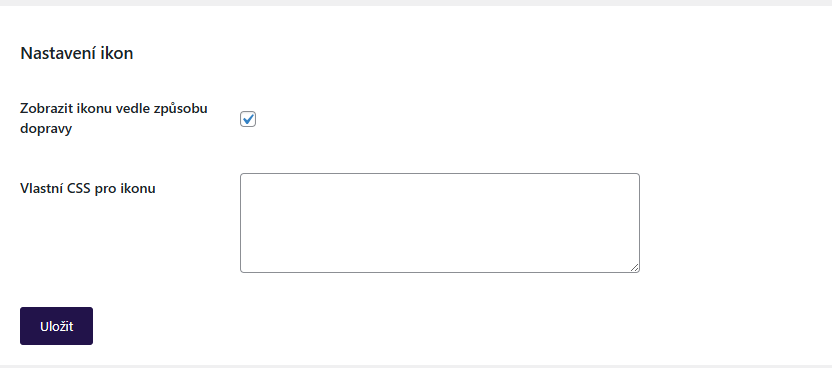
Icon Settings
In this section, you can disable/enable the display of the carrier icon in the checkout and enter custom CSS for modification. Custom icons can be set directly in the settings of a specific carrier (see below).
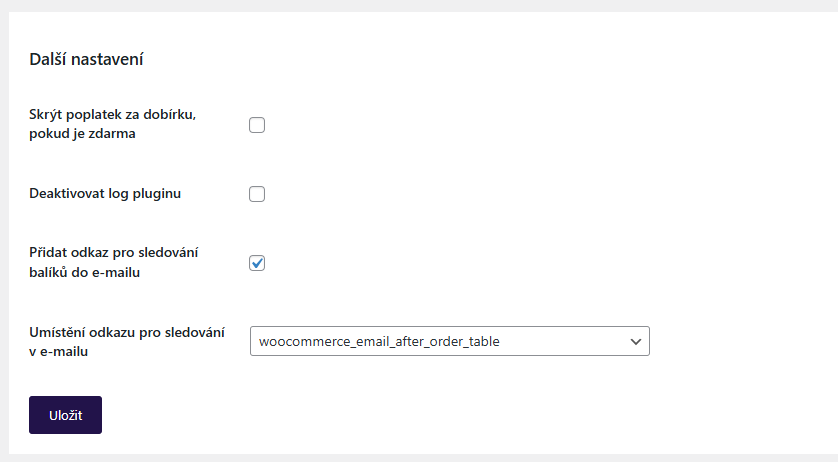
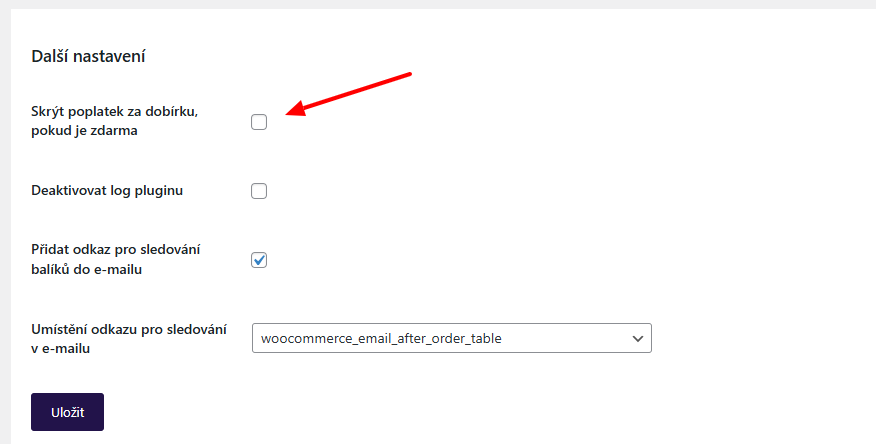
Other Settings
- Hide COD fee if free
- Deactivate plugin log
- Add package tracking link to email
- Tracking link position in email
Pickup Point Selection Widget Settings
If you want to offer delivery to pickup points/boxes, it is necessary to set up a map widget for individual carriers, from which customers will choose a branch at checkout. (Toret Plugins > GO balík)
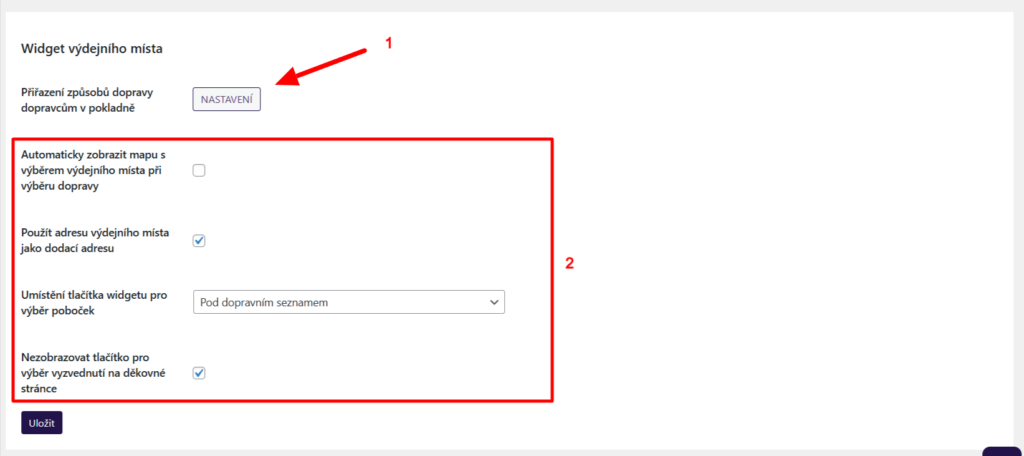
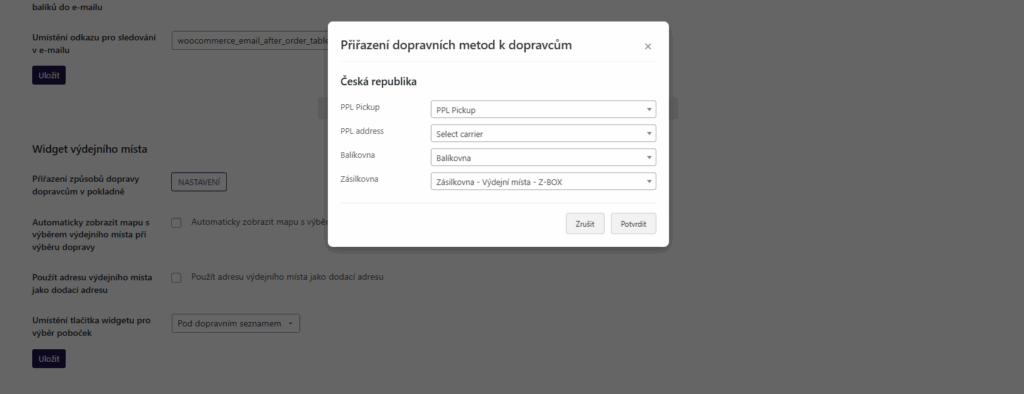
1. First, it is necessary to pair your shipping methods with carriers from the menu.
2. Subsequently, you can set the widget behavior – automatic opening, using the branch address as the delivery address, button placement, and its display on the thank you page.
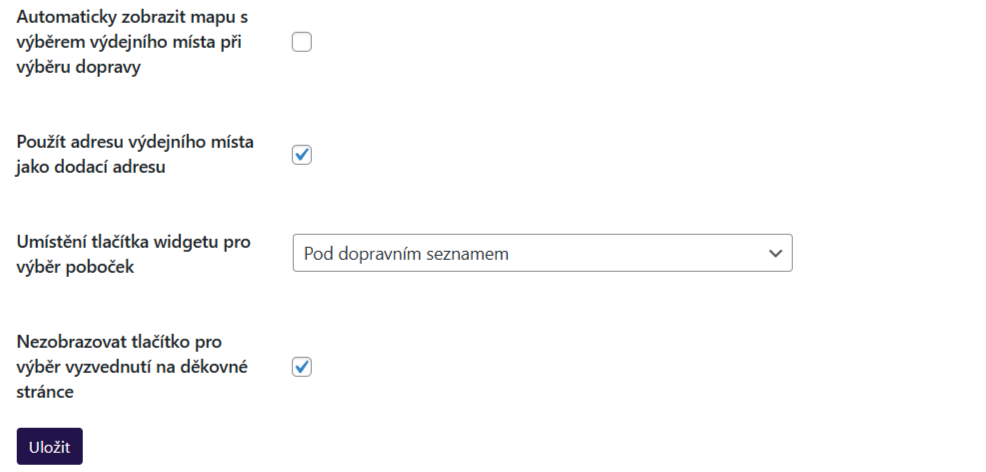
3. Do not forget to save the changes made.
Shipment Submission from Web to Go balík
There are three options for submitting a shipment to the Go balík system in the plugin.
Attention! Do not send the order to the Go balík system unless you are ready to ship the package. By submitting the package, you indicate to Go balík that you have the package ready for courier pickup.
Manual Submission
1) Manually via a button in the order overview or in the order detail

Clicking the button opens a dialog box allowing you to complete or change shipment attributes.
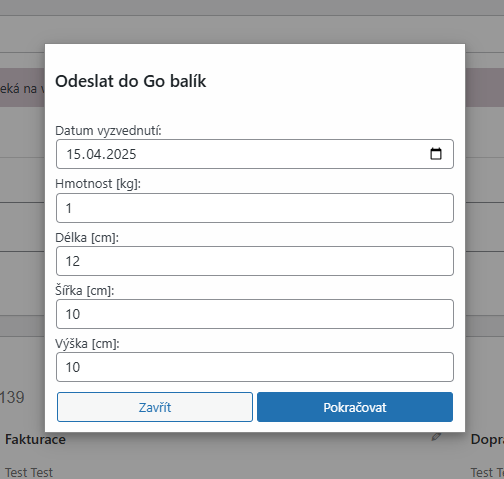
Displaying this dialog box can be disabled in the Hlavní nastavení (Main Settings) of the plugin, in the Dialogy (Dialogs) section. In this case, however, you must have attributes preset.
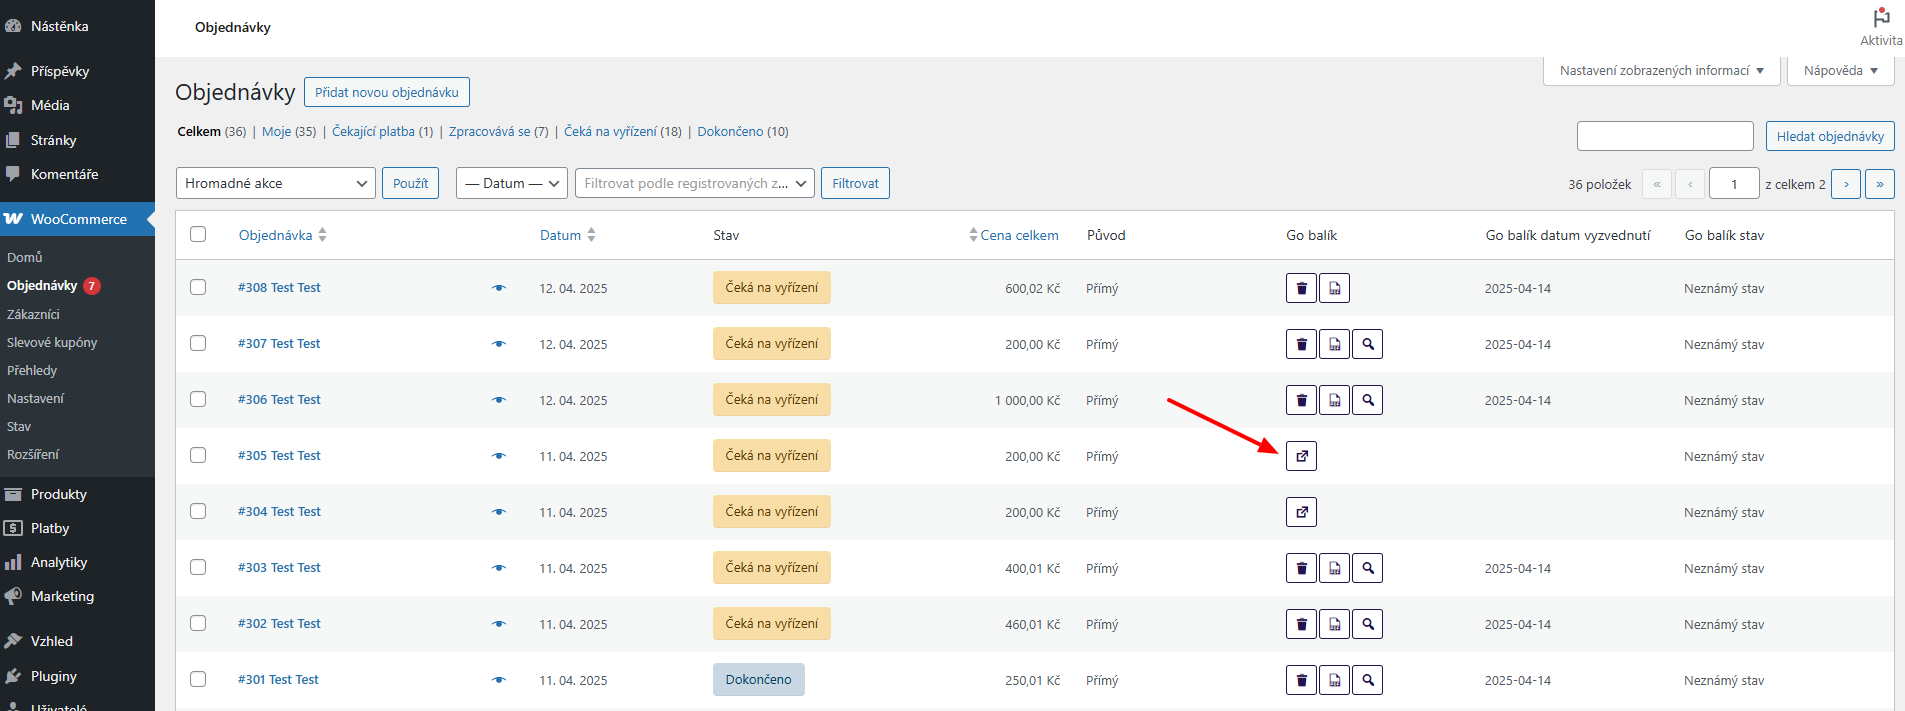
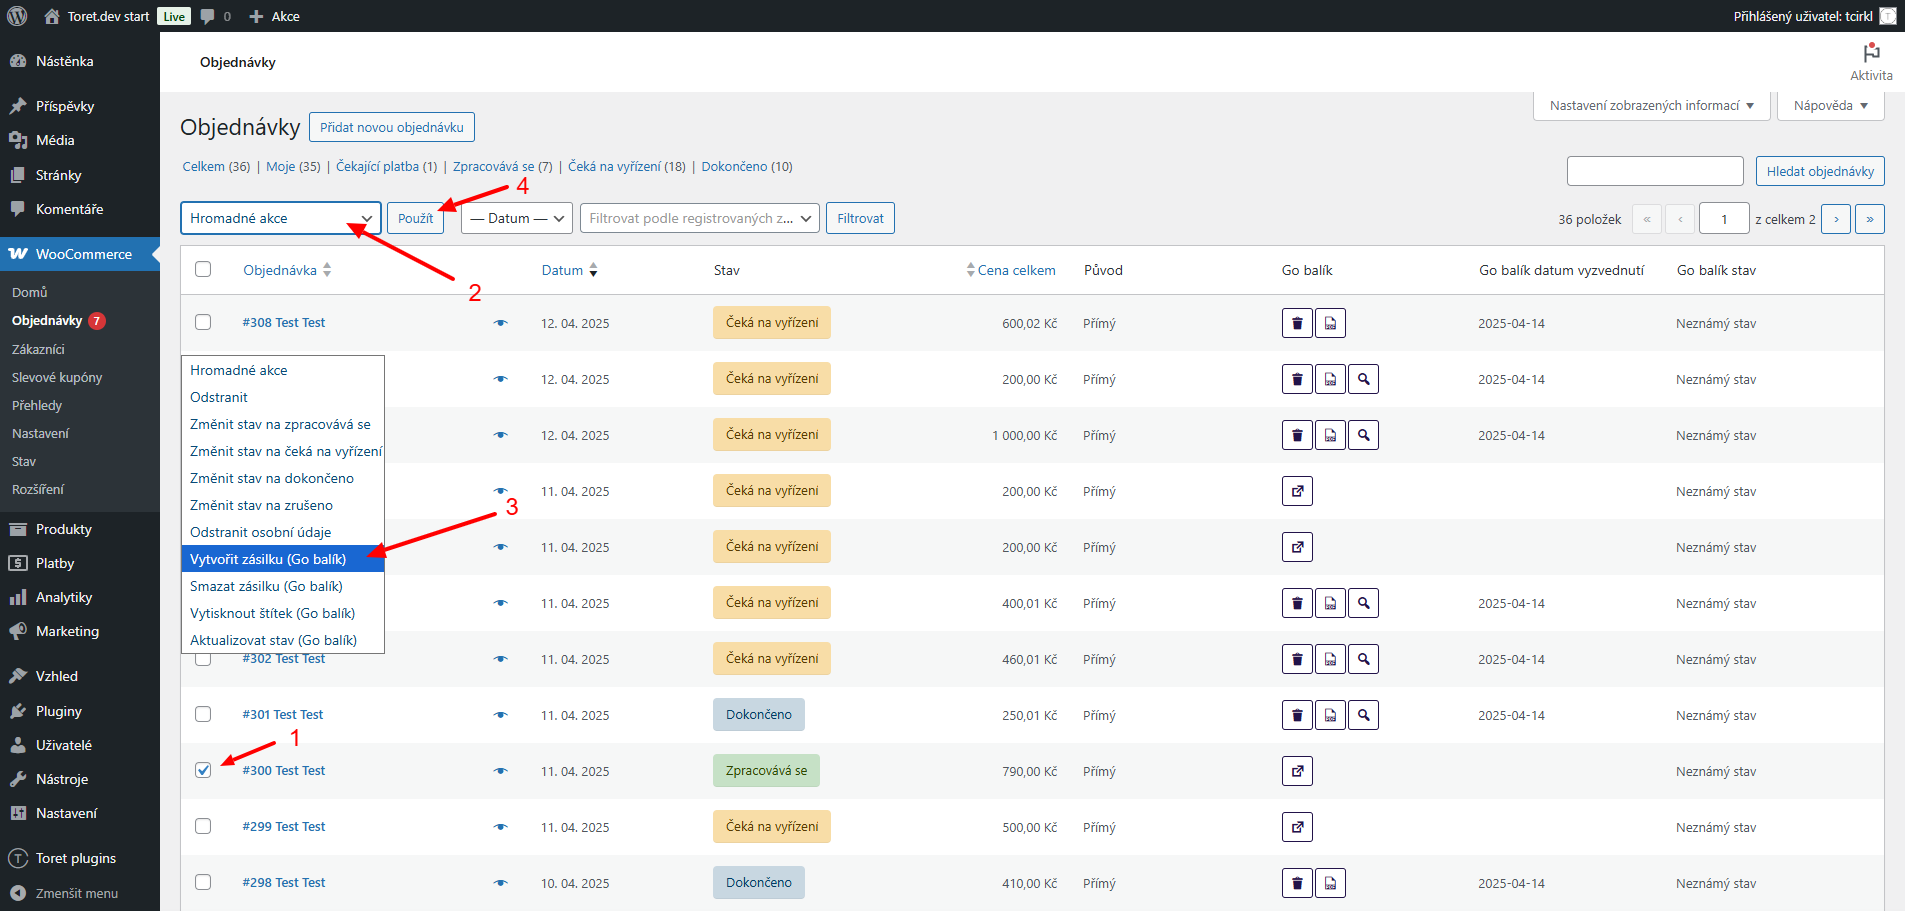
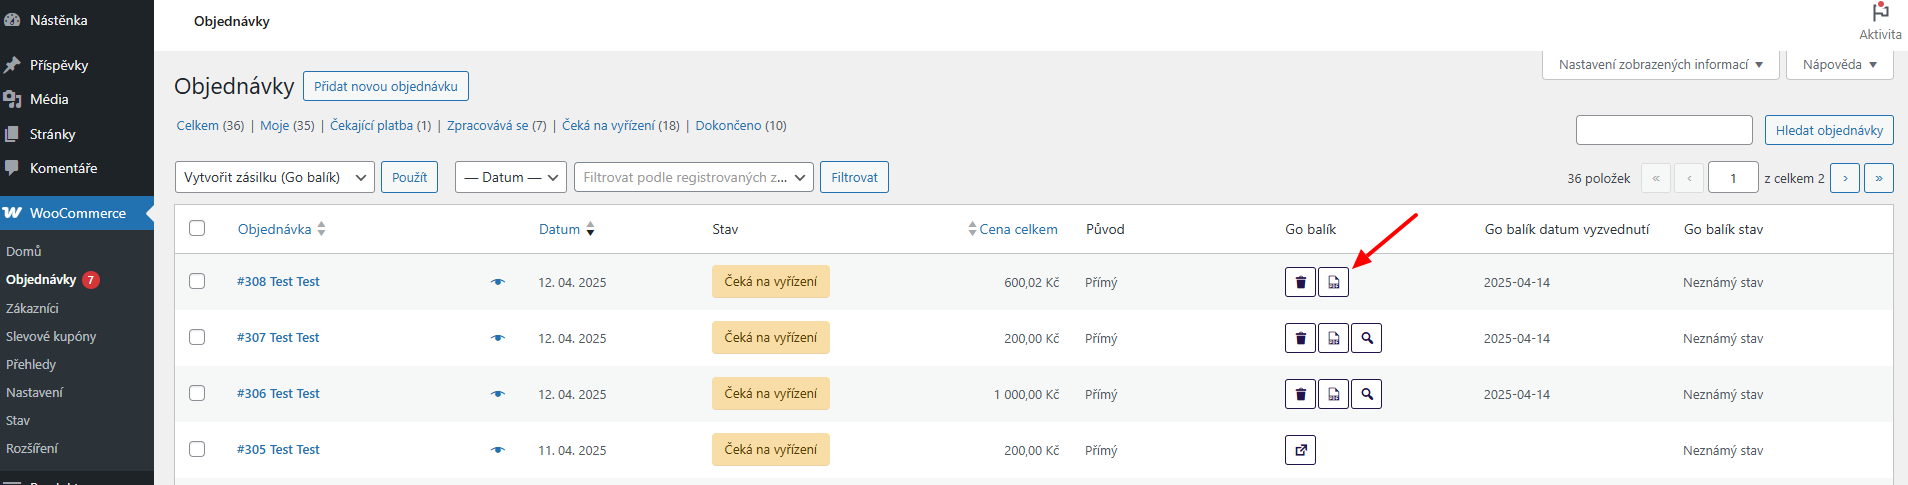
2) Manually via bulk actions in the order overview.
For bulk submission, you must select orders and use the bulk action “Vytvořit zásilku (Go balík)” (Create shipment (Go balík)).
When submitting via bulk actions, the window with shipment attributes does not open. Therefore, it is necessary to have attributes preset in the Hlavní nastavení (Main Settings) of the plugin.
Automatic Shipment Submission
In the plugin, it is possible to set automatic sending of data to Go balík upon order status change.
Settings for automatic shipment submission are under the tab “Automatické odesílání” (Automatic Sending) (Toret plugins > Go balík > Automatické odesílání).
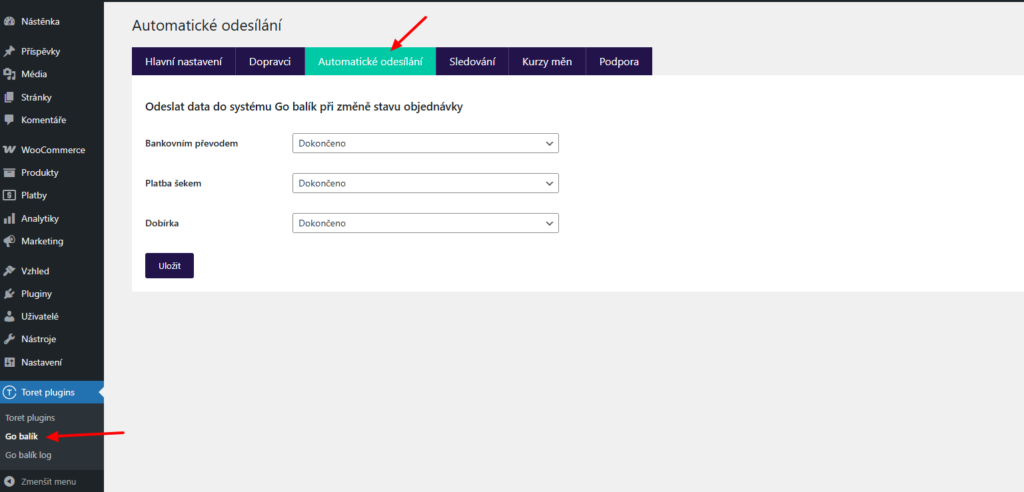
You simply assign order statuses for individual payment methods at which data will be sent to Go balík. After making changes, do not forget to click Uložit (Save).
Note: The plugin requires shipment weight for submission. If your products do not have weight set, automatic submission will not work. In such a case, you will see an exclamation mark icon in the order overview for orders containing products without defined weight. If such a state has occurred on the web, it is necessary to add weight to products. The plugin will take the weight from the order, and the exclamation mark for addition will not appear for new orders.
Printing Labels
Labels of submitted packages can be downloaded directly in the website administration.
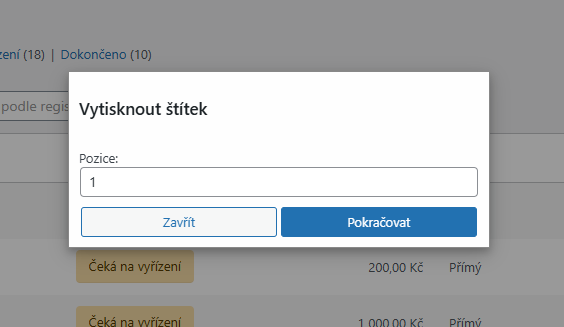
In the order overview for an order already submitted to the Go balík system, click on the PDF document icon (see image) for the selected order. In the subsequent dialog box, you can select the label position for printing. After clicking Continue, the label is saved in PDF format, and then you can print it.
For a submitted shipment, the label can also be downloaded in the order detail.
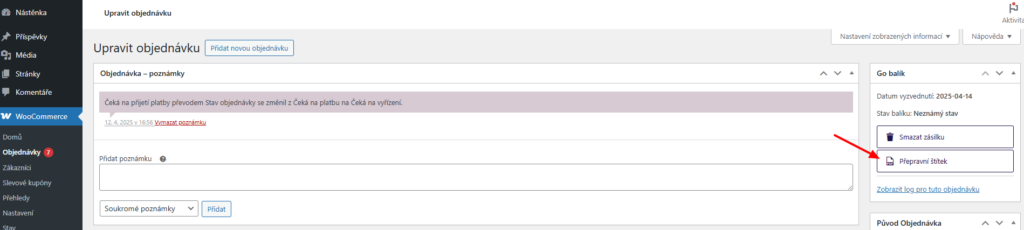
The dialog box for selecting label position can be disabled in the Main Settings of the plugin.
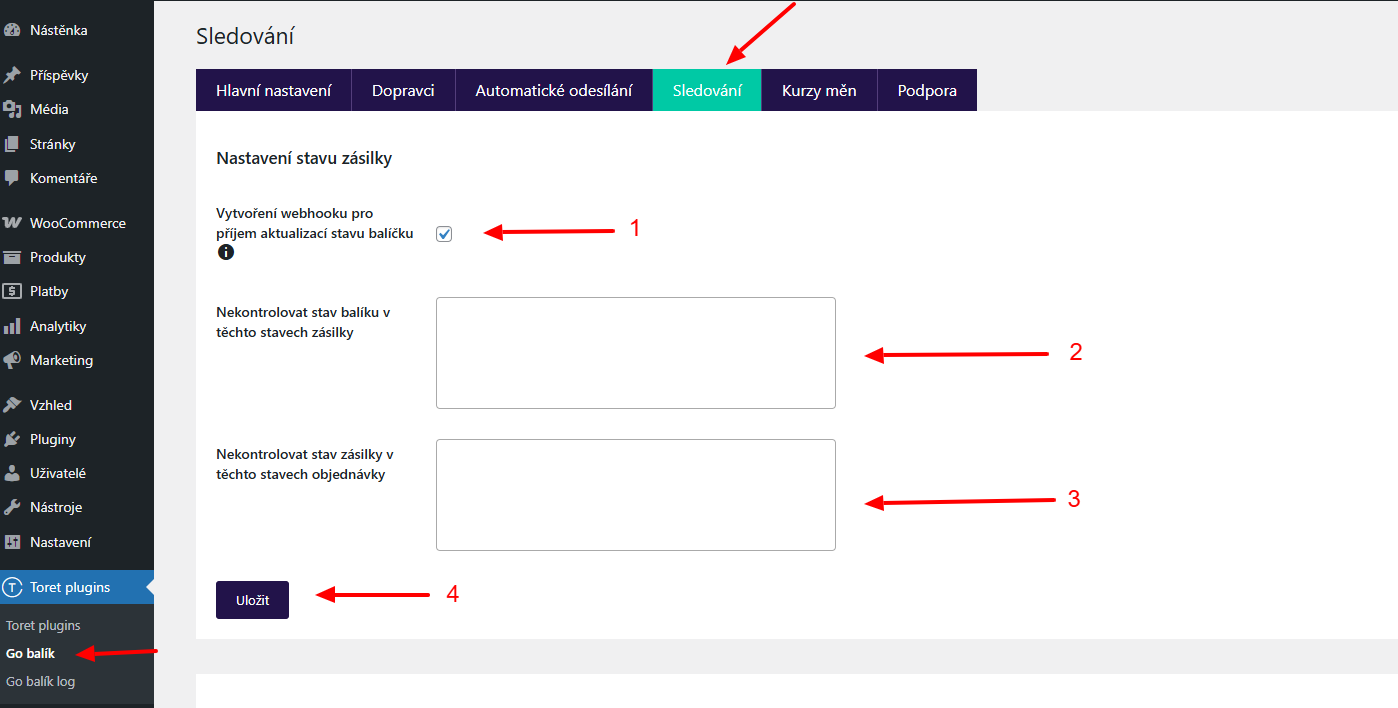
Shipment Status Tracking
Automatic Shipment Status Update
The plugin has a function that allows displaying the current shipment status in the order overview in the “Go balík stav” (Go balík status) column.

You set automatic update in the plugin on the Sledování (Tracking) tab (Toret plugins > Go balík > Sledování).
For automatic updates, the function Vytvoření webhooku pro příjem aktualizací stavu balíčku (Create webhook for receiving package status updates) (1) must be active. In other fields, you can set shipment statuses in transit (2) and order statuses (3) in which the check will not take place. Clicking on an empty field displays values.
Do not forget to save the changes made.
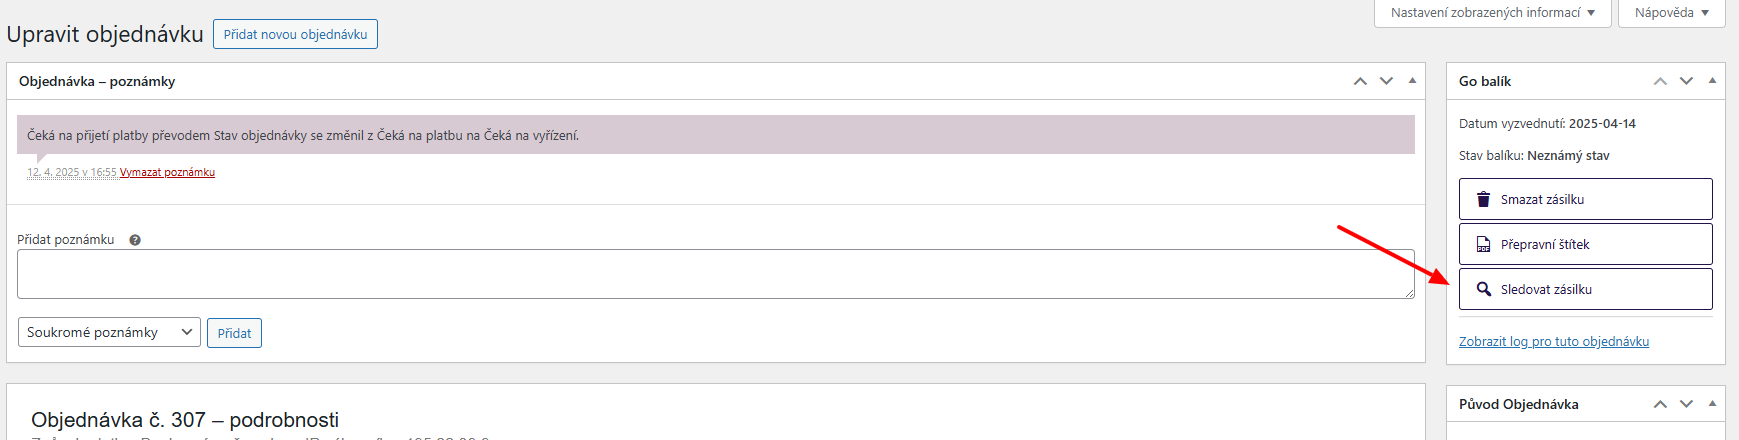
Tracking Shipments in Carrier System
Once the shipment is created, a tracking link is created for it, under which you will find information about the submitted shipment directly in the system of individual carriers (e.g. Zásilkovna, PPL, etc.).
The shipment tracking link is listed in the order overview in the Go balík column under the magnifying glass icon. The same button is also in the order detail.

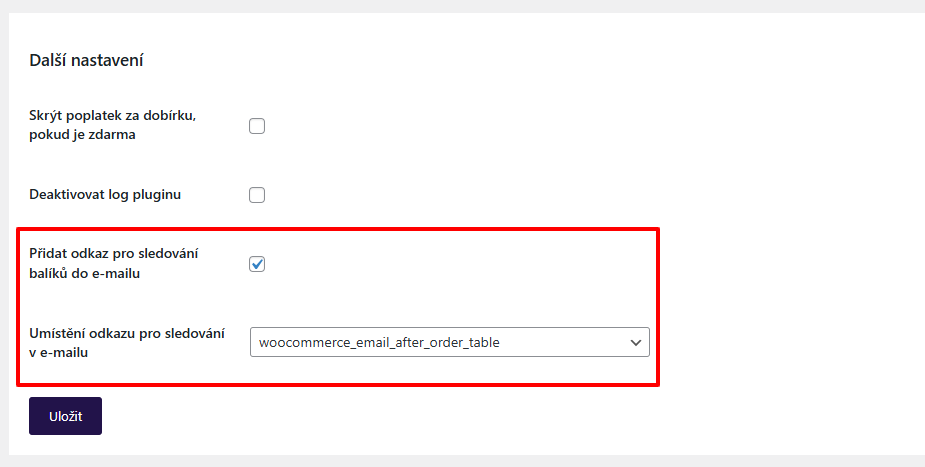
Tracking Link in Customer Email
The “Sledovat stav zásilky” (Track shipment status) link can be added to the customer’s email they receive when the order status changes. The condition is that the shipment must already be created when the order status changes.
Adding a link to the customer email can be enabled/disabled in the main plugin settings (Toret Plugins > Go balík > Hlavní nastavení > Další nastavení). Here you can also select the link position in the email using a hook.
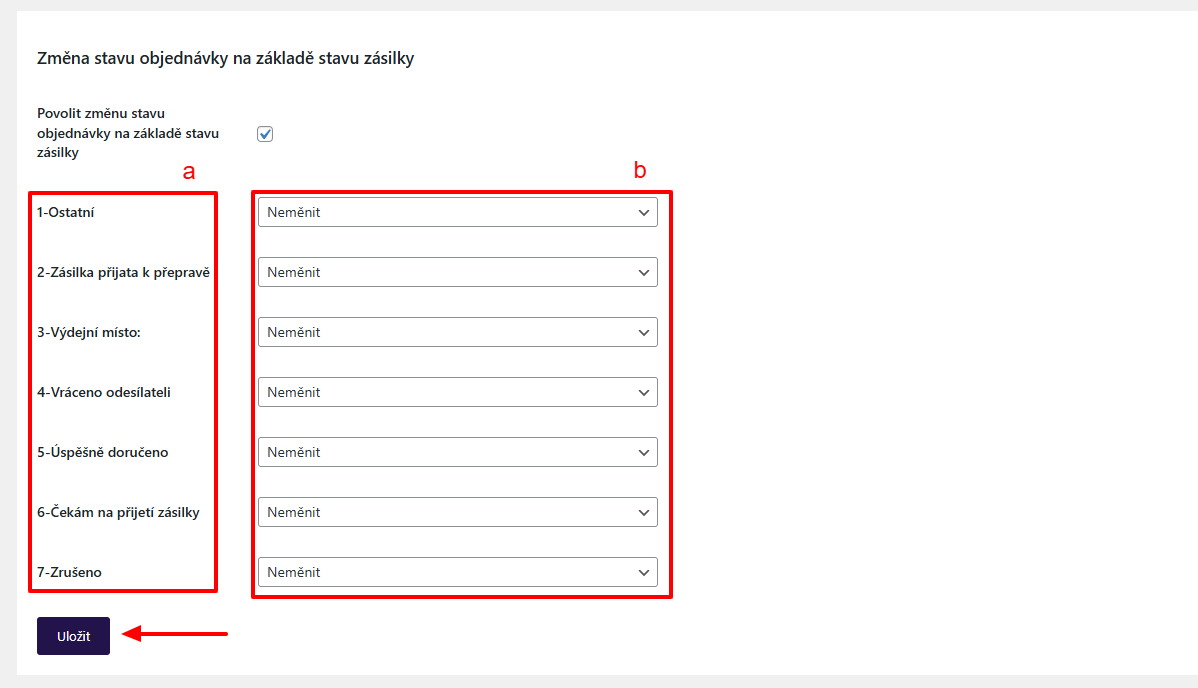
Automatic Order Status Change Based on Shipment Status
To automatically change the order status based on the shipment status in transit, you must first have the automatic shipment status loading set (1, settings see above) on the Sledování (Tracking) tab.
On the same tab, it is also necessary to activate the function Povolit změnu stavu objednávky na základě stavu zásilky (Enable order status change based on shipment status) (2).
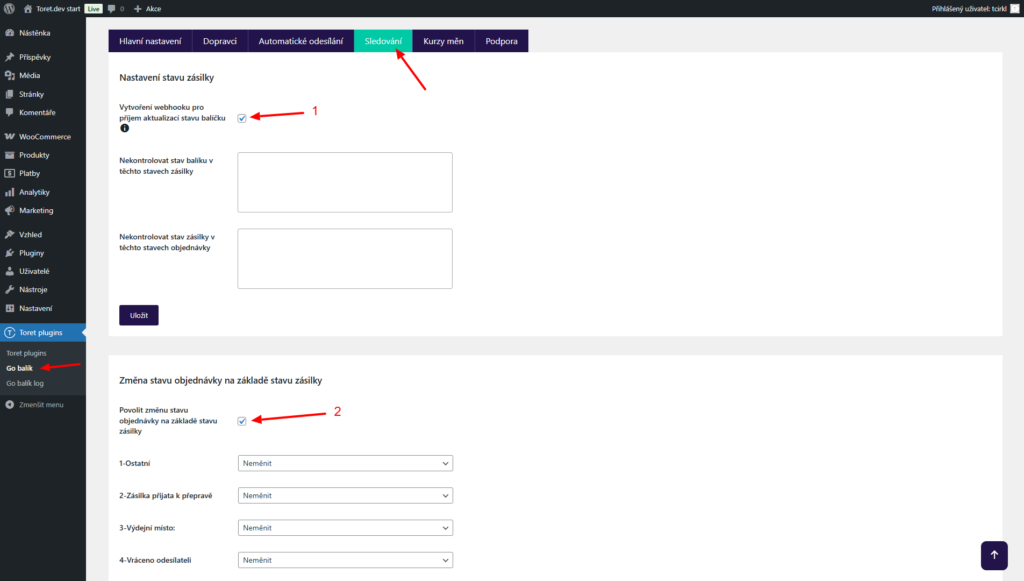
In the last step, you need to pair shipment statuses (a) with order statuses (b) to which the order should switch. Do not forget to save the changes made.
Free Shipping
You set free shipping directly in the Go balík plugin for each carrier (Toret plugins > Go balík > Dopravci > Nastavení)
EXAMPLE: If you want free shipping from 500, set the amount 500 in the plugin.
If you are a VAT payer, it is possible to activate the function “Nastavovat ceny včetně DPH” (Set prices including VAT) on the “Hlavní nastavení” (Main Settings) tab. Then you can set the free shipping value incl. VAT in the plugin. The free shipping amount setting applies only to products; the shipping price is not included.
EXAMPLE: If you have free shipping set from 500, and the cart contains a product for 450 + shipping price 65 = 515 CZK, free shipping will not be activated. It is necessary to meet the set free shipping value condition, i.e., to activate free shipping set this way, you need to put product(s) worth at least 500 CZK into the cart.
Free Shipping Only for Selected Products and Categories
In the plugin, it is possible to set free shipping only for selected products. Settings can be found for each product on the Go balík tab.
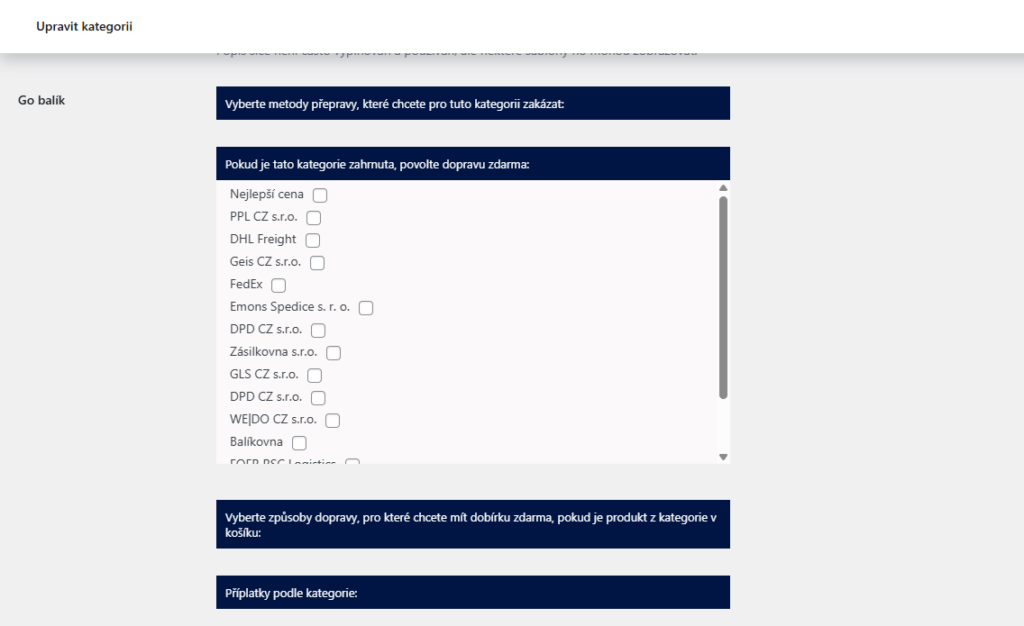
Similarly, free shipping can be set at the product category level.
Cash on Delivery (COD)
For the COD surcharge to appear in the checkout and for the information that the submitted package is COD to be transmitted, it is necessary to enable the COD payment method from WooCommerce (=cod) in WooCommerce settings (WooCommerce > Settings > Payments).
In the plugin, you can set a uniform COD surcharge and a condition for triggering free COD. Or you can scale the COD surcharge according to the total order price. You perform this setting in the carrier settings (Toret plugins > Go balík > Dopravci > Nastavení)
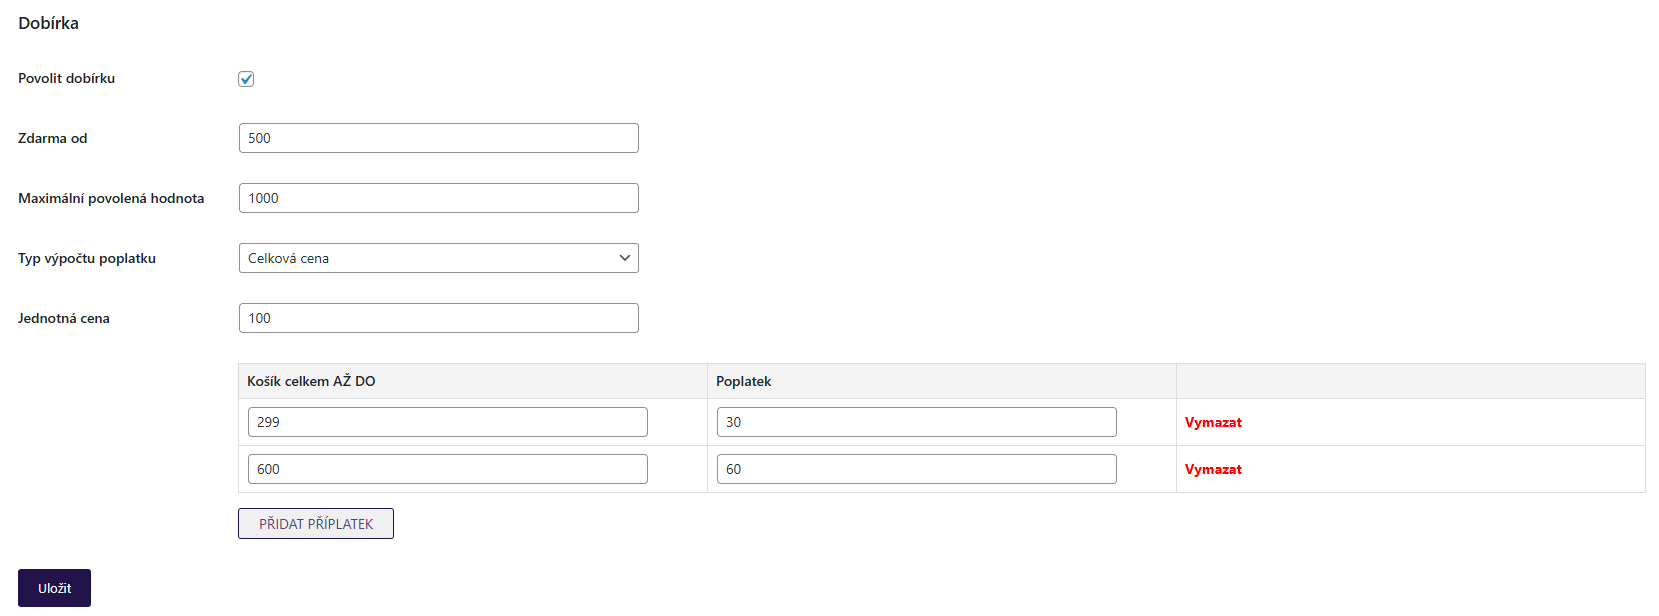
In the Hlavní nastavení (Main Settings) of the plugin, it is also necessary to set the bank account for COD payout. (Toret plugins > Go balík > Hlavní nastavení)
Furthermore, in Main Settings, in the Sazby a daně (Rates and taxes) box, set the COD tax class – you can set a fixed rate or determine it by items in the cart (recommended for CZ). (Toret plugins > Go balík > Hlavní nastavení )
In the main settings, you can further enable hiding the COD fee if it is free (Toret plugins > Go balík > Hlavní nastavení > Další nastavení)
At the product or category level, you can set specific products or product categories for which COD will be free. This setting can be found in the product/category detail.
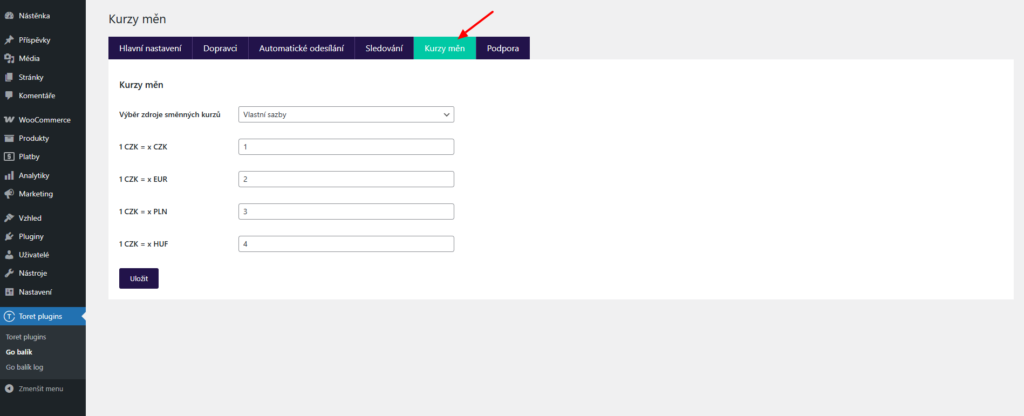
Exchange Rate Settings
If it was necessary to recalculate the shipment value to another currency, it is possible to select the exchange rate source or set your own rate.
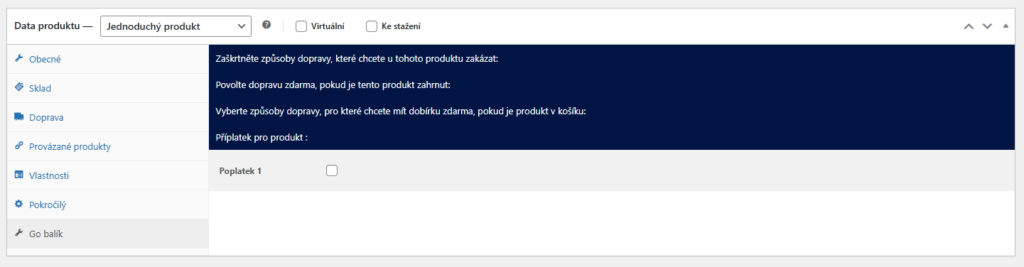
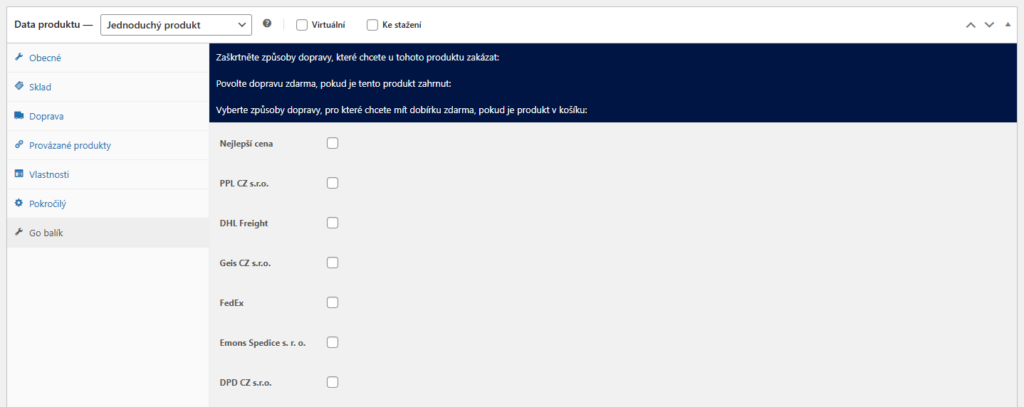
Settings at Product, Variant, or Category Level
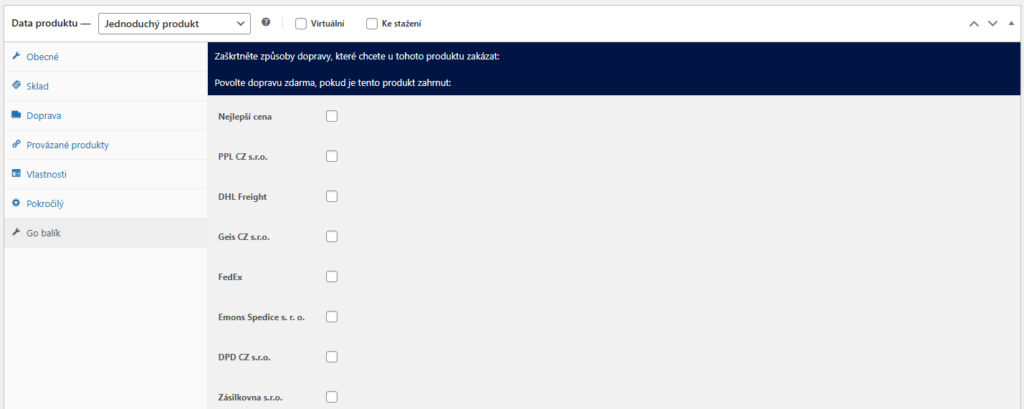
Shipping settings in the plugin are global for all products in WooCommerce. The plugin includes the option to set selected functions for separate products/variants.
In the product settings on the “Toret Go balík” tab, there are individual dropdowns with functions. It is possible for a specific product to:
- set free shipping
- disable selected shipping
- set free COD
- activate created fees
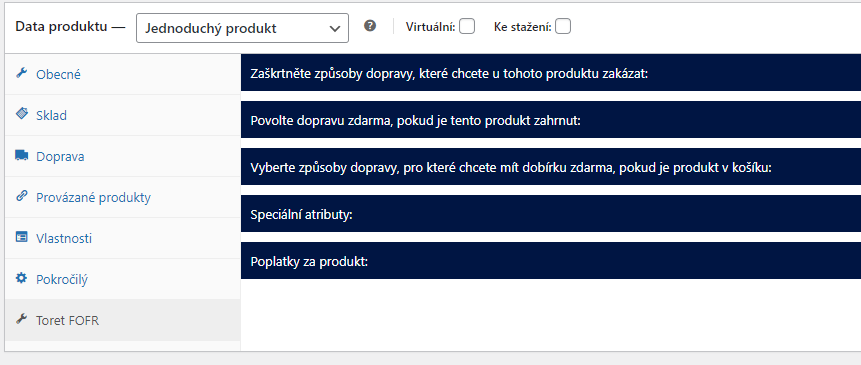
The same shipping setting is possible for each variant or category.
Testování pluginu
Pro účely testování můžete využít:
- subdoménu “dev.doménalicence” (se stejnou licencí jako pro produkční web)
- localhost (127.0.0.1)
Na těchto umístěních budou zakoupené pluginy fungovat také a můžete zde otestovat implementaci a kompatibilitu před ostrým nasazením na web i v průběhu jeho užívání.