
You are viewing the documentation for the WooCommerce plugin Toret PPL, version 4.0.0 and newer.
⚠️ Using an older version of the plugin? The documentation for versions below 4.0.0 is on the Toret PPL Documentation for versions up to 3.13.9.
To use the PPL plugin, you need an account with PPL. You also need to request access to the CPL API from PPL. In your request, state that you will be using the integrator solution of:
Toret plugins s.r.o.
IntegrID: 4257736.
You can purchase the PPL plugin here: Toret PPL for WooCommerce
- Minimum Requirements
- Plugin Installation
- License Activation
- Connecting to PPL (CPL API)
- Sender Addresses
- PPL Shipping Methods
- Shipping Methods and Prices
- Pickup Points and the PPL 2.0 Widget
- Checkout and Emails
- Return Shipment
- Custom Fees
- Product, Variation and Category Settings
- Automation
- Labels and Shipment Data
- Sending Shipments to PPL
- Printing Labels
- Booking a Pickup
- Shipment Status Tracking
- Customs Data and Documents (ICS2)
- Queue and Server Cron
- PPL Log
- PPL Code Lists
- Upgrading from Version 3.x to Version 4
- Uninstalling and Deleting Data
- FAQ and Troubleshooting
- The pickup point map doesn't load at checkout
- A PPL method isn't offered at checkout
- A shipment stays “queued” or “waiting for PPL” for a long time
- A shipment ended with an error
- PPL reports an invalid product
- Only one label is printed on an A4 sheet
- Cancelling a pickup fails
- A shipment to a non-EU country isn't created
- Return Connect shipments can't be sent
- I want a custom VAT rate for cash on delivery
- After activation, I can't see most of the settings
- Plugin testing
Minimum Requirements
- WordPress 7.1 or higher
- WooCommerce 11.0 or higher
- PHP 8.1 or higher
- MySQL 5.7 or higher
- A PPL account and issued CPL API credentials (Client ID and Client secret)
Plugin Installation
After purchasing the plugin, you will receive an email with your license key and a link to download the plugin as a ZIP file. Install the plugin the standard way:
- In the WordPress admin, go to Plugins → Add New Plugin → Upload Plugin (Pluginy → Instalace pluginů → Nahrát plugin).
- Select the downloaded ZIP file and click Install Now (Instalovat).
- Once installed, activate the plugin.
Alternatively, you can upload the contents of the ZIP file via FTP to the wp-content/plugins/ folder and activate the plugin in the plugin list.
As long as your license is active, plugin updates are delivered automatically directly in the WordPress admin. The plugin is translated into Czech, Slovak and Polish.
License Activation
Open the plugin settings via the Toret plugins → PPL menu. On the first tab, PPL Connection (Připojení k PPL), enter the key you received by email (or which you can find in My Account on toret.cz) in the License Key (Licenční klíč) field and click Save (Uložit).
The license is verified on the license server and tied to your website’s address. The plugin then re-checks it every 12 hours.
Until the license is active, only the PPL Connection (Připojení k PPL) and Help (Nápověda) tabs are shown in the settings. The checkout keeps working (shipping methods, pickup points, fees, emails), but sending shipments, labels, pickups, the queue, the PPL log and plugin updates are all disabled.
The message next to the license key field tells you what’s wrong:
- License is active. (Licence je aktivní.) – everything is fine.
- Invalid license key. (Neplatný licenční klíč.) – the key doesn’t match; check it in My Account on toret.cz.
- License key is already used on another website. (Licenční klíč je už použitý na jiném webu.) – the key is activated elsewhere. If you want to transfer it, you need to reset it in your Toret account.
- This license key does not belong to any order. (Tento licenční klíč nepatří k žádné objednávce.) – the key isn’t in the system; contact support.
- The license server did not respond. (Licenční server neodpověděl.) – a temporary connection issue; save the settings again in a moment.
Connecting to PPL (CPL API)
From version 4, the plugin works exclusively with the PPL CPL API. You can get your credentials from PPL in the customer portal or from your account manager. In your request, state that you use the integrator solution of Toret plugins s.r.o., IntegrID: 4257736.
On the PPL Connection (Připojení k PPL) tab, fill in:
- Client ID – the identifier issued by PPL.
- Client secret – the API password. For security reasons, a saved secret is not displayed; if you’re not changing it, leave the field empty.
- Environment (Prostředí) – Production (Produkce) for live operation. Test (api-dev.dhl.com) and Sandbox (x-api-sandbox.dhl.com) are PPL test environments; shipments created there are not delivered and require separate test credentials.
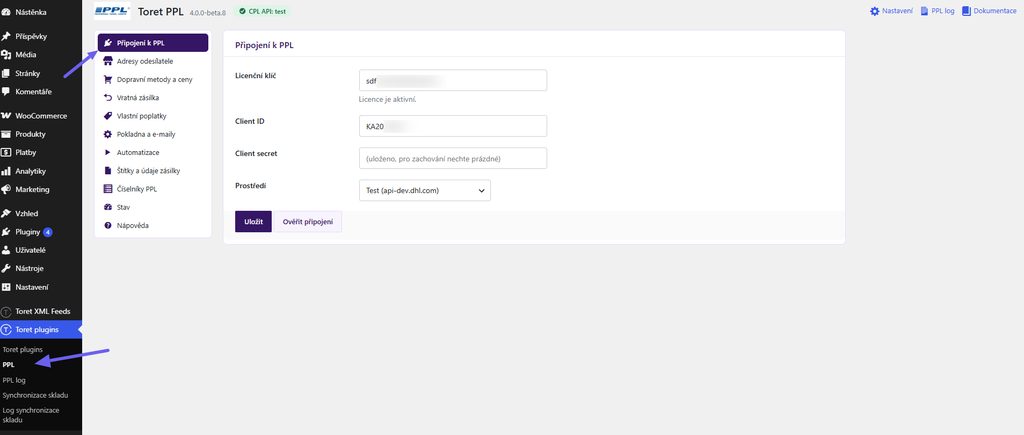
After saving, click Verify Connection (Ověřit připojení). The plugin logs in to PPL, downloads the code lists and displays:
- a list of products enabled for your account – based on your contract with PPL,
- several pickup points near your sender address, confirming that the code lists work as well.
The settings header always shows a CPL API badge with the name of the selected environment. Green means the credentials are filled in – to confirm the connection actually works, use the Verify Connection (Ověřit připojení) button.
Sender Addresses
On the Sender Addresses (Adresy odesílatele) tab, fill in at least one address. It is printed on labels as the sender, and it’s where the driver comes for pickups.
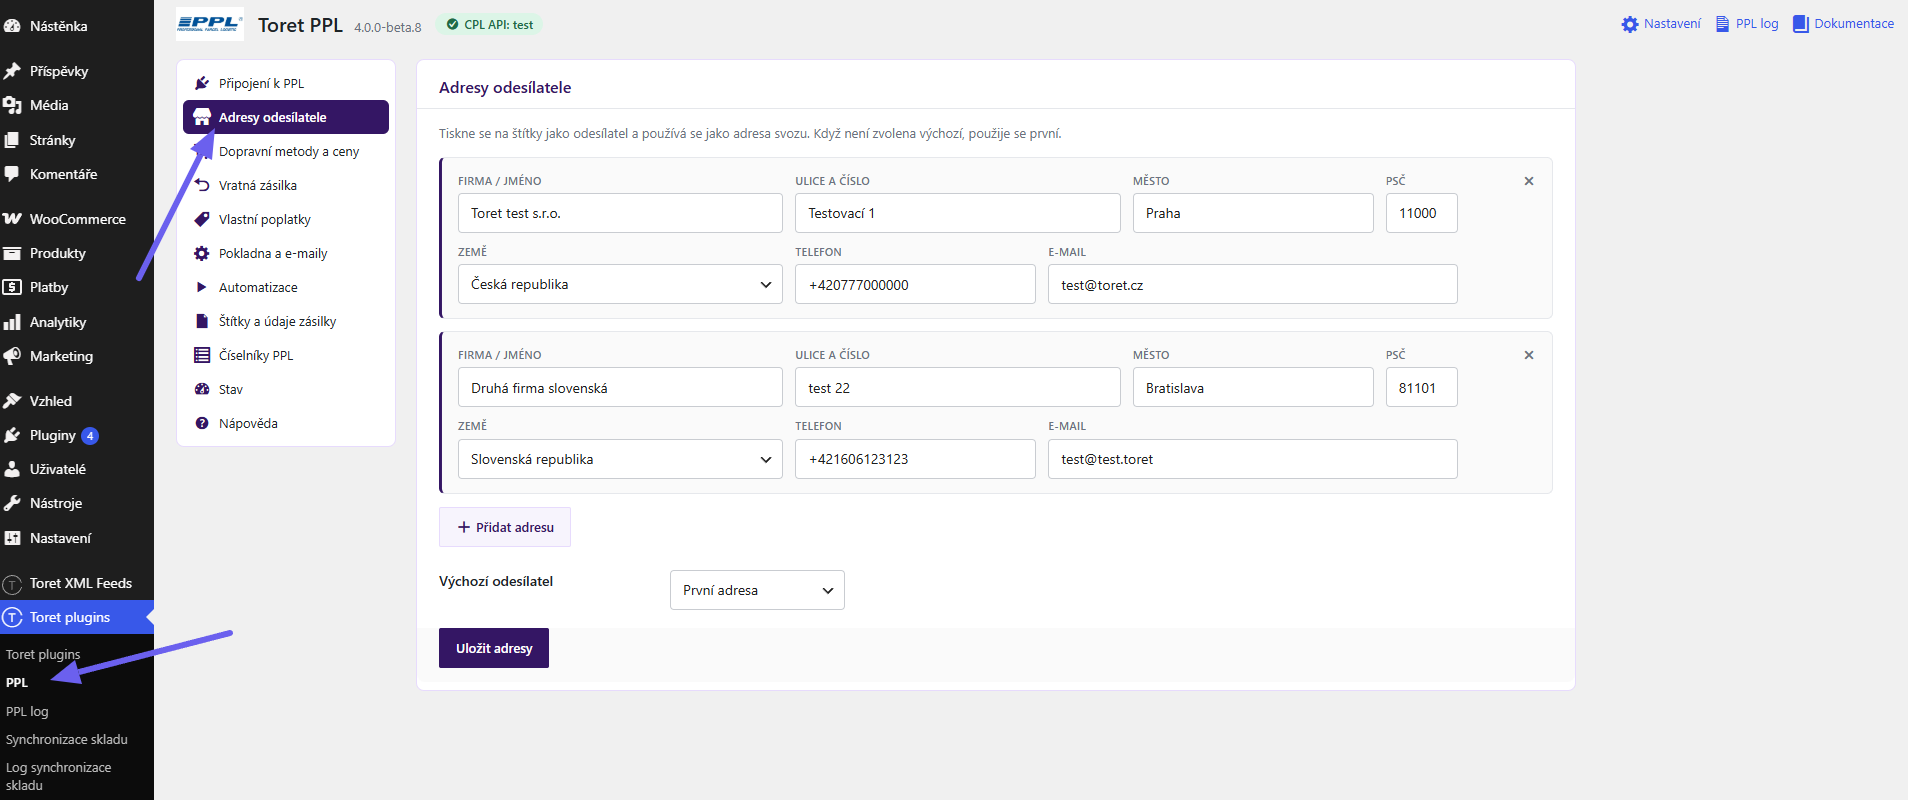
- You can have multiple addresses, e.g. for multiple warehouses. Add more with the Add Address (Přidat adresu) button and remove them with the cross on the right.
- Enter the Phone (Telefon) with the international dialling code.
- Email (E-mail) is required – PPL sends pickup confirmations to it.
- Default Sender (Výchozí odesílatel) determines which address is used. If none is selected, the first one in the list is used.
Note on Return Connect methods. Return Connect Import and Return Connect Europe shipments are sent from abroad, so PPL requires a sender outside the Czech Republic. Add a sender address abroad – the plugin uses it automatically for these methods. Without it, sending fails with an error about an unsupported country and product combination.
PPL Shipping Methods
The plugin adds nine shipping methods to WooCommerce:
| Method | Description | Countries |
|---|---|---|
| PPL Private home delivery (PPL Private doručení na adresu) | Home delivery to private individuals | Czech Republic and 24 European countries |
| Delivery to a PPL pickup point (Doručení na výdejní místo PPL) | The customer selects a ParcelShop, PPL ParcelBox or AlzaBox on the map | CZ, SK, PL, DE, FR, IT, ES, PT, SI, HR, NL, AT, HU, RO, BG |
| Delivery to a PPL Parcelshop (Doručení na PPL Parcelshop) | Staffed pickup points only (no boxes) | same as pickup point |
| Delivery to a PPL Box (Doručení do PPL Boxu) | ParcelBoxes and AlzaBoxes only | CZ |
| PPL Parcel CZ Smart To Box | Delivery to a PPL Parcel Box | CZ |
| PPL Morning home delivery (PPL Morning doručení na adresu) | Morning delivery by 10 a.m. | CZ |
| PPL Business delivery (PPL Business doručení na adresu) | Delivery to businesses, optionally only when a company name is filled in | Czech Republic and 25 European countries |
| PPL Return Connect Import | From a sender address abroad to the Czech Republic | CZ |
| PPL Return Connect Europe | From a sender address abroad to Slovakia, Poland, Germany or Austria | SK, PL, DE, AT |
Cash on delivery is available with PPL for home and pickup point delivery in the Czech Republic, Slovakia, Poland, Hungary and Romania. For the Morning, Smart To Box, Box and Business methods it is available in the Czech Republic only, and it is not available at all for Return Connect methods.
Adding Methods to Shipping Zones
First, add the methods you want to offer to your WooCommerce shipping zones: go to WooCommerce → Settings → Shipping (WooCommerce → Nastavení → Doprava), open a zone and click Add shipping method (Přidat způsob dopravy).
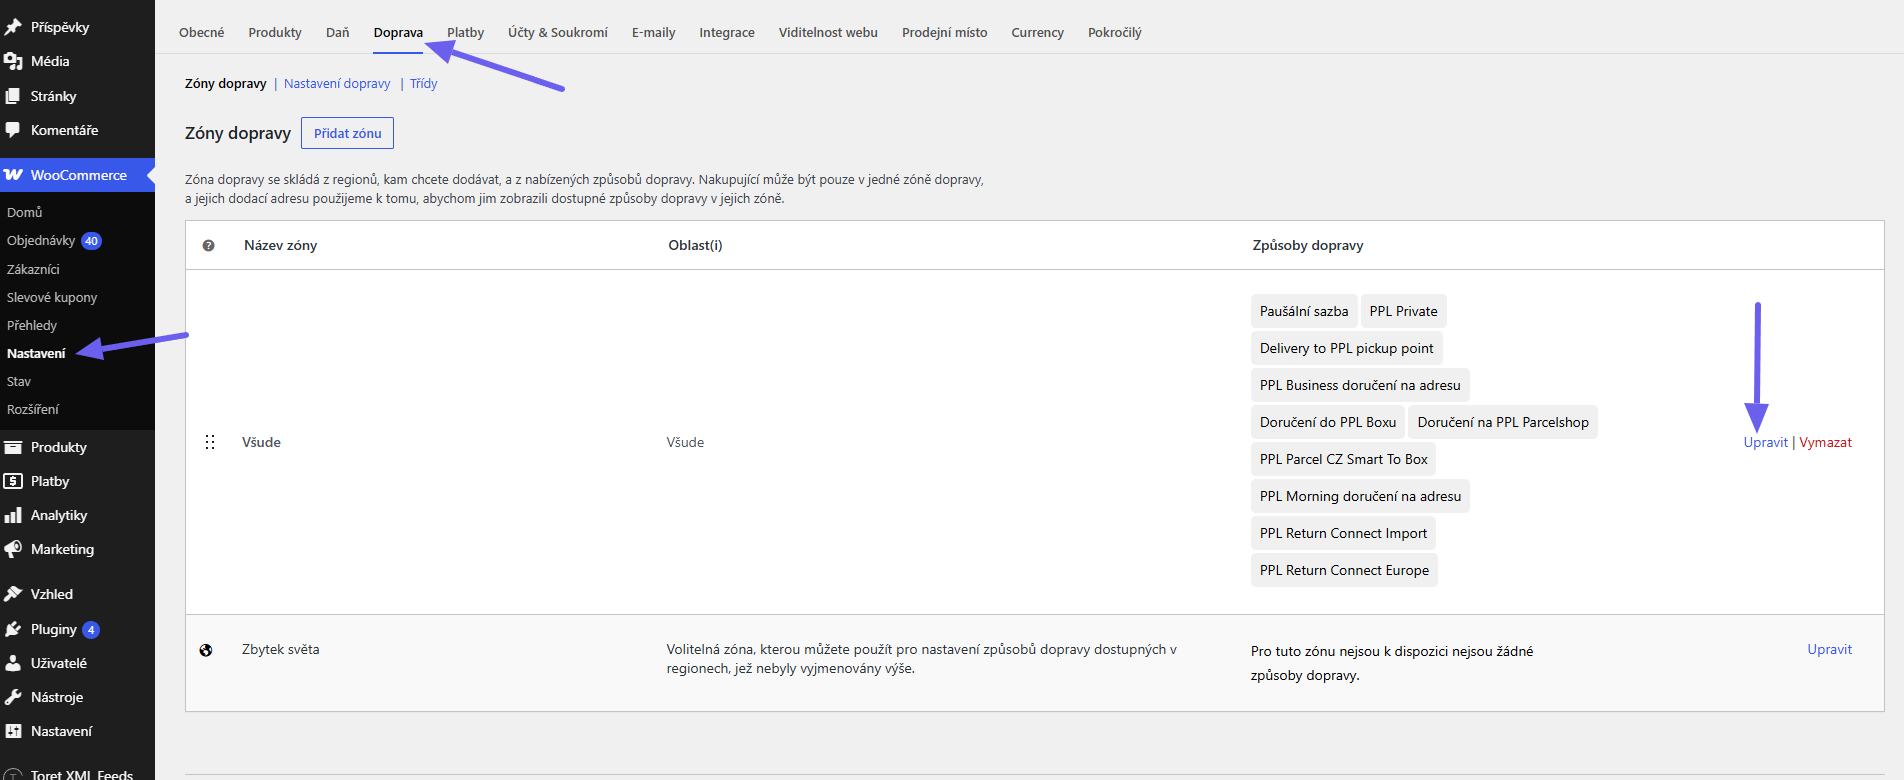
For each method in a zone, you can set:
- Enable (Povolit) – turns the method on in this zone.
- Title (Název) – the text the customer sees at checkout.
- Description (Popis) – additional text shown to the customer.
- Tax status (Daňový status) – taxable or none.
A method is only offered to the customer if it’s in the matching zone, it’s enabled for their country in the plugin settings, and the order meets the weight, dimension and cart limits.
Shipping Methods and Prices
On the Shipping Methods and Prices (Dopravní metody a ceny) tab, you enable specific countries for each method and set prices. The methods are collapsible, and each one shows how many countries are enabled.
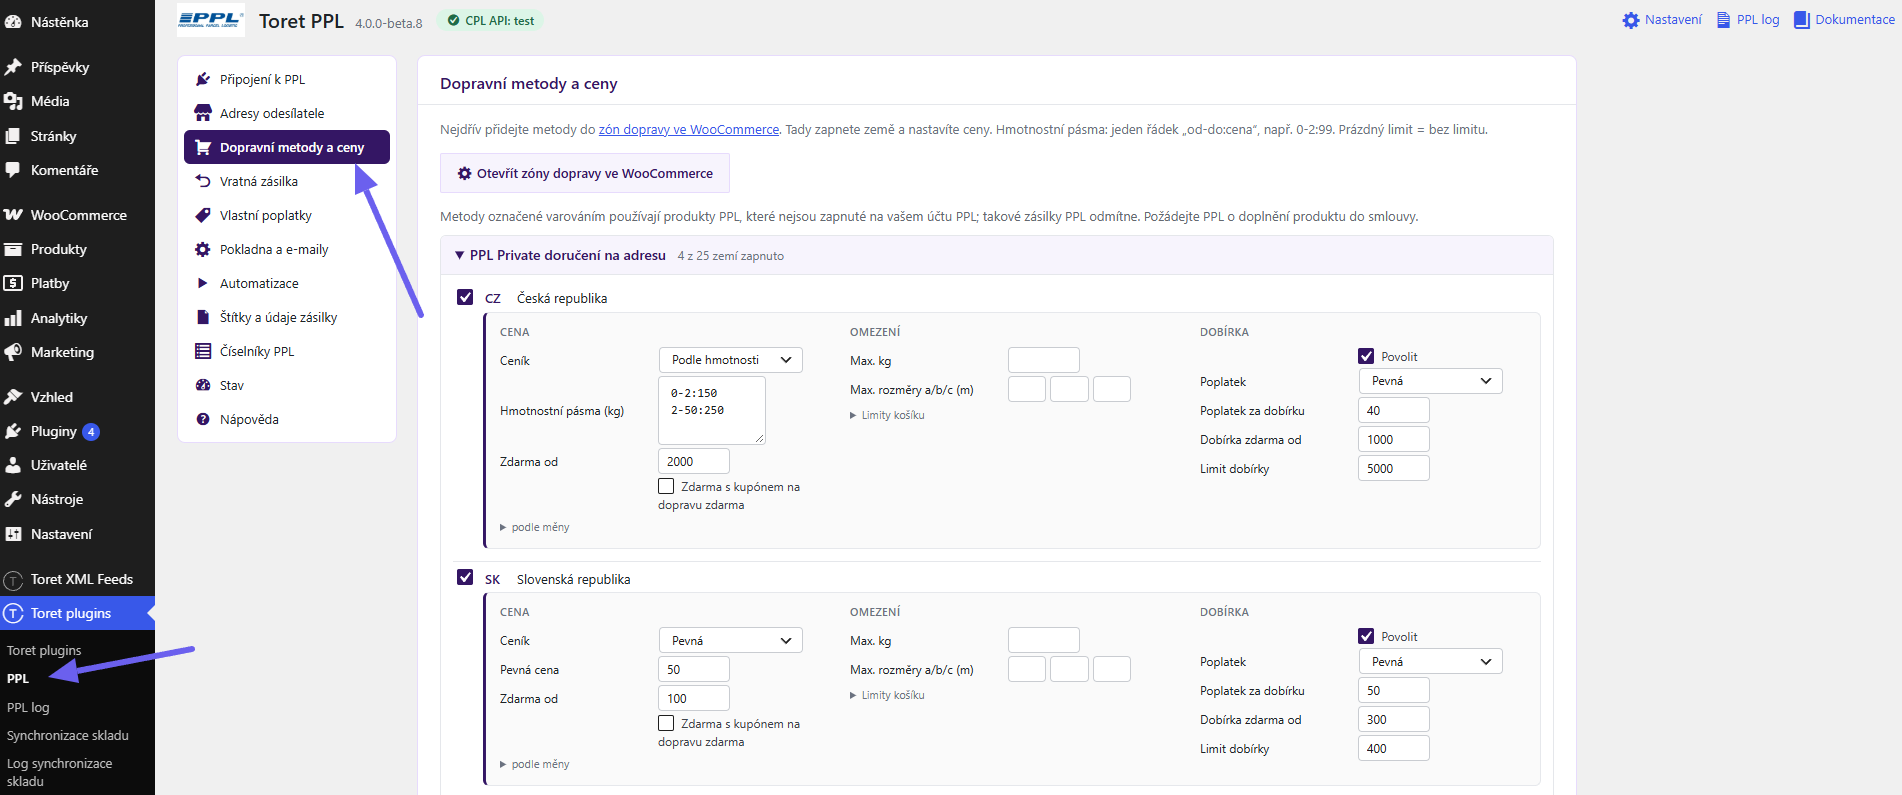
Ticking a country expands its settings in three columns – Price (Cena), Restrictions (Omezení) and Cash on Delivery (Dobírka).
TIP: If a method uses a PPL product that isn’t enabled on your account, the plugin flags it with the warning not enabled on your PPL account (není zapnuto na vašem účtu PPL). PPL will reject such shipments – ask PPL to add the product to your contract.
Price
- Price List (Ceník) – Fixed (Pevná) price or By weight (Podle hmotnosti).
- Fixed Price (Pevná cena) – a single amount regardless of weight.
- Weight Bands (kg) (Hmotnostní pásma (kg)) – each band on its own line in the format
from-to:price, for example:0-2:992-5:1495-10:199
Weight is calculated from the products in the unit set in WooCommerce. - Free From (Zdarma od) – the cart value from which shipping is free. Empty field = never.
- Free with a free shipping coupon (Zdarma s kupónem na dopravu zdarma) – applies only if Free for selected methods only (Zdarma jen vybrané metody) is selected for coupons in the Checkout and Emails (Pokladna a e-maily) section.
- By Currency (Podle měny) – a collapsible section with a fixed price in CZK, EUR, PLN and HUF. Useful if you use a currency switcher (WOOCS, WCML, WPML, Aelia). A price entered in a currency takes priority over exchange rate conversion, even with weight-based pricing.
TIP: Whether you enter prices with or without VAT is determined by the Prices in settings include VAT (Ceny v nastavení jsou včetně DPH) option on the Checkout and Emails (Pokladna a e-maily) tab.
Restrictions
- Max. kg – the maximum order weight for this method.
- Max. dimensions a/b/c (m) (Max. rozměry a/b/c (m)) – the maximum shipment dimensions.
- Cart Limits (Limity košíku) – minimum and maximum cart value, minimum and maximum number of items, minimum and maximum product price.
An empty field means no limit. Weight and dimension checks switch on automatically as soon as you fill in a limit. If an order doesn’t meet a limit, the method isn’t offered at checkout.
Cash on Delivery
- Enable (Povolit) – enables cash on delivery for the country. For countries where PPL doesn’t offer it, the note no cash on delivery (bez dobírky) is shown instead of the settings.
- Fee (Poplatek) – a Fixed (Pevná) amount or By order value (Podle hodnoty objednávky).
- Value Bands (Pásma hodnoty) – when charging by order value, enter bands in the format
from-to:fee, for example:0-1000:391000-3000:19 - Free COD From (Dobírka zdarma od) – the cart value from which no fee is charged.
- COD Limit (Limit dobírky) – the maximum cash on delivery amount; above it, cash on delivery isn’t offered.
The plugin sends the cash on delivery amount to PPL in the currency PPL expects for the given country: CZK for the Czech Republic, PLN for Poland, HUF for Hungary and EUR for all other countries. If the exchange rate for the conversion is missing, the shipment isn’t created and an entry is written to the log.
Pickup Points and the PPL 2.0 Widget
Version 4 works exclusively with the PPL 2.0 pickup point widget. The older 1.0 widget is no longer supported. Without an API key, the map won’t load at checkout and the customer can’t select a pickup point.
Generating an API Key for the PPL 2.0 Widget
- Open klient.ppl.cz/widgetadmin.
- Fill in the details you are registered with at PPL – Company ID (IČO), PPL ID and registration email – and click Generate API Key (Vygenerovat API klíč).
- You will receive your credentials and an activation link by email. You must complete the setup within 60 minutes.
- In the activation form, enter your store’s domain (e.g.
myeshop.com), choose Custom Settings (Vlastní nastavení) as the product type, select the pickup point types and available countries, set the default language, choose Modal as the display type and click Activate (Aktivovat). - Paste the generated key into the PPL Widget API Key (API klíč widgetu PPL) field on the Checkout and Emails (Pokladna a e-maily) tab in the plugin settings and save. After saving, the plugin verifies the key with PPL. It checks both that the key is valid and that your store’s domain is allowed. You will see the result right below the PPL Widget API Key field and on the Status (Stav) tab.
Your store’s domain must be allowed in the PPL admin. If the map doesn’t load at checkout, this is the most common cause.

Checkout and Emails
The Checkout and Emails (Pokladna a e-maily) tab controls how PPL shipping behaves at checkout and what appears in customer emails. The settings work the same in the classic and block-based checkout.
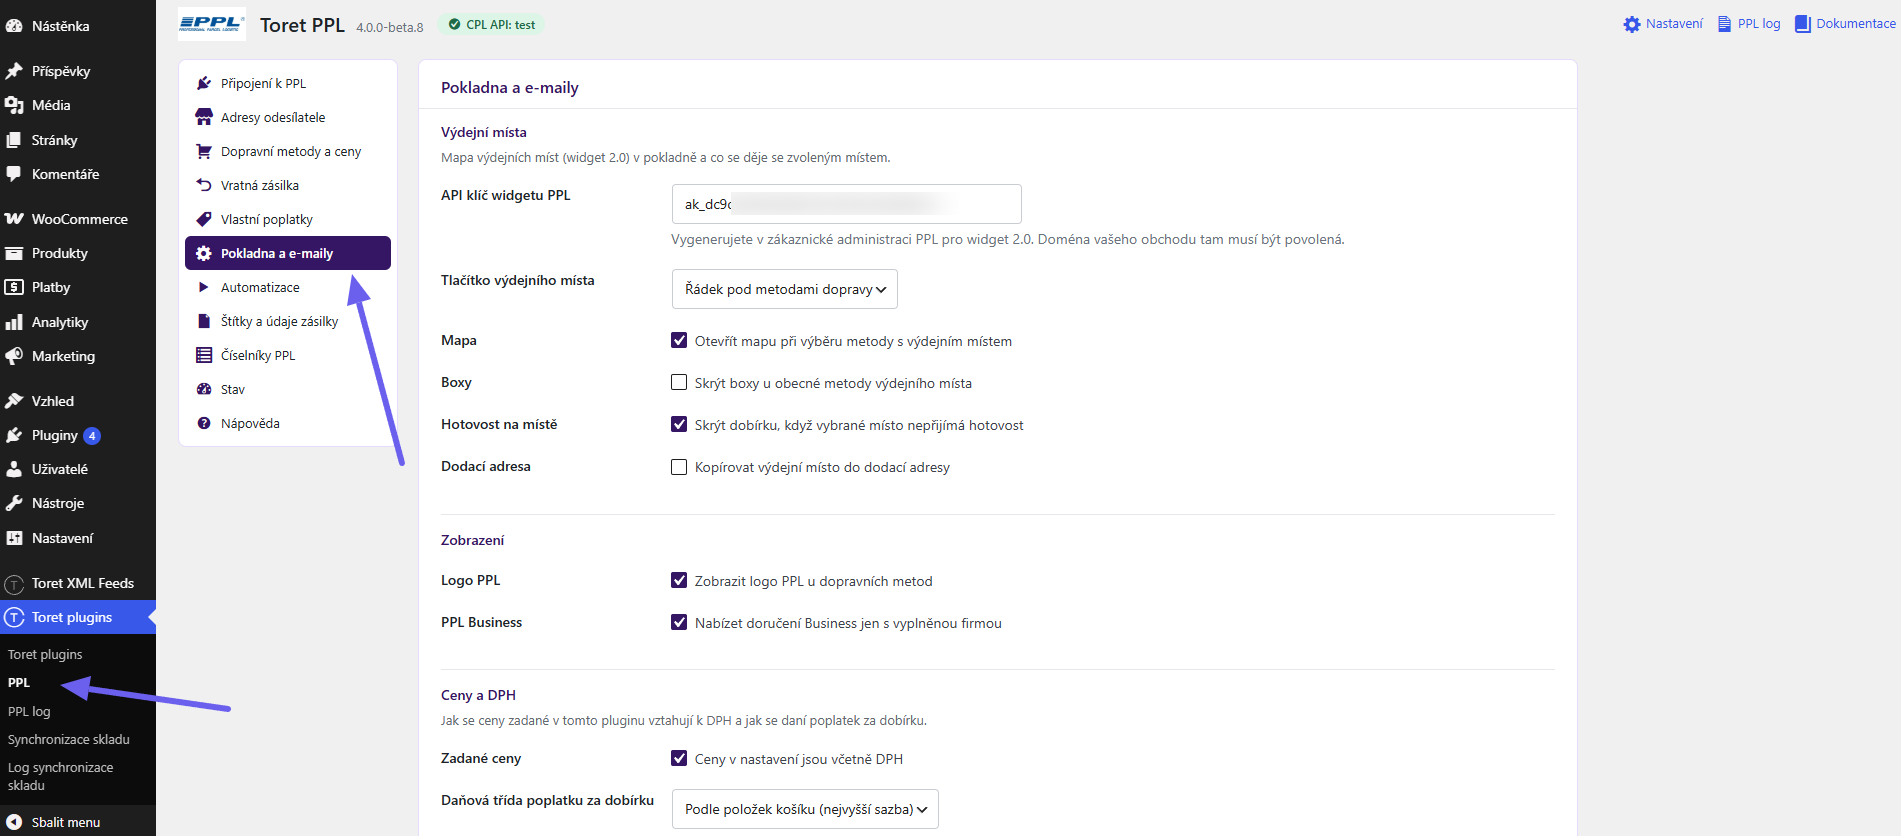
Pickup Points
- PPL Widget API Key (API klíč widgetu PPL) – the key from the PPL admin, see the previous section.
- Pickup Point Button (Tlačítko výdejního místa) – Row below the shipping methods (Řádek pod metodami dopravy) or Directly below the selected method (Přímo pod vybranou metodou).
- Map (Mapa) – open the map automatically when a pickup point method is selected.
- Boxes (Boxy) – hide boxes for the general Pickup Point (Výdejní místo) method, so the customer only sees ParcelShops.
- Cash at Pickup Point (Hotovost na místě) – hide cash on delivery if the selected point doesn’t accept cash. This prevents orders that PPL couldn’t deliver.
- Shipping Address (Dodací adresa) – copy the pickup point to the order’s shipping address. Useful for invoices and reports.
Display
- PPL Logo (Logo PPL) – show the PPL logo next to shipping methods.
- PPL Business – offer Business delivery only when the customer fills in a company name.
Prices and VAT
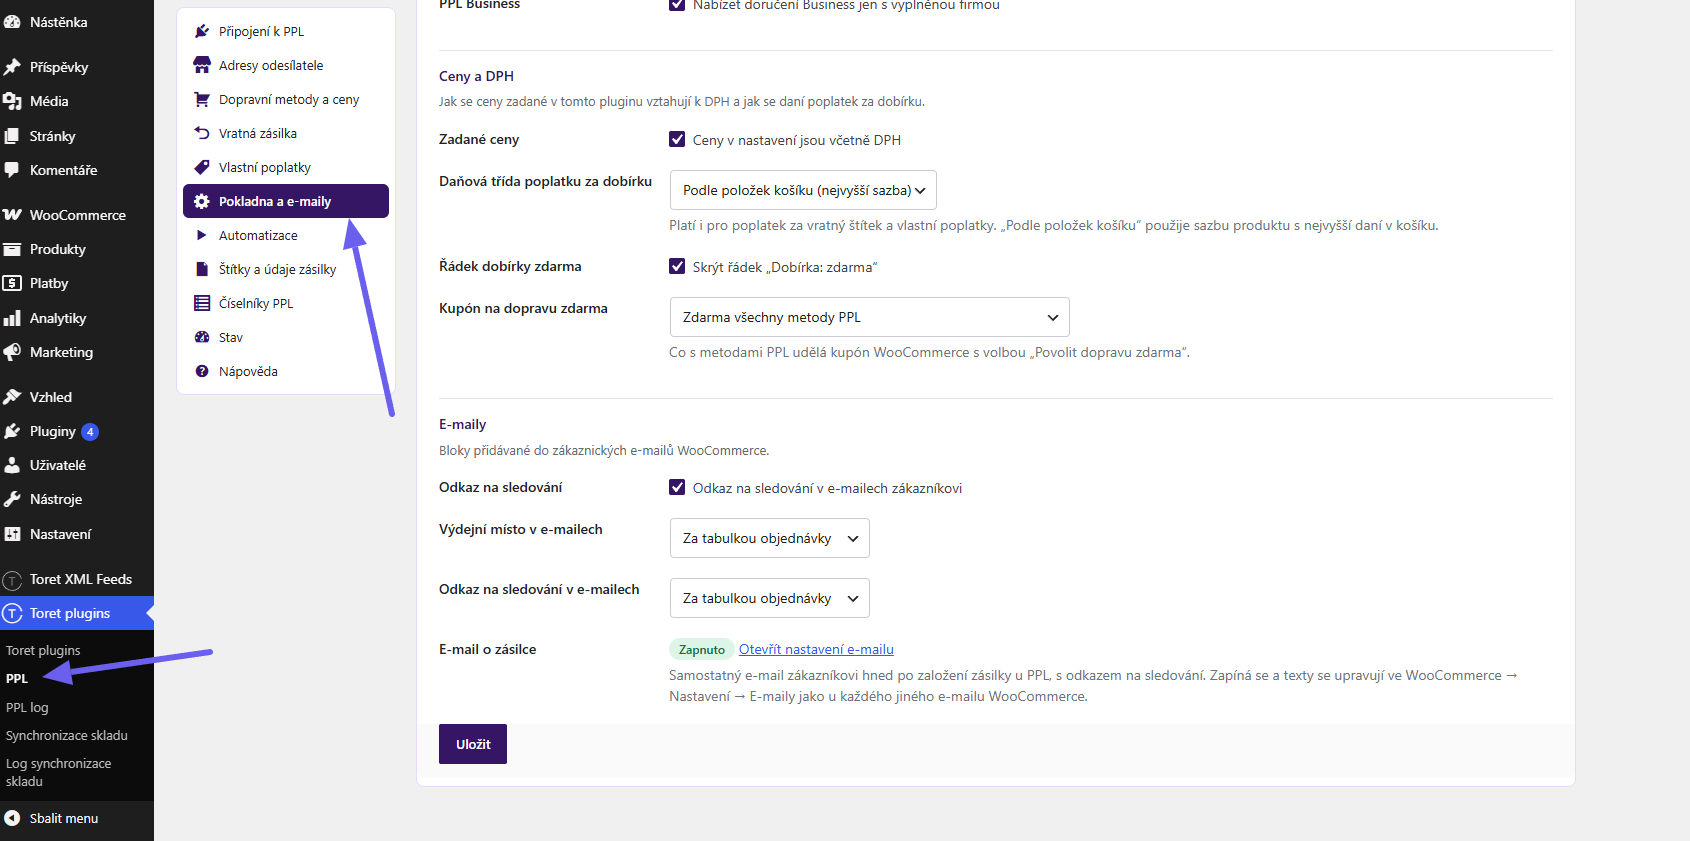
- Entered Prices (Zadané ceny) – the Prices in settings include VAT (Ceny v nastavení jsou včetně DPH) checkbox. Tick it if the prices entered in the plugin settings include VAT; the plugin recalculates shipping and fee prices accordingly.
- COD Fee Tax Class (Daňová třída poplatku za dobírku) – also applies to the return label fee and custom fees. The Based on cart items (highest rate) (Podle položek košíku (nejvyšší sazba)) option uses the rate of the product with the highest tax in the cart, which is common practice among Czech stores. You can also choose Standard rate (Základní sazba) or a specific tax class.
- Free COD Row (Řádek dobírky zdarma) – hide the “Cash on delivery: free” row.
- Free Shipping Coupon (Kupón na dopravu zdarma) – what a WooCommerce coupon with the “Allow free shipping” option does with PPL methods:
– Free for all PPL methods (Zdarma všechny metody PPL).
– Free for selected methods only (Zdarma jen vybrané metody) (enabled per country and method in Shipping Methods and Prices).
– PPL methods ignore it (Metody PPL ho ignorují).
Emails
- Tracking Link (Odkaz na sledování) – add a shipment tracking link to customer emails. The link appears once the shipment has been created at PPL.
- Pickup Point in Emails (Výdejní místo v e-mailech) and Tracking Link in Emails (Odkaz na sledování v e-mailech) – for both, choose where the block is placed in the email: after the order table, before the order table, in the order details, in the order meta or with the customer details. The selected pickup point is also shown to the customer on the thank-you page and in the order details in My Account.
- Shipment Email (E-mail o zásilce) – adds a new automatic email with the tracking number and tracking link, sent as soon as the shipment is handed over. Click Open Email Settings (Otevřít nastavení e-mailu) to go to the settings, where you can enable/disable it and edit its content.
TIP: With automatic sending, the tracking link isn’t included in the email for the selected status (e.g. Processing) – the email is sent on the status change before the shipment has been processed. If you send shipments automatically, we recommend setting up the Shipment Email (E-mail o zásilce) (see above).
Return Shipment
Customers can order a return label together with their order. They either take the parcel to a PPL pickup point (drop-off at a pickup point) or a driver collects it (driver pickup).
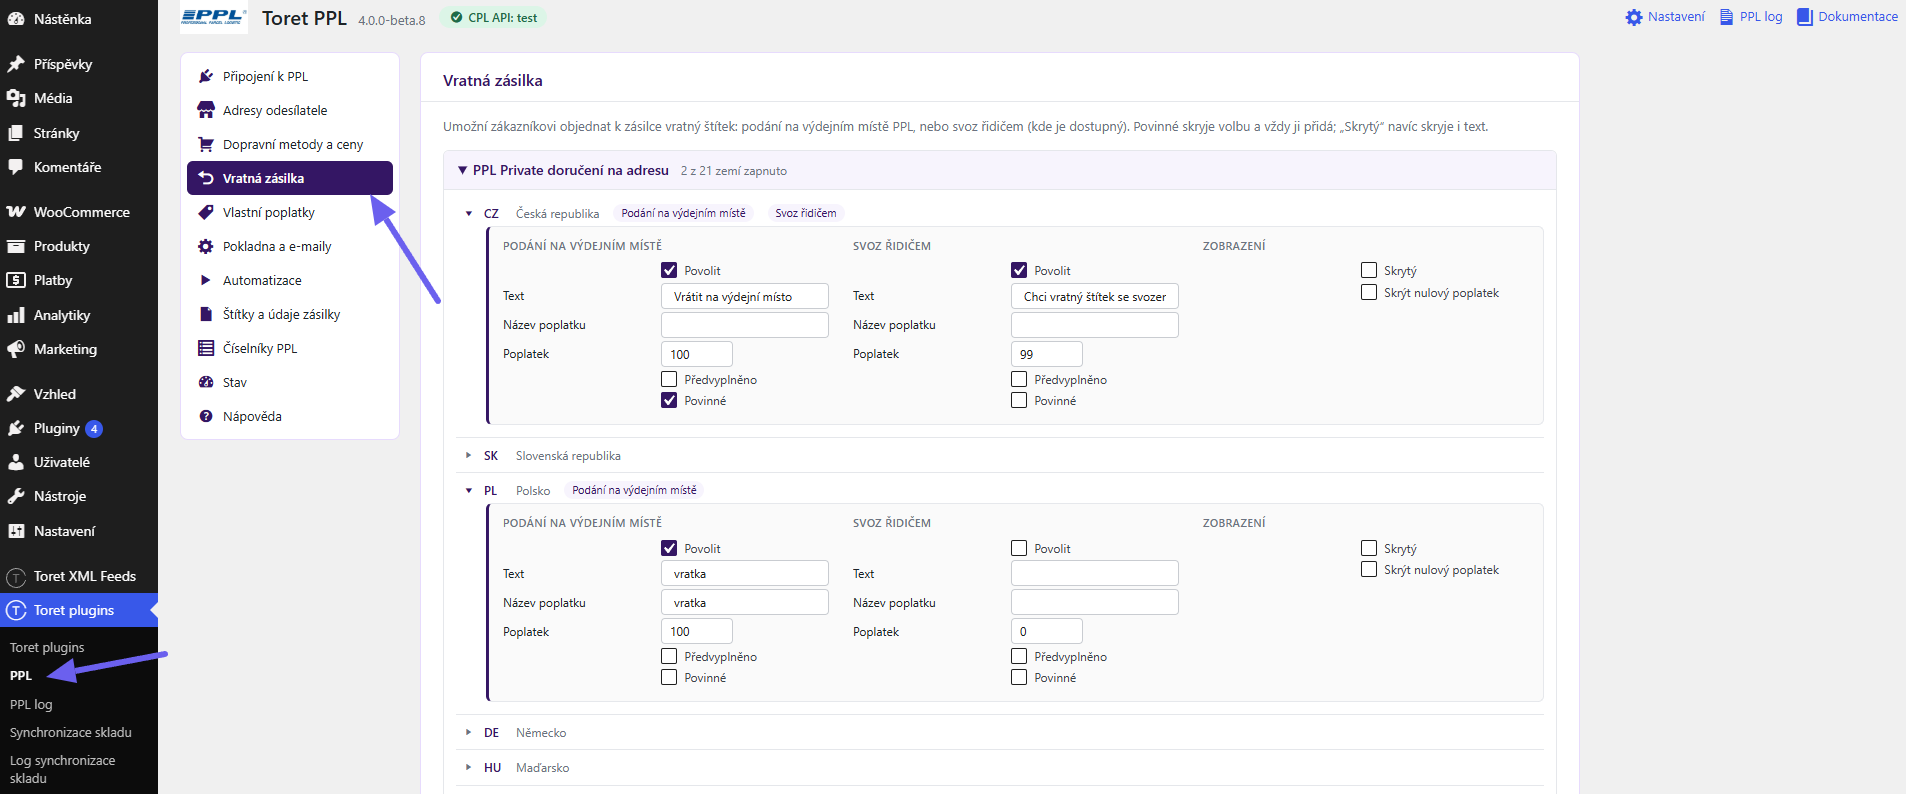
It is configured separately for home delivery and pickup point delivery, and within each for every country. Availability is determined by PPL:
- Drop-off at a pickup point (Podání na výdejním místě) – Czech Republic plus SK, PL, DE, HU, AT, ES, PT, IE, FI, SE, EE, LT, LV, BG, HR, IT, LU, RO, GR, SI.
- Driver pickup (Svoz řidičem) – Czech Republic, Slovakia, Poland, Germany, Hungary, Spain and Portugal.
For each option, you can set:
- Enable (Povolit) – shows the option at checkout.
- Text – the checkbox label at checkout.
- Fee Name (Název poplatku) and Fee (Poplatek) – shown as a separate order line.
- Pre-checked (Předvyplněno) – the option is ticked by default.
- Required (Povinné) – the option is ticked and locked at checkout; the customer can’t untick it. To hide it completely, combine it with the Hidden (Skrytý) option.
The Display (Zobrazení) column has two extra options: Hidden (Skrytý), together with Required (Povinné), hides the checkbox and text completely; Hide zero fee (Skrýt nulový poplatek) hides the row when the amount is zero.
The return label is created at PPL together with the main shipment. The order details then show its number with a tracking link, and the orders list shows a return shipment (vratná zásilka) link next to the main number.
Custom Fees
On the Custom Fees (Vlastní poplatky) tab, you can add any extra fees to orders with PPL shipping, such as handling or packaging fees.
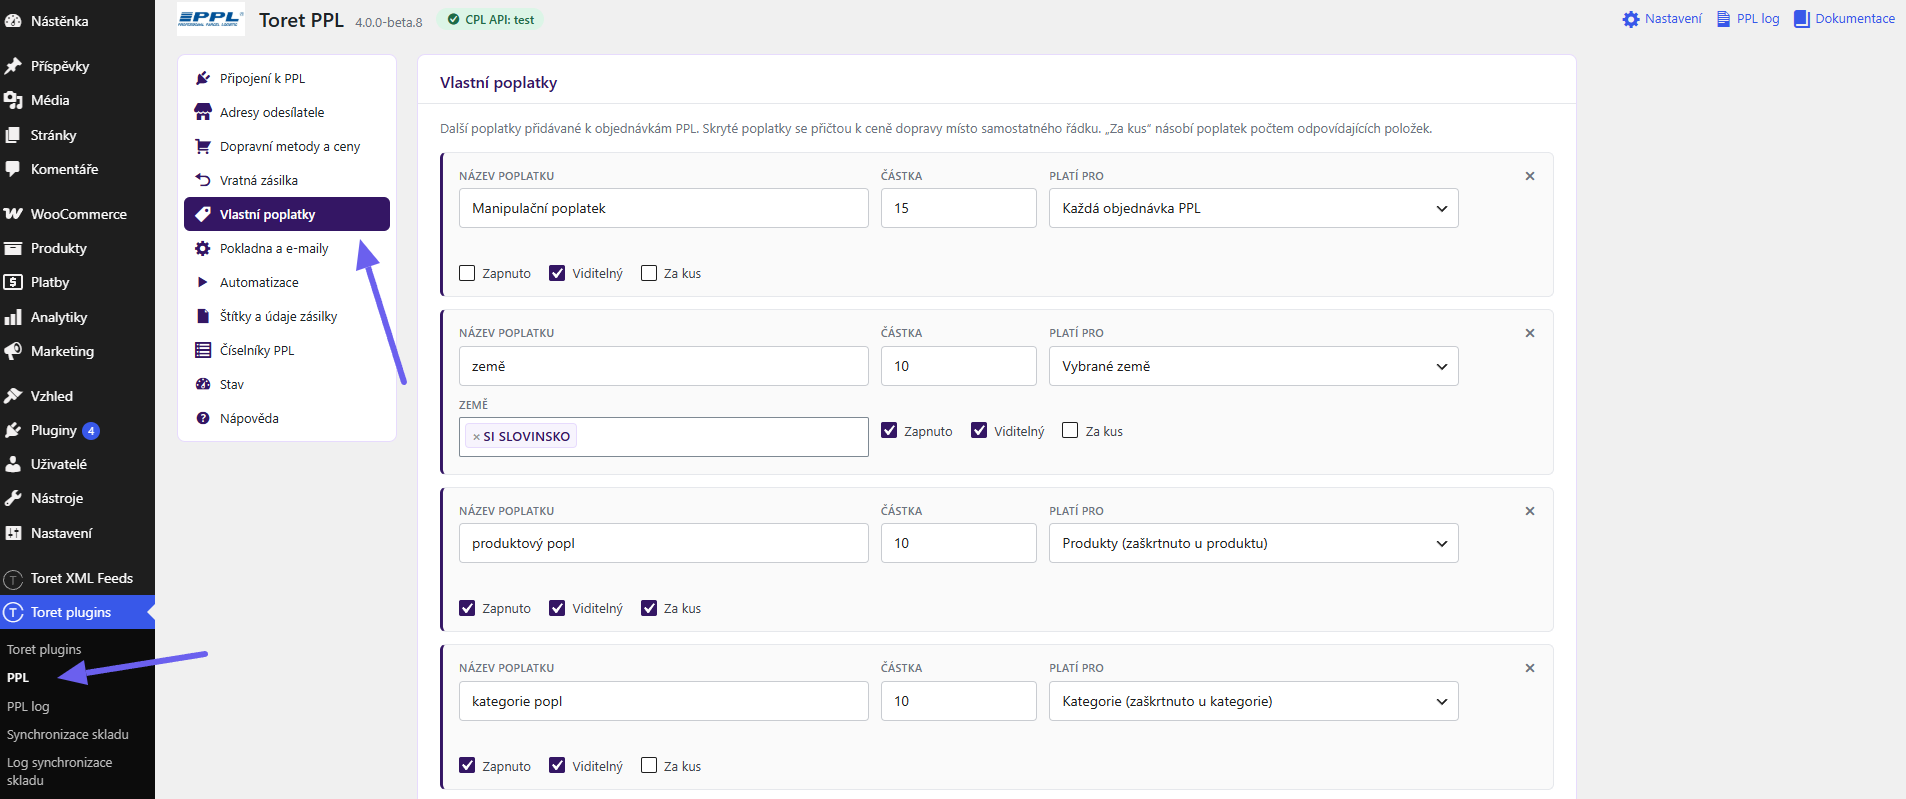
Each fee has a name, an amount and an Applies to (Platí pro) scope:
- Every PPL order (Každá objednávka PPL) – the fee is always added.
- Selected countries (Vybrané země) – a country selector is shown.
- Products (Produkty), Categories (Kategorie), Variations (Varianty) – the fee is added only if the cart contains an item with the fee ticked on its product, category or variation edit screen.
- Shipping method (Dopravní metoda) – the fee applies to a specific PPL method only.
Three checkboxes control the behaviour:
- Enabled (Zapnuto) – a disabled fee stays saved but isn’t charged.
- Visible (Viditelný) – the fee is a separate line in the cart. A hidden fee is added to the shipping price instead.
- Per item (Za kus) – the fee is multiplied by the number of matching items in the cart.
Fees are taxed according to the COD Fee Tax Class (Daňová třída poplatku za dobírku) option on the Checkout and Emails (Pokladna a e-maily) tab.
Product, Variation and Category Settings
On the product edit screen, you’ll find a PPL tab in Product Data (Data produktu). Some fields are also available on variations and on the product category edit screen – specifically the shipping methods table, the Cannot be delivered to boxes (Nelze doručit do boxů) option and custom fees. Age verification, HS code and customs description are set on the product only.
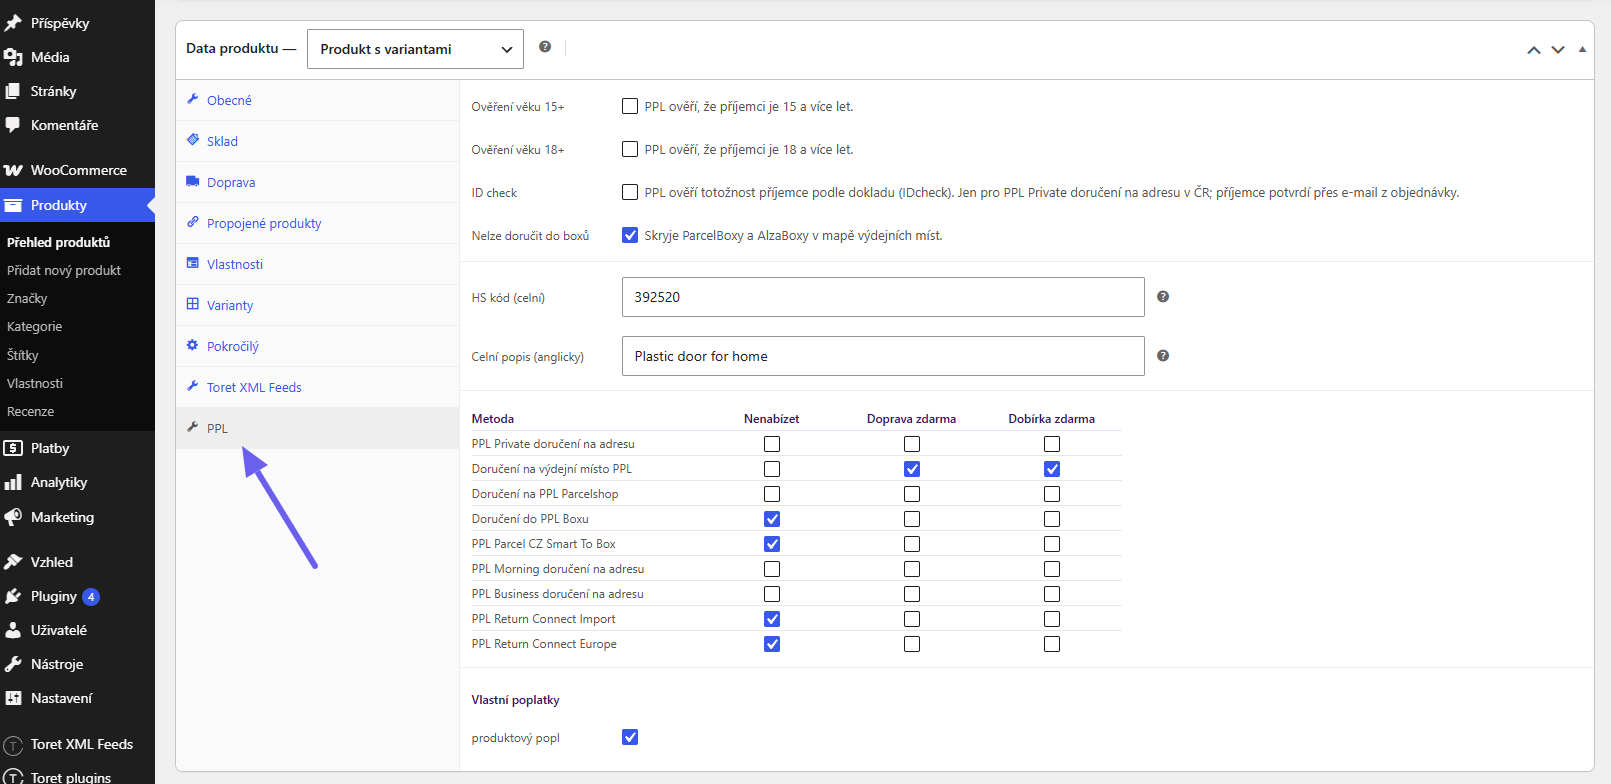
- Age verification 15+ (Ověření věku 15+) and Age verification 18+ (Ověření věku 18+) – the driver or pickup point staff verify the recipient’s age.
- ID check (product level only) – stricter age verification (the courier checks the ID document number). Only for PPL Private in the Czech Republic.
- Cannot be delivered to boxes (Nelze doručit do boxů) – ParcelBoxes and AlzaBoxes are hidden on the map, e.g. for bulky goods.
- HS code (customs) (HS kód (celní)) – at least 6 digits. Required for shipments outside the EU.
- Customs description (in English) (Celní popis (anglicky)) – up to 100 characters. Also required for shipments outside the EU.
- Methods table with three flags for each shipping method:
– Do not offer (Nenabízet) – with this product in the cart, the method isn’t shown at checkout,
– Free shipping (Doprava zdarma) – with this product in the cart, shipping via this method is free,
– Free COD (Dobírka zdarma) – with this product in the cart, cash on delivery for this method is free. - Custom Fees (Vlastní poplatky) – tick the fees whose scope is Products, Categories or Variations.
The methods table lists only methods that have at least one country enabled in the plugin settings. Until none is enabled, all methods are shown.
Age verification has restrictions at PPL. PPL only accepts the service for the PPL Parcel CZ Private, PPL Parcel CZ Smart and PPL Parcel CZ Morning products, i.e. for shipments within the Czech Republic delivered to an address, to a pickup point or by morning delivery. PPL doesn’t offer it for international shipments, the Business method or the PPL Parcel CZ Smart To Box method. The plugin handles this automatically: it sends such a shipment without age verification and adds a note to the order – otherwise PPL would reject it.
Automation
The Automation (Automatizace) tab controls what the plugin does on its own in the background. Everything on this tab runs through the queue – for best results, we recommend setting up a server cron (see Queue and Server Cron).
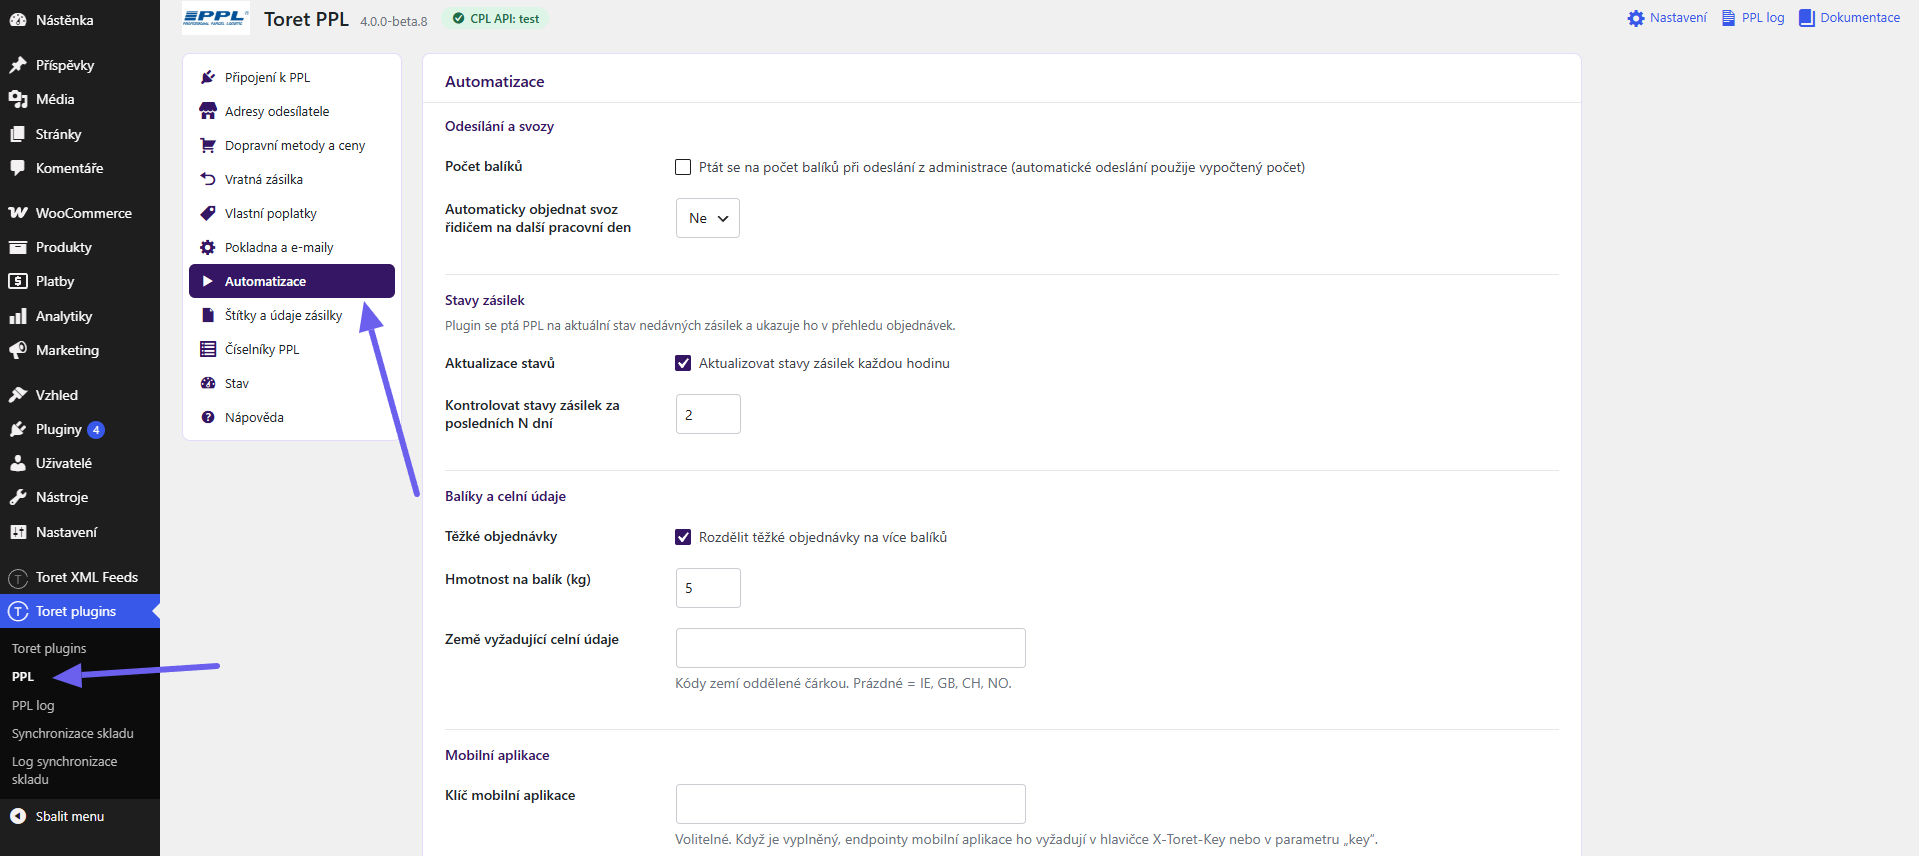
Sending and Pickups
- Number of Parcels (Počet balíků) – ask for the number of parcels when sending from the admin. Before sending, a page is shown where you check the number of parcels for each order. Automatic sending continues to work and uses the automatically calculated number.
- Automatically book a driver pickup for the next business day (Automaticky objednat svoz řidičem na další pracovní den) – after a shipment is created, a pickup is booked for the next business day if one doesn’t exist for that day yet.
Shipment Statuses
- Status Updates (Aktualizace stavů) – update shipment statuses every hour.
- Check shipment statuses for the last N days (Kontrolovat stavy zásilek za posledních N dní) – how many days back the plugin queries PPL. A lower number means fewer requests to PPL.
Parcels and Customs Data
- Heavy Orders (Těžké objednávky) – split heavy orders into multiple parcels.
- Weight per Parcel (kg) (Hmotnost na balík (kg)) – above this weight, the shipment is created as a multi-parcel shipment. The numbers of the additional parcels are shown in the order details.
- Countries requiring customs data (Země vyžadující celní údaje) – enter country codes separated by commas. If left empty, customs data is required for shipments to Ireland, the United Kingdom, Switzerland and Norway (IE, GB, CH, NO). For shipments to these countries, product HS codes and customs descriptions are sent to PPL.
Mobile App
The Mobile App Key (Klíč mobilní aplikace) is optional security for the connection with the Toret WooCommerce Manager mobile app, which can send shipments, print labels and update statuses. If you fill in the key, the app must send it in the X-Toret-Key header or the key parameter.
Automatic Sending
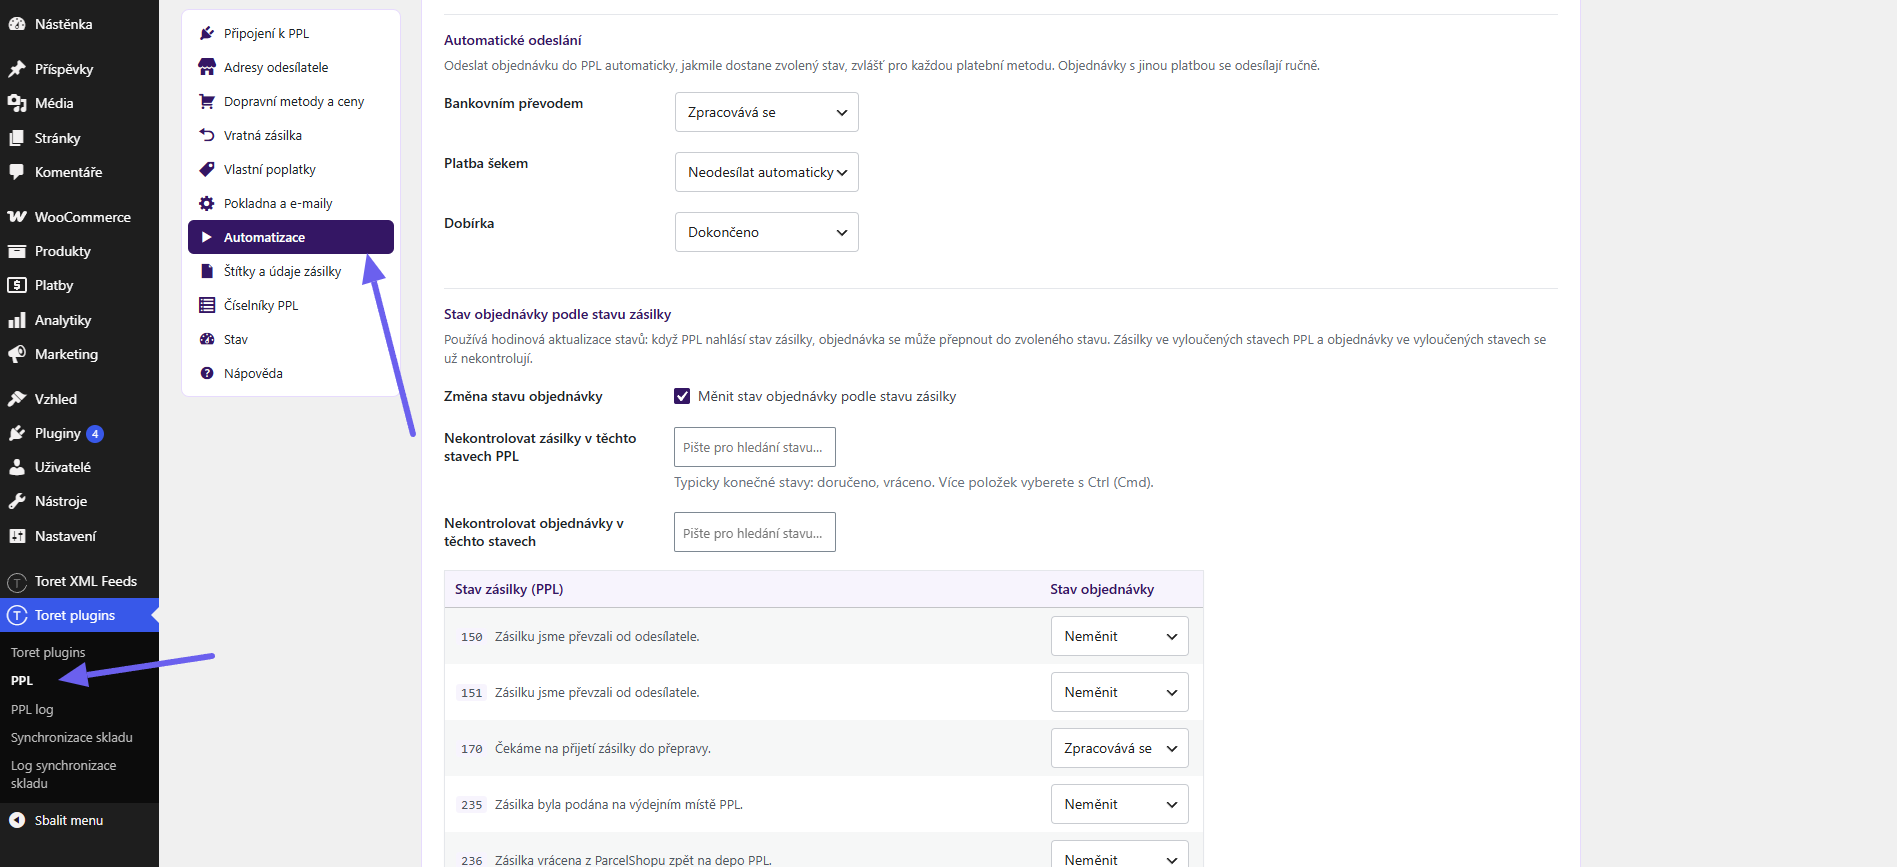
For each enabled payment method, choose the order status at which the shipment is sent to PPL automatically – for example, Processing (Zpracovává se) for card payments and On hold (Čeká na vyřízení) for cash on delivery. The order is added to the queue as soon as it receives that status, whether set by the payment gateway or by staff.
The Do not send automatically (Neodesílat automaticky) option means you’ll send orders with this payment method manually. If asking for the number of parcels is enabled, it only applies to sending from the admin – automatic sending continues and uses the calculated number of parcels.
TIP: With automatic sending, the tracking link isn’t included in the email for the status selected in the automation (e.g. Processing) – the email is sent on the status change before the shipment has been processed. If you send shipments automatically, we recommend setting up the Shipment Email (E-mail o zásilce) (see Checkout and Emails).
Order Status Based on Shipment Status
During the hourly update, the plugin can switch the order status based on the status reported by PPL – for example, to Completed (Dokončeno) after delivery.
- Order Status Change (Změna stavu objednávky) – tick to enable the whole mapping.
- Do not check shipments in these PPL statuses (Nekontrolovat zásilky v těchto stavech PPL) – typically final statuses such as delivered and returned. PPL is no longer queried for a shipment in such a status.
- Do not check orders in these statuses (Nekontrolovat objednávky v těchto stavech) – e.g. cancelled and refunded orders.
- Status Table (Tabulka stavů) – for each PPL status, choose the target order status, or leave it at Do not change (Neměnit).
Excluding statuses saves requests to PPL and speeds up synchronisation. PPL statuses only appear in the table once the PPL connection is set up.
Labels and Shipment Data
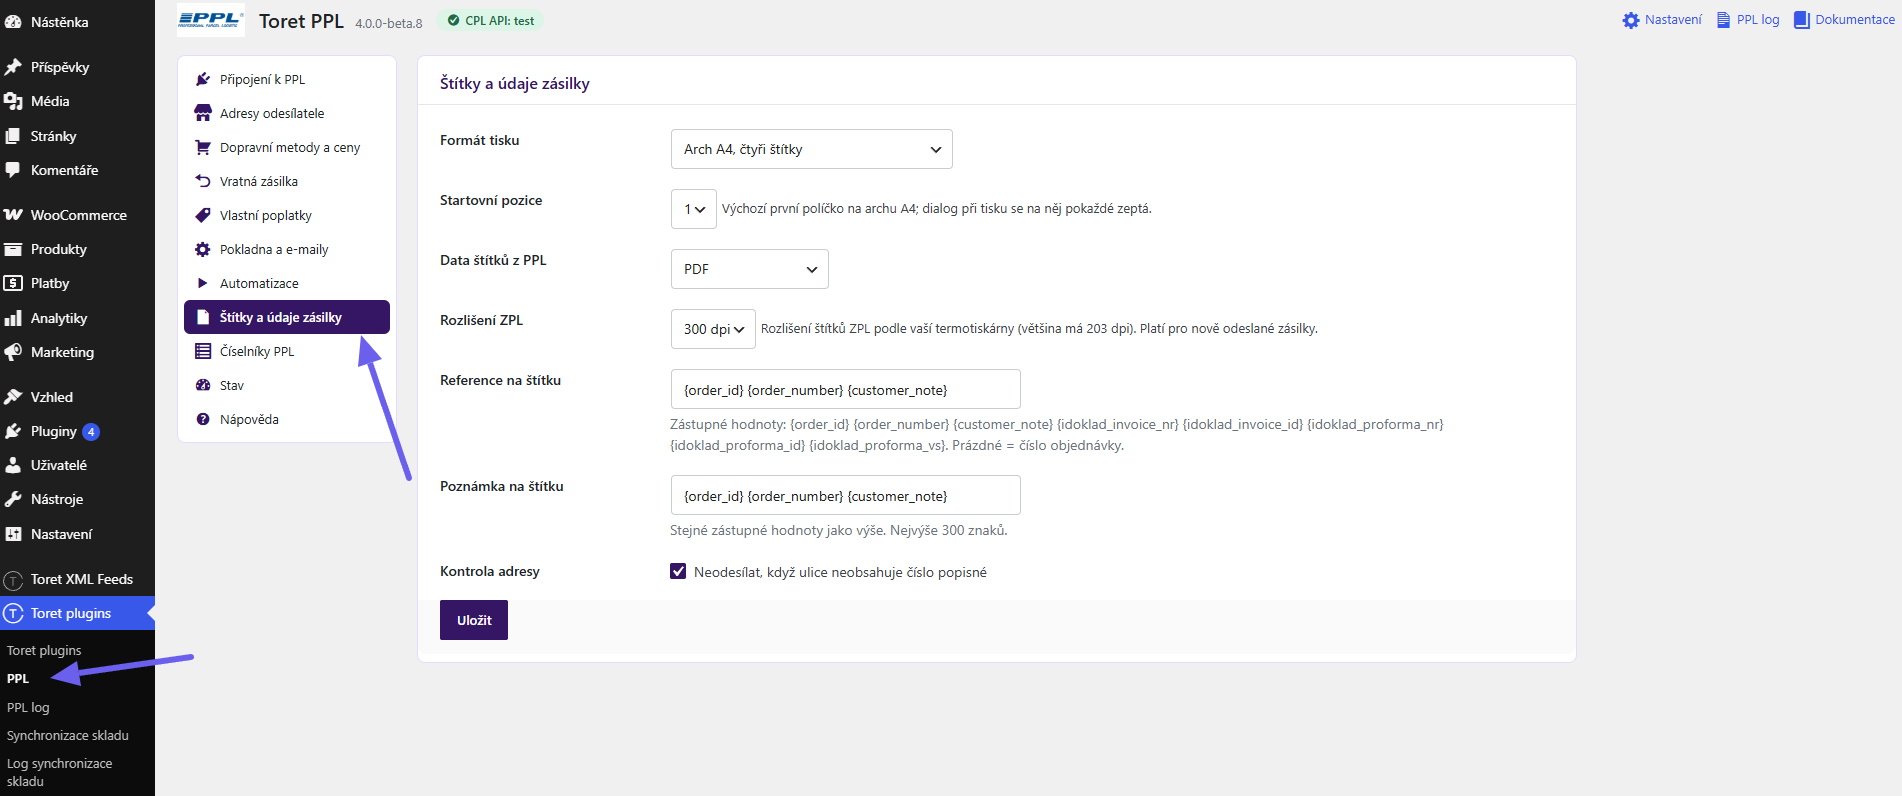
- Print Format (Formát tisku) – 100 × 150 mm label (one per page) (Štítek 100 × 150 mm (jeden na stránku)) for label printers, or A4 sheet, four labels (Arch A4, čtyři štítky). The default is A4 sheet.
- Start Position (Startovní pozice) – the default first slot on an A4 sheet (1 to 4). When printing, the plugin always asks which slot is the first free one, so you can finish a partly used sheet. Slots are numbered the same way as at PPL: the right column top to bottom first, then the left.
- Label Data from PPL (Data štítků z PPL) – PDF, or ZPL (thermal printers) (ZPL (termotiskárny)) for Zebra and compatible printers.
- ZPL Resolution (Rozlišení ZPL) – 203, 300 or 600 dpi depending on your printer; most thermal printers use 203 dpi. The change applies to newly sent shipments.
- Label Reference (Reference na štítku) – text with placeholders. The reference is also saved with the shipment and used to look up the order. Empty field = order number.
- Label Note (Poznámka na štítku) – the same placeholders, up to 300 characters.
- Address Check (Kontrola adresy) – don’t send the shipment if the street doesn’t include a house number. PPL returns such shipments with an error.
You can use the following placeholders in both the reference and the note:
{order_id}{order_number}{customer_note}{idoklad_invoice_nr}{idoklad_invoice_id}{idoklad_proforma_nr}{idoklad_proforma_id}{idoklad_proforma_vs}
Labels are downloaded automatically right after the shipment is created and saved to the wp-content/uploads/toret-ppl/labels folder. Printing then takes one click, with no waiting for PPL. For a multi-parcel shipment, the file contains a label for each parcel.
Sending Shipments to PPL
A new PPL column is added to the orders list. It shows the shipment status, the tracking number with a tracking link, the pickup date and action icons.
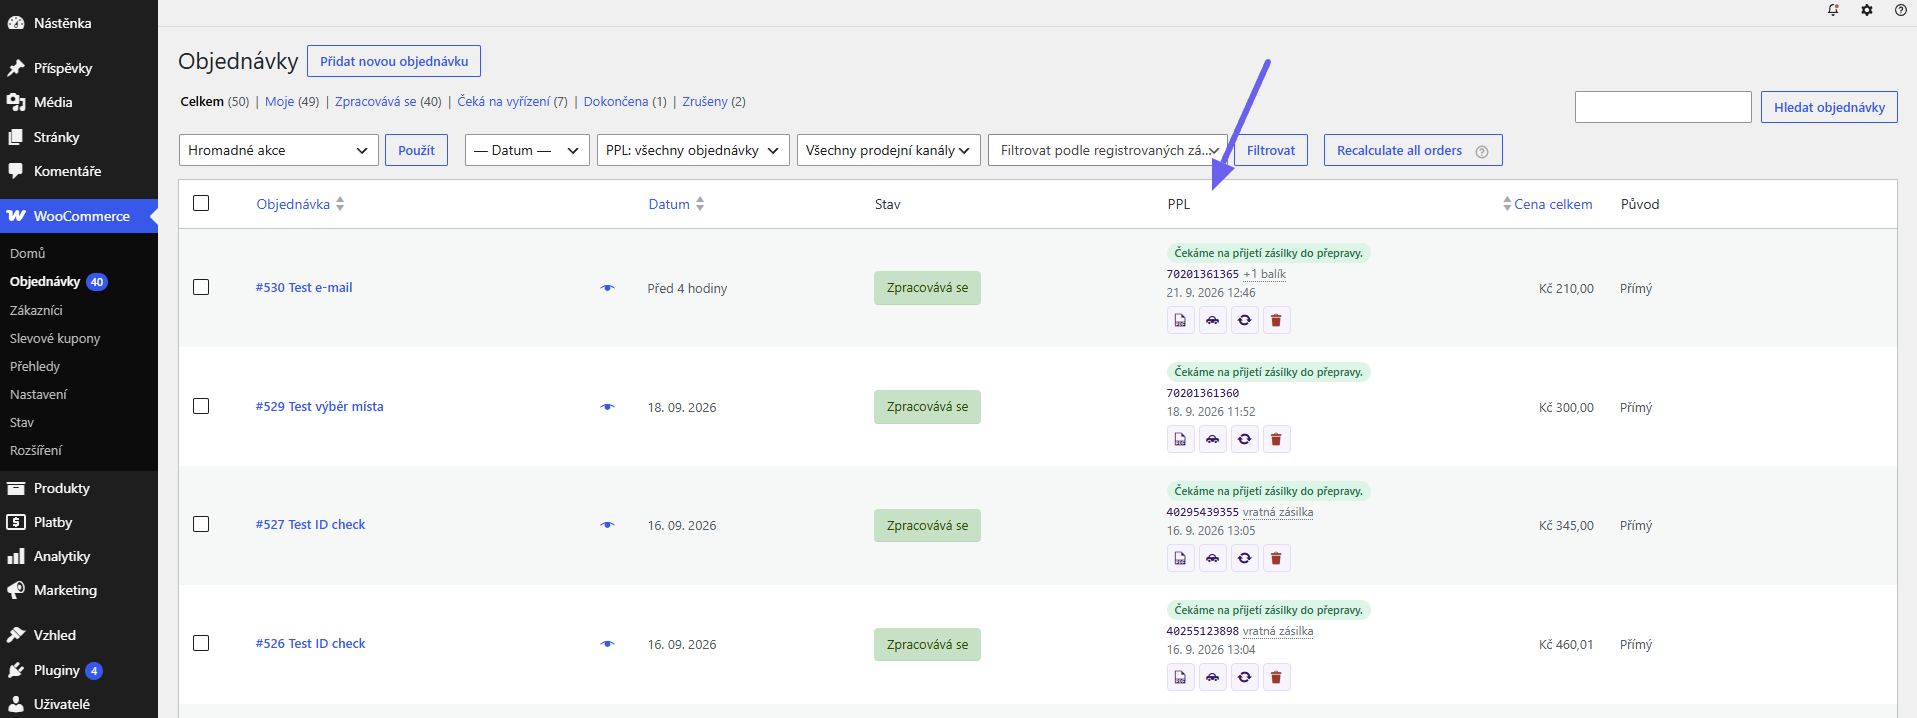
Statuses shown in the column:
- Not sent (Neodesláno) – the shipment doesn’t exist yet.
- Queued (Ve frontě) – the order is waiting to be processed by the queue.
- Waiting for PPL (Čeká na PPL) – the batch has been sent, waiting for PPL’s response.
- Created (Založeno) / Label ready (Štítek připraven) – the shipment exists; with the second status, the label has been downloaded too.
- Error (Chyba) – PPL rejected the shipment; the error message is shown directly in the cell and in the log.
- After status synchronisation, the current status from PPL with its date is shown instead.
Sending a Single Order Manually
In the PPL column, click the Send to PPL (Odeslat do PPL) icon. The order is added to the queue and the tracking number is filled in automatically once PPL responds. The same button is available in the PPL metabox on the order edit screen.
For a shipment that has already been sent, additional icons are shown: Label (Štítek), Book Pickup (Objednat svoz) or Cancel Pickup (Zrušit svoz), Update Status (Aktualizovat stav) and Cancel (Zrušit).
For a shipment with an error, Resend (Odeslat znovu) and Remove (Odebrat) are shown instead.
Bulk Sending
Select the orders and choose the action you want from Bulk actions (Hromadné akce):
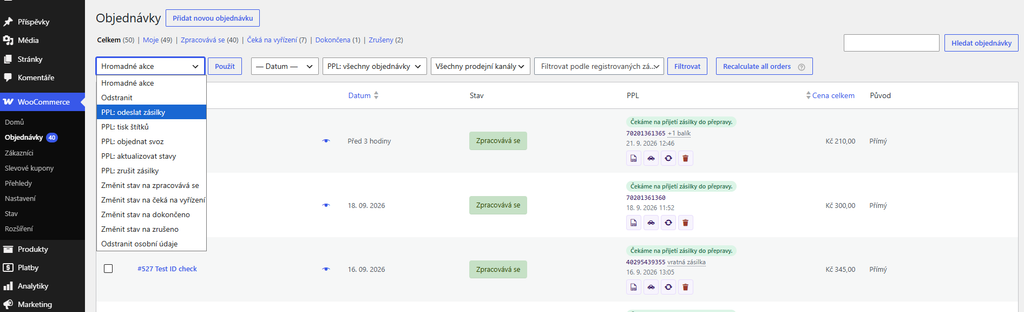
- PPL: send shipments (PPL: odeslat zásilky)
- PPL: print labels (PPL: tisk štítků)
- PPL: book pickup (PPL: objednat svoz) – enter the pickup date and time in the pop-up window
- PPL: update statuses (PPL: aktualizovat stavy)
- PPL: cancel shipments (PPL: zrušit zásilky)
Sending runs in the background. A progress bar is shown above the list (PPL: sending X, waiting for PPL Y (PPL: odesílá se X, čeká na PPL Y)) and tracking numbers are filled into the column as they come in. The admin isn’t blocked in the meantime, so you can keep working.
Above the list, there is also a PPL filter with these options: all orders, shipped via PPL, not sent, with an error and created. Search also works with tracking numbers, including the numbers of additional parcels.
Number of Parcels
If you enable Ask for the number of parcels (Ptát se na počet balíků) in Automation, a page listing the selected orders is shown before sending: number, customer, shipping method, weight and a field for the number of parcels. The pre-filled value is based on the order weight and the weight-per-parcel setting. Orders that can’t be sent (not PPL, already queued or ended with an error) are marked with an explanation.
Order Details
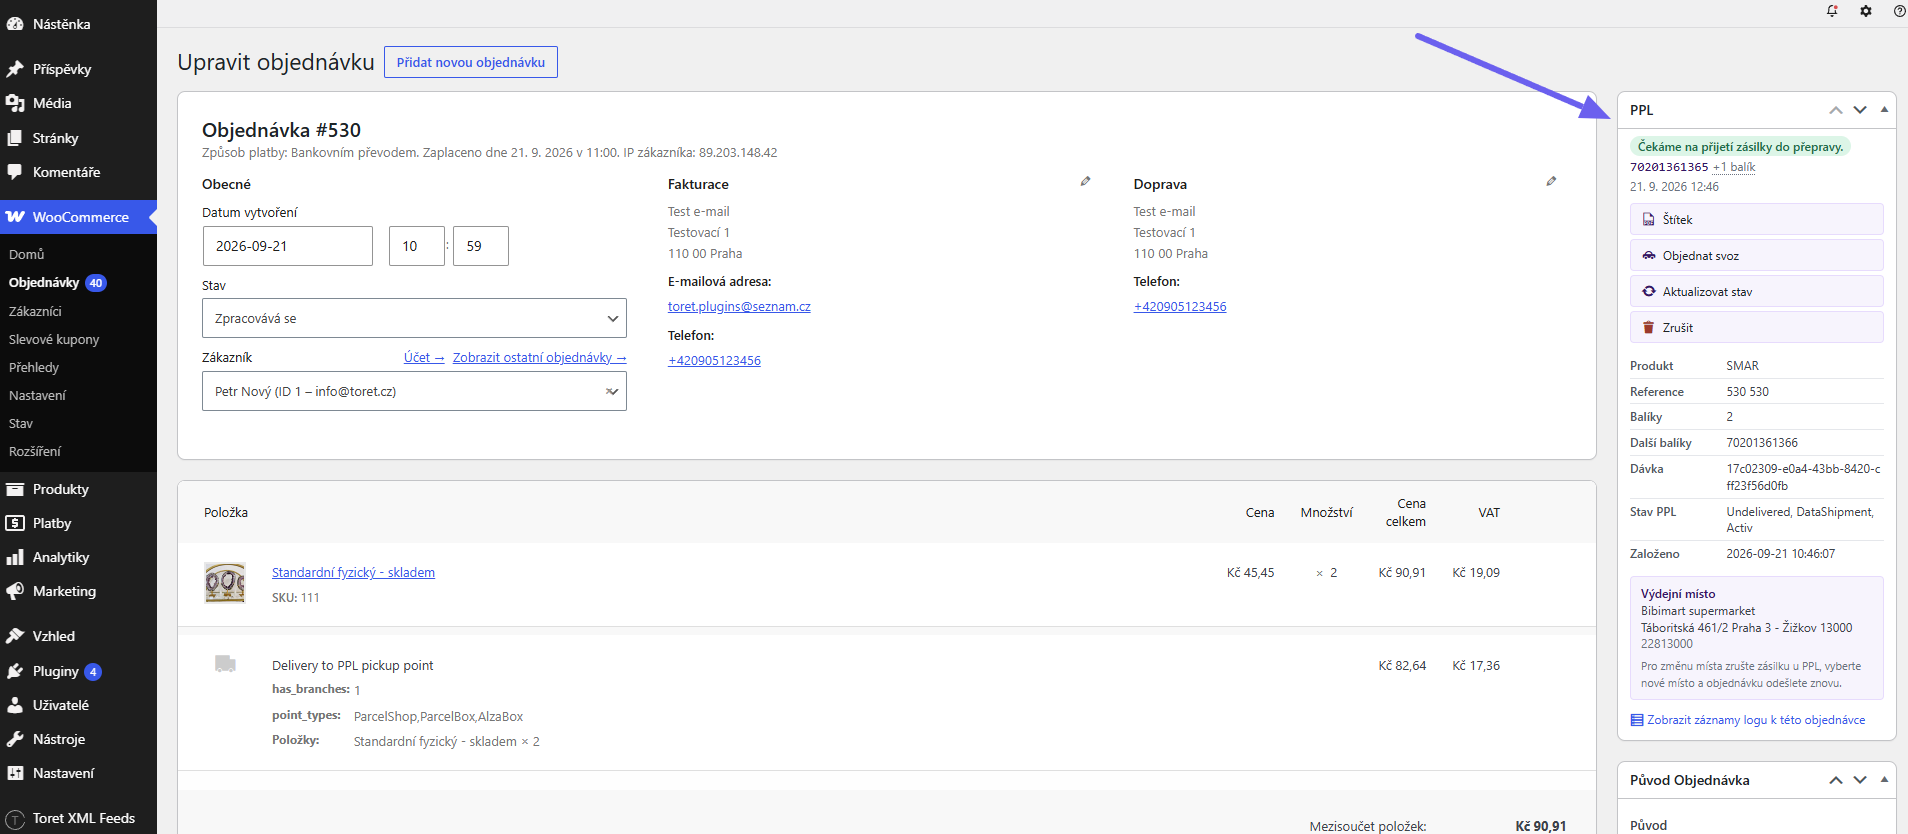
The PPL metabox on the order edit screen shows the shipment status and number, the same actions as the orders list, plus:
- Product (Produkt) – the PPL product code the shipment was created with.
- Reference, Batch (Dávka), PPL Status (Stav PPL), Created (Založeno).
- Parcels (Balíky) and Additional Parcels (Další balíky) for multi-parcel shipments.
- Return Label (Vratný štítek) with its number and tracking link.
- Pickup (Svoz) – the date and reference of the booked pickup.
- Pickup Point (Výdejní místo) – name, address and code. Until the shipment is created at PPL, you can select it again on the map with the Change Pickup Point (Změnit výdejní místo) button. For a created shipment, you need to cancel it first.
- Customs Data (ICS2) (Celní údaje (ICS2)) for shipments to countries outside the EU.
- A View log entries for this order (Zobrazit záznamy logu k této objednávce) link.
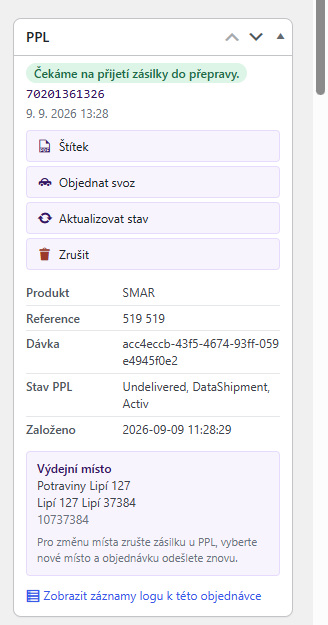
The shipment is created using the order data: the shipping address or selected pickup point, the recipient’s phone and email, the weight from the products, cash on delivery based on the payment method, and the reference and note based on the label settings. If PPL rejects the shipment, you’ll find the error message in the PPL column and in the log; once you’ve corrected the data, send the order again.
Printing Labels
To print the label for a single shipment, use the Label (Štítek) icon in the PPL column or in the order metabox. It opens in a new browser tab in the format set on the Labels and Shipment Data (Štítky a údaje zásilky) tab.
Start bulk printing with the PPL: print labels (PPL: tisk štítků) action. With the A4 format, a dialog appears before printing where you select the first free slot on the sheet – so you can finish a partly used sheet without wasting anything. A sheet can combine shipments sent at different times.
If the label for a shipment isn’t ready yet, the plugin lets you know and prints the rest. The shipment must be created at PPL; queued shipments and shipments with an error have no label icon.
Booking a Pickup
There are three ways to book a driver pickup:
- For a single order – with the Book Pickup (Objednat svoz) icon in the PPL column or in the metabox.
- In bulk – with the PPL: book pickup (PPL: objednat svoz) action. Enter the pickup date and time in the pop-up window. The default date is today if it’s before 9:00 a.m. and not a weekend; otherwise it’s the next business day.
- Automatically – with the Automatically book a driver pickup for the next business day (Automaticky objednat svoz řidičem na další pracovní den) option in Automation.
There is one pickup per day per sender address. Further shipments are added to the same day without another call to PPL. A booked pickup is shown in the PPL column as a date next to the shipment.
To cancel a pickup, use the Cancel Pickup (Zrušit svoz) icon. This cancels the entire pickup, including all shipments that belong to it. PPL only allows cancellation until it processes the pickup – after that, contact PPL customer service.
The pickup date must be today or later, and pickups can only be booked for shipments already created at PPL.
Shipment Status Tracking
When Status Updates (Aktualizace stavů) is enabled in Automation, the plugin queries PPL once an hour for the status of shipments from the last N days and saves it to the order. The status is shown in the PPL column and in the order metabox along with the date of the last change.
You can also trigger an update manually:
- with the Sync Statuses Now (Synchronizovat stavy teď) button on the Status (Stav) tab (only works when Status Updates (Aktualizace stavů) is enabled),
- with the PPL: update statuses (PPL: aktualizovat stavy) bulk action,
- with the Update Status (Aktualizovat stav) icon on an individual order.
Synchronisation runs at most once an hour, whether triggered by WP-Cron or a server cron. The Status (Stav) tab shows when it last ran and when it’s due next.
Customs Data and Documents (ICS2)
For shipments to countries outside the EU customs territory, PPL requires customs data. You set the list of countries in Automation (empty field = IE, GB, CH, NO).
Shipments to these countries can’t be created without the HS code and customs description (in English) filled in on the products. The plugin lists which products are missing this data – fill it in on the product’s PPL tab.
For such orders, the order metabox also includes a Customs Data (ICS2) (Celní údaje (ICS2)) block:
- Select the document type from the list the plugin loads from the PPL code list (invoice, proforma, etc.).
- Use the Select File (Vybrat soubor) button to attach the document from the Media Library (PDF or image).
- The document is uploaded to PPL automatically as soon as the shipment is created. The Upload to PPL (Nahrát do PPL) button only appears for a created shipment and is used to upload it again.
The upload status and any error from PPL are shown directly below the buttons.
Queue and Server Cron
Sending shipments, checking batch status and downloading labels run in a queue separate from customer requests, so they don’t slow down the checkout or the admin. The queue is run by:
- Action Scheduler from WooCommerce, with WP-Cron as a fallback. However, both are only triggered by site visits.
- An open orders list – while anything is in the queue, the admin keeps nudging it along.
- A server cron – the most reliable option.
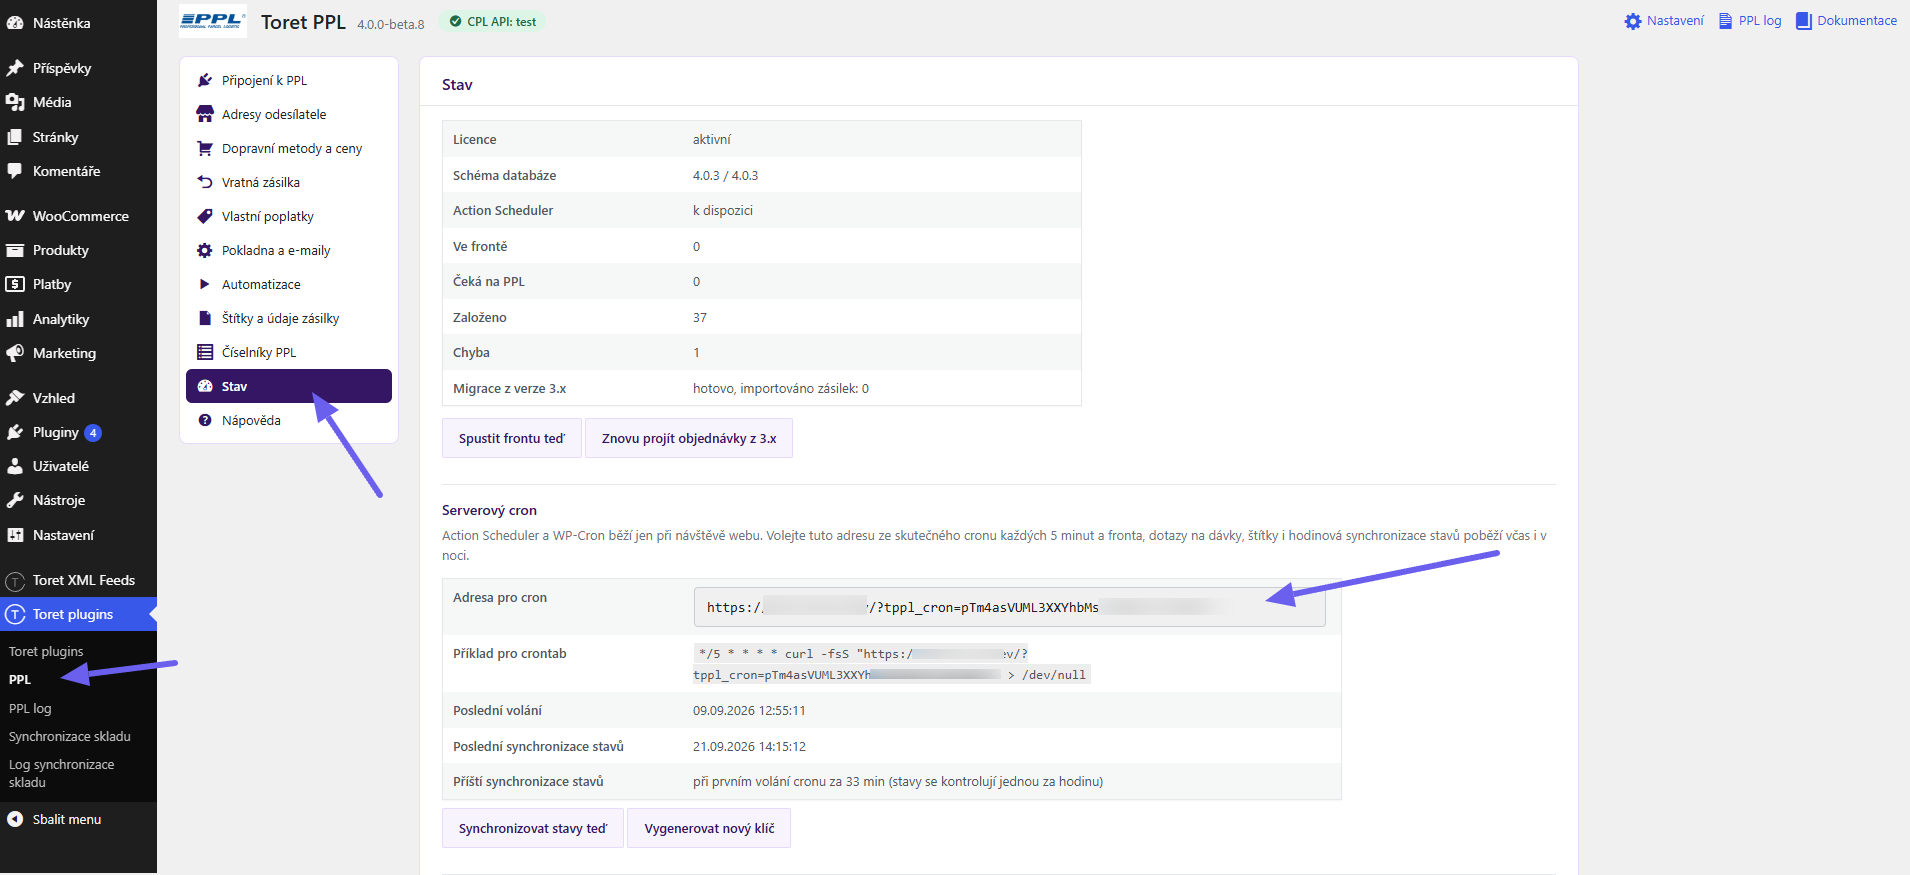
On the Status (Stav) tab, you’ll find the Cron URL (Adresa pro cron) with a secret key and a ready-made Crontab Example (Příklad pro crontab). Call the URL every 5 minutes and shipments will be processed even overnight:
*/5 * * * * curl -fsS "https://your-eshop.com/?tppl_cron=YOUR-SECRET-KEY" > /dev/nullThe cron response is JSON and tells you what happened: how many shipments were processed, whether status synchronisation ran or in how many seconds it’s due (it runs once an hour), and whether daily maintenance ran. A wrong key returns a 403 error. You can regenerate the key at any time with the Generate New Key (Vygenerovat nový klíč) button – the old URL then stops working.
The Status (Stav) tab also shows:
- the status of the license and the database schema,
- the availability of Action Scheduler,
- the number of shipments queued, waiting for PPL, created and with an error,
- the progress of the migration from version 3.x,
- a table of recent shipments and recent log entries.
The Run Queue Now (Spustit frontu teď) button runs one pass manually.
PPL Log
The Toret plugins → PPL log page records communication with PPL: sent batches, created shipments, pickups and errors.
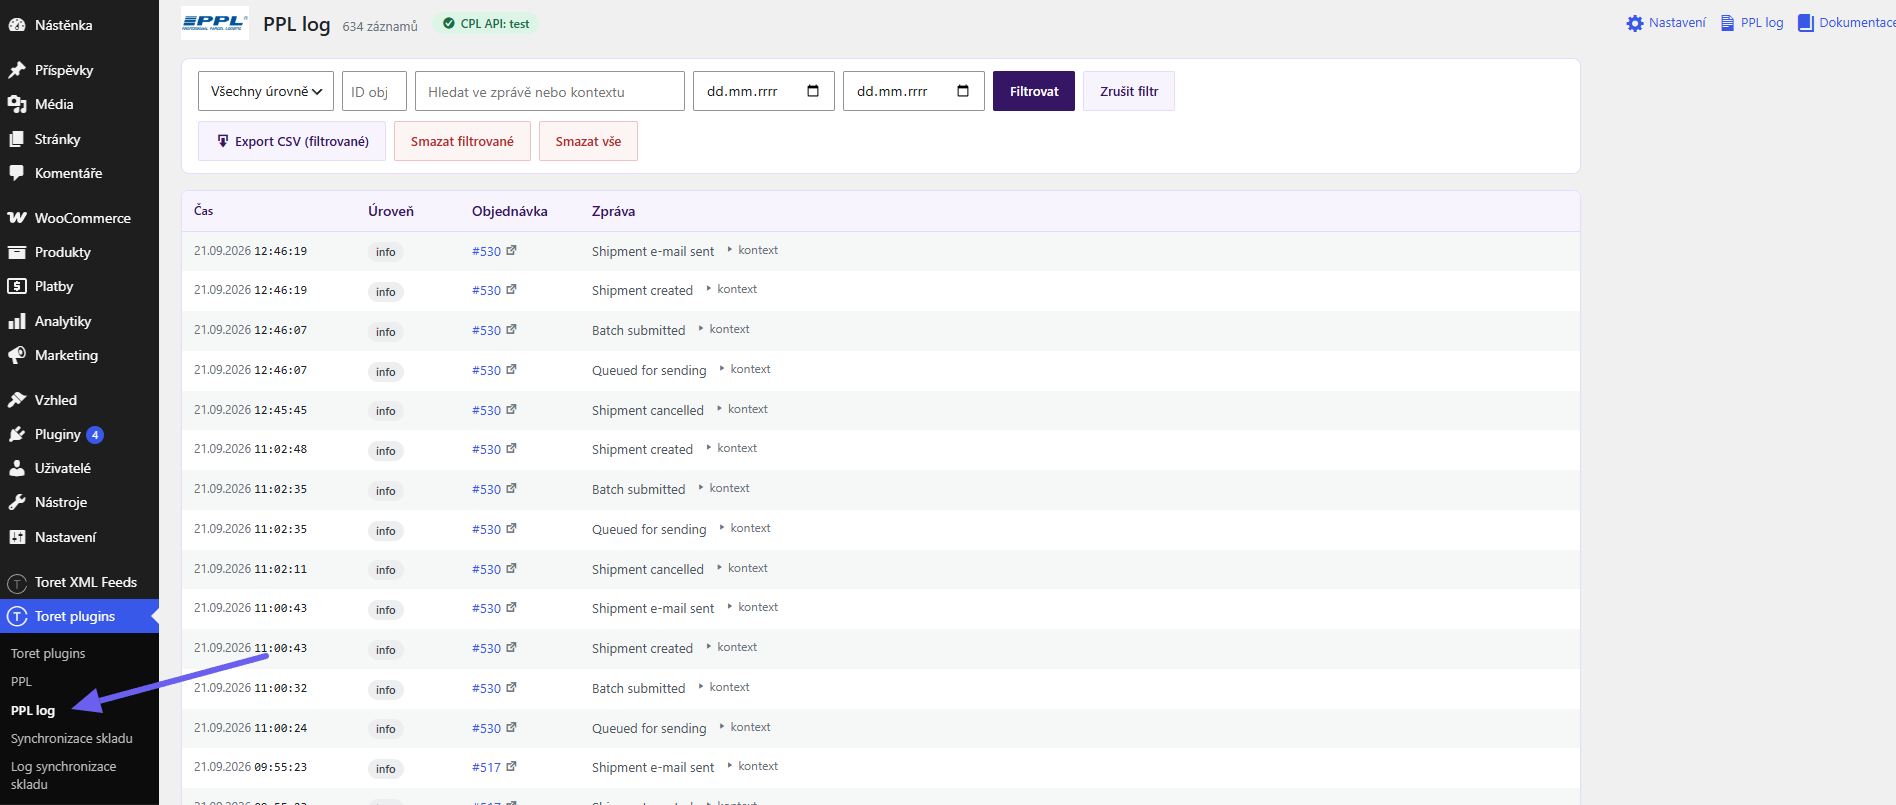
- You can filter by level (error, warning, info, debug), order ID, text in the message or context, and date.
- Each entry can be expanded to show the context with the data sent to PPL and PPL’s response.
- The Export CSV (filtered) (Export CSV (filtrované)) button downloads the currently filtered entries.
- You can clear the entire log or just the filtered entries.
When reporting an issue to support, send the entry including the expanded context – it makes solving the problem much faster.
PPL Code Lists
The PPL Code Lists (Číselníky PPL) tab shows the lists the plugin downloads from PPL: products enabled for your account, services and shipment statuses. The code lists are cached for one day; use the Reload from PPL (Znovu načíst z PPL) button to download them again – for example, after PPL adds a new product to your contract.
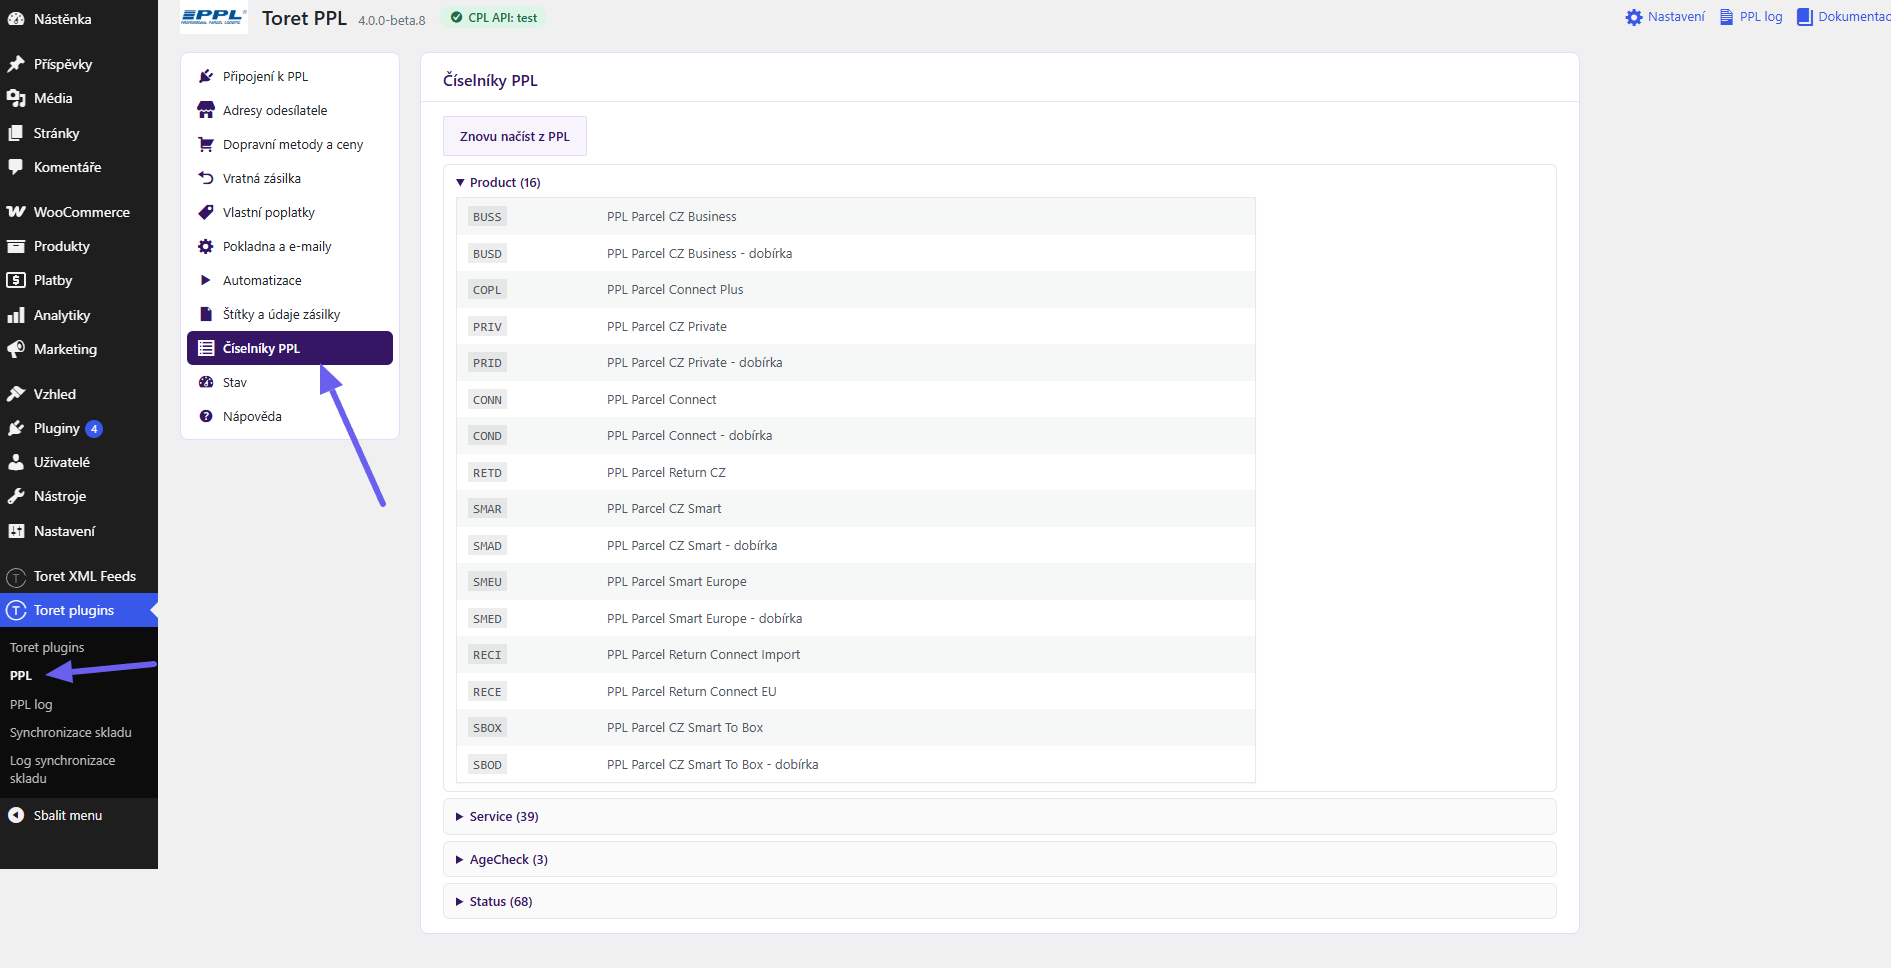
Based on this list, the plugin knows which methods work on your account and shows a warning for the others in Shipping Methods and Prices.
Upgrading from Version 3.x to Version 4
The upgrade is safe, but expect a few changes:
- Settings are kept. CPL credentials, sender addresses, prices, cash on delivery, return shipments and fees carry over unchanged – version 4 reads the same options.
- myAPI is no longer supported. If you sent shipments using a username and password, you now need a CPL Client ID and Client secret issued by PPL. A tracking number range is no longer entered.
Important! As long as myAPI is selected in the settings of version 3.x, the update to version 4 will not be offered to you, not even automatically. Instead, a notice with a link to the guide is shown in the WordPress admin. First switch to CPL API in the plugin settings; the update will then be offered.
- Widget 1.0 is no longer supported. Generate an API key for widget 2.0.
- Evening delivery has been removed, as PPL no longer provides this service.
- Shipments are migrated. After activation, shipments from orders from the last 2 years are loaded into the new records in the background. For shipments younger than 30 days, the labels are downloaded from PPL again, so you can keep printing them. PPL no longer issues older labels. You can see the progress of the migration on the Status (Stav) tab, where you can restart it with the Re-scan orders from 3.x (Znovu projít objednávky z 3.x) button. If the migration does not finish, it starts again automatically after the plugin is updated.
- Older orders remain readable, but their statuses are not tracked.
- Compatibility with other plugins is preserved – the plugin also writes order data in the version 3 format.
After upgrading, we recommend going through the PPL Connection (Připojení k PPL) tab (verify the connection), Checkout and Emails (Pokladna a e-maily) tab (widget API key) and Status (Stav) tab (set up the server cron).
Uninstalling and Deleting Data
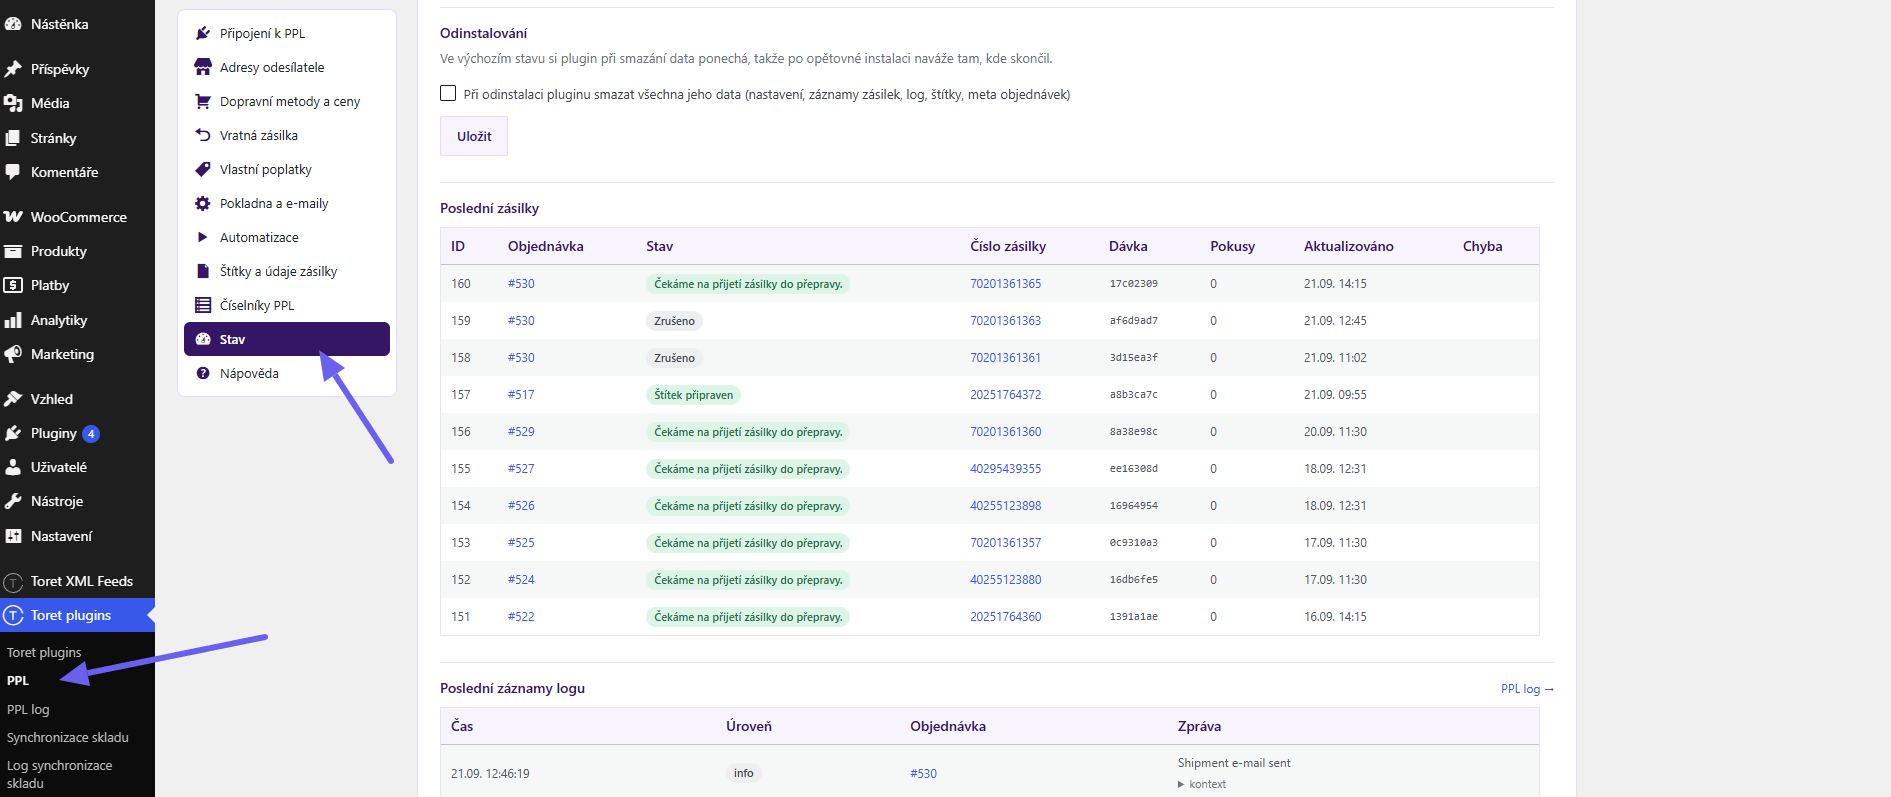
By default, the plugin keeps its data when deleted, so after reinstalling it picks up where it left off. If you want the data deleted, tick Delete all plugin data when uninstalling (Při odinstalaci pluginu smazat všechna jeho data) on the Status (Stav) tab and save. This deletes the settings, shipment records, log, labels and order meta.
Plugin testing
For testing purposes, you can use:
- the subdomain “dev.domainlicense” (with the same license as for the production website)
- localhost (127.0.0.1)
Purchased plugins will also work in these locations, and you can test their implementation and compatibility here before deploying them to the website and during its use.
FAQ and Troubleshooting
The pickup point map doesn’t load at checkout
First, check the result of the key verification below the PPL Widget API Key (API klíč widgetu PPL) field (Checkout and Emails (Pokladna a e-maily) tab) or on the Status (Stav) tab. Check the widget API key and make sure your store’s domain is allowed in the PPL admin at klient.ppl.cz/widgetadmin. The key is tied to a specific domain, so you need to allow both your staging and production sites.
A PPL method isn’t offered at checkout
Go through the following:
- Is the method added to the WooCommerce shipping zone that matches the customer’s country?
- Is it enabled for their country in the plugin settings?
- Does the order meet the weight, dimension and cart limits?
- Does any product / product category in the cart have the Do not offer (Nenabízet) flag for this method?
- For the Business method: is Offer Business delivery only with a company name (Nabízet doručení Business jen s vyplněnou firmou) enabled, and the customer didn’t fill in a company?
A shipment stays “queued” or “waiting for PPL” for a long time
The queue is triggered by site visits or an open orders list. On a low-traffic store, set up a server cron as described in Queue and Server Cron. You can see the current queue status on the Status (Stav) tab, where you can run it manually with the Run Queue Now (Spustit frontu teď) button.
A shipment ended with an error
The error message is shown in the PPL column and in the PPL log. The most common causes are a missing phone number, a missing house number in the street, or a postcode that doesn’t match the country. Correct the order data and send it again with the Resend (Odeslat znovu) icon.
PPL reports an invalid product
The PPL product (e.g. Morning, Smart or Business) isn’t enabled on your PPL account. The plugin checks this when sending and, in Shipping Methods and Prices, flags methods whose product is missing from your account’s code list. Ask PPL to add the product to your contract, then click Reload from PPL (Znovu načíst z PPL) on the PPL Code Lists (Číselníky PPL) tab.
Only one label is printed on an A4 sheet
Check the Print Format (Formát tisku) on the Labels (Štítky) tab and select the correct first free slot when printing. A sheet is only assembled from shipments whose labels have already been downloaded.
Cancelling a pickup fails
A pickup can only be cancelled at PPL until PPL processes it. After that, contact PPL customer service.
A shipment to a non-EU country isn’t created
Fill in the HS code and customs description in English on the products and check the list of countries requiring customs data in Automation. The plugin’s message lists which products are missing this data.
Return Connect shipments can’t be sent
Return Connect Import and Return Connect Europe require a sender address outside the Czech Republic. Add one on the Sender Addresses (Adresy odesílatele) tab and send the order again.
I want a custom VAT rate for cash on delivery
In WooCommerce, go to Settings → Tax → Tax classes (Nastavení → Daň → Daňové třídy), create a new tax class with the rate you need and select it in the COD Fee Tax Class (Daňová třída poplatku za dobírku) field on the Checkout and Emails (Pokladna a e-maily) tab. The same class also applies to the return label fee and custom fees.
After activation, I can’t see most of the settings
The license isn’t active. Enter your license key on the PPL Connection (Připojení k PPL) tab. The other tabs, order tools and the PPL log appear right after activation.