You are on the documentation page for the SmartEmailing for WooCommerce plugin, which automatically connects your WooCommerce store with the SmartEmailing service.
You can purchase the Smart Emailing plugin here: Toret Smart Emailing for WooCommerce
Plugin Installation
Upon purchasing the plugin, you will receive a license key and a download link for the plugin zip file via email. You can find detailed instructions on how to install the plugin from your computer into WordPress here.
Plugin Activation
After installing the plugin, open the SmartEmailing for WooCommerce plugin (Toret plugins > SmartEmailing), insert the license key into the appropriate field, and verify the license.

Plugin Settings
After installation and activation of the plugin, you need to connect the plugin to SmartEmailing. Do this, just like activation, in the plugin (Toret plugins > SmartEmailing). Thanks to the connection, the SmartEmailing service will be able to create contacts for e-shop customers.
- Api klíč (Api Key) – insert the API key from SmartEmailing.
- Přihlašovací email (Login Email) – insert the email you use to log in to SmartEmailing.
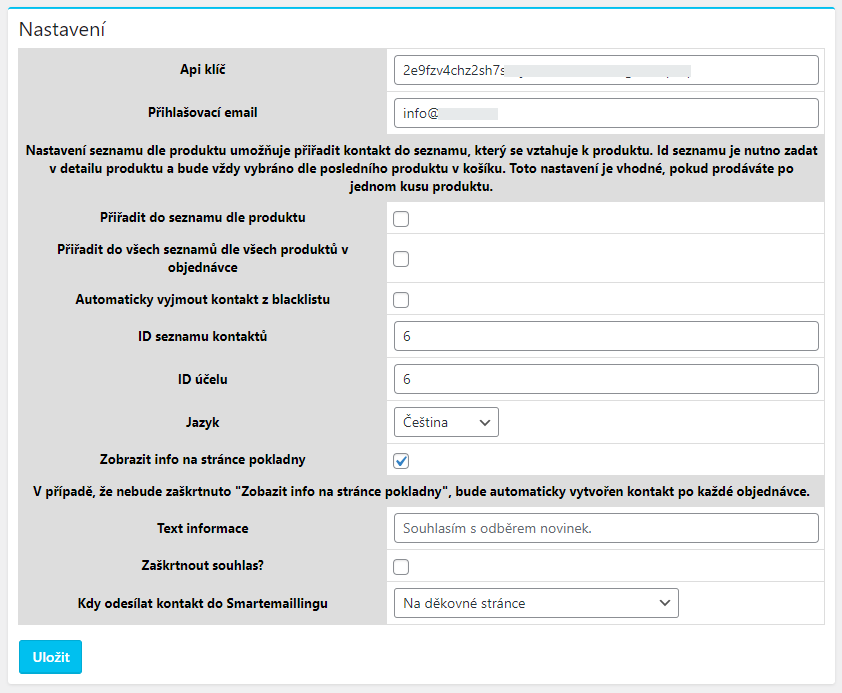
Further settings concern the connection between WooCommerce and the service:
- Přiřadit do seznamu dle produktu (Assign to list by product) – the customer’s email will be added to the list in SmartEmailing according to the ID of the product they bought. In case of multiple products in the order, it is assigned to the list according to the last product in the cart.
- Přiřadit do všech seznamů dle všech produktů v objednávce (Assign to all lists based on all products in order) – the customer’s email is assigned to lists of all products in the order
- Automaticky vyjmout kontakt z blacklistu (Automatically remove contact from blacklist)– if an order is created with a contact that is on the SmartEmailing blacklist, activating this function will remove it from the blacklist and place it in the active list
- ID seznamu kontaktů (Contact list ID) – insert the Contact list ID if you want to add every customer to this list. You can find the Contact list ID in your account in the SmartEmailing interface.
- ID účelu (Purpose ID) – insert the Purpose ID. You must create the Purpose in SmartEmailing in the section Kontakty a Seznamy (Contacts and Lists) -> Účely zpracování osobních údajů (Personal Data Processing Purposes).
- Jazyk (Language) – select language
- Zobrazit info na stránce pokladny (Display info on checkout page) – If “Display info on checkout page” is not checked, a contact will be automatically created after every order. Otherwise, the text you entered (in the Text informace (Info text) field) and a consent checkbox will be displayed.
- Text informace (Info text) – enter the text for displaying consent in the checkout (e.g., I agree to receive newsletters, etc.)
- Zaškrtnout souhlas? (Check consent?) – here you set whether the consent checkbox in the checkout will be pre-checked or if the customer must actively check it
- Kdy odesílat kontakt do SmartEmaillingu (When to send contact to SmartEmailing) – setting the trigger for sending to SmartEmailing (On thank you page / When marking order – Processing / When marking order – Completed)
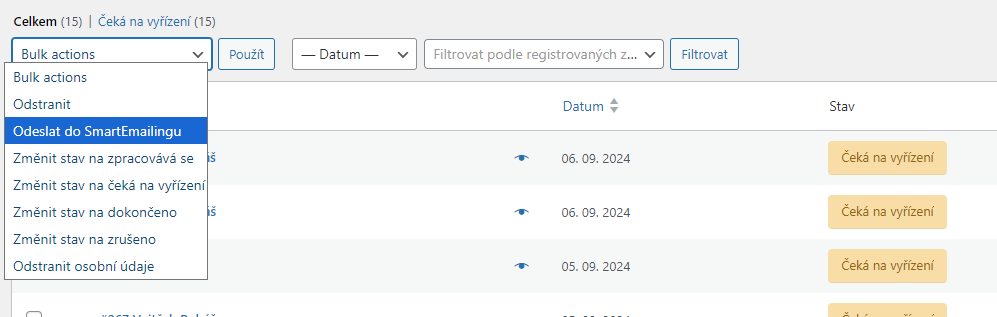
In addition to automatic contact sending, it is also possible to use bulk contact sending actions from the order overview.
Testování pluginu
Pro účely testování můžete využít:
- subdoménu “dev.doménalicence” (se stejnou licencí jako pro produkční web)
- localhost (127.0.0.1)
Na těchto umístěních budou zakoupené pluginy fungovat také a můžete zde otestovat implementaci a kompatibilitu před ostrým nasazením na web i v průběhu jeho užívání.