You are on the documentation page for the Comgate plugin, which enables integration of the Comgate payment gateway. You can purchase the Comgate plugin here: Toret Comgate for WooCommerce
Note: To implement the payment gateway, you need to have completed registration with Comgate.
Plugin Installation
Upon purchasing the plugin, you will receive a license key and a download link for the plugin zip file via email. You can find detailed instructions on how to install the plugin from your computer into WordPress here.
Plugin Activation
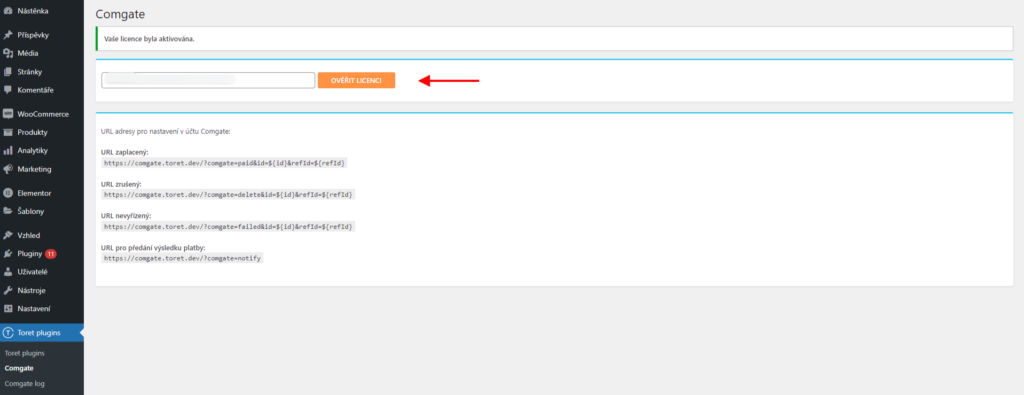
After installing the plugin, open the Comgate plugin, insert the license key into the appropriate field, and click the button to verify the license.
Video Tutorial
Connecting Comgate with WooCommerce
Comgate is a payment gateway offering several payment methods. The Toret Comgate plugin connects this payment gateway with your WooCommerce e-shop. We will go through the entire connection and setup process step by step.
Settings in the Comgate Portal
Let’s discuss what needs to be configured in the Comgate portal after you have received the ID, secure key, and login credentials from the company.
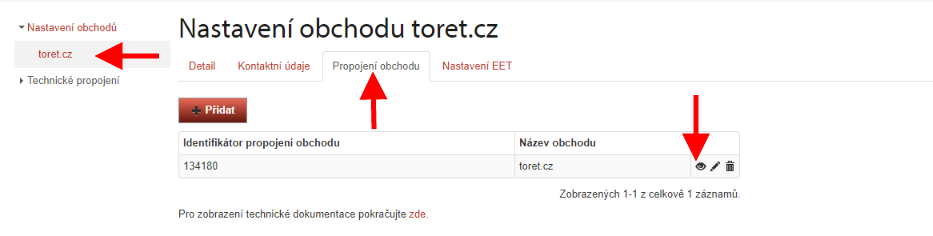
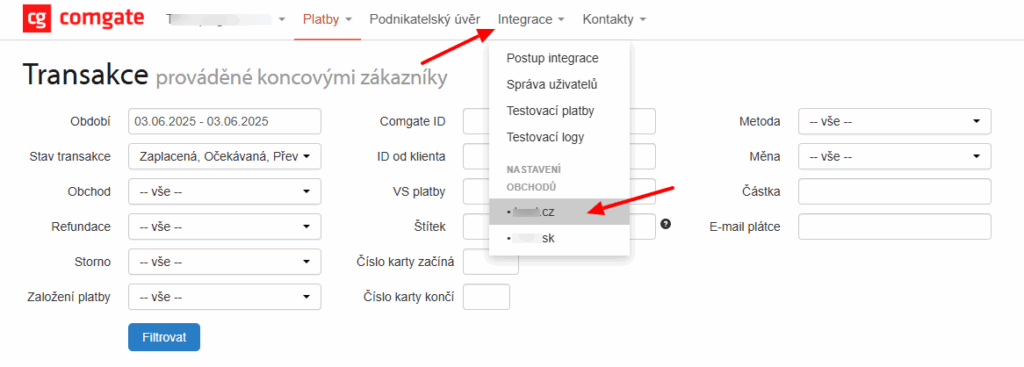
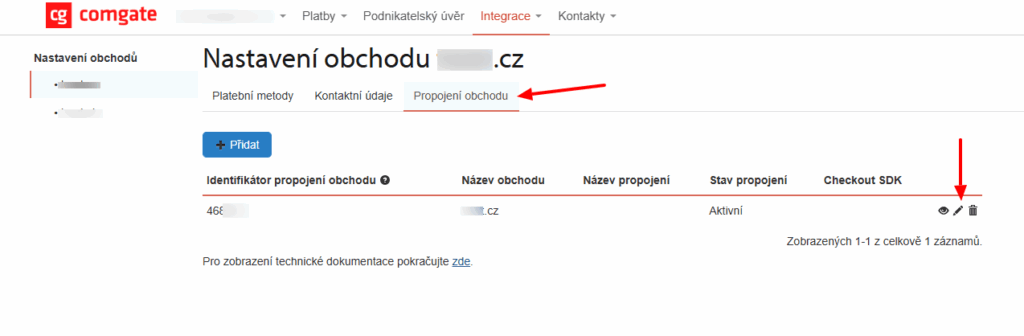
After logging in, go to the Integrace (Integration) > Nastavení obchodů (Store Settings) tab in the top menu and select the store you want to manage. Then click on Propojení obchodu (Store Connection) and finally on the eye icon Náhled (Preview).
A new screen with the following menu will appear.

As mentioned above, you will need to copy the Identifikátor propojení obchodu (Store Connection Identifier) and Heslo (Password/Secure Key) data and paste them into WooCommerce (see Entering Access Credentials into the Plugin).
For Povolený způsob založení platby (Allowed payment creation method), choose either BACKEND or SIMPLE_REDIRECT.
The following fields for URLs are very important; you need to insert the following URLs. You can also find these addresses in the plugin settings (Toret plugins > Comgate).
URL zaplacený (Paid URL):
http://vas-eshop.cz/?comgate=paid&id=${id}&refId=${refId}URL zrušený (Cancelled URL):
http://vas-eshop.cz/?comgate=delete&id=${id}&refId=${refId}URL nevyřízený (Pending URL):
http://vas-eshop.cz/?comgate=failed&id=${id}&refId=${refId}URL pro předání výsledku platby (Payment Result URL):
http://vas-eshop.cz/?comgate=notifyIn the Povolené IP adresy (Allowed IP Addresses) field, you need to enter the IP addresses of the server where the website is hosted. If IP addresses are not allowed, individual payment methods will not load in the plugin after entering implementation data, and payments via the gateway will not work.
IP addresses do not have to be defined individually but can be written as a range. That is, the IP address followed by a slash and a number determining the number of locked bits of the address (the so-called network mask). For example, the entry 192.168.1.0/24 will allow IP addresses starting with 192.168.1. with any last number.
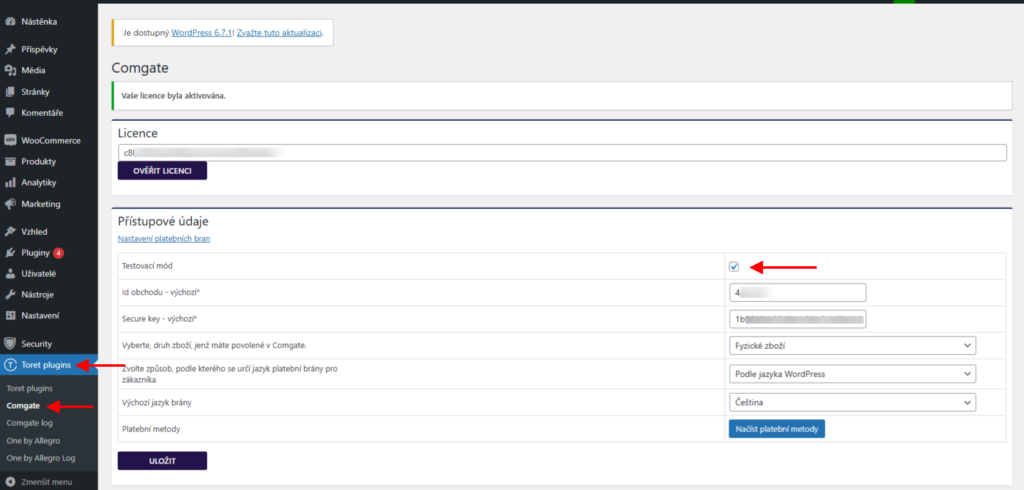
Entering Access Credentials into the Plugin
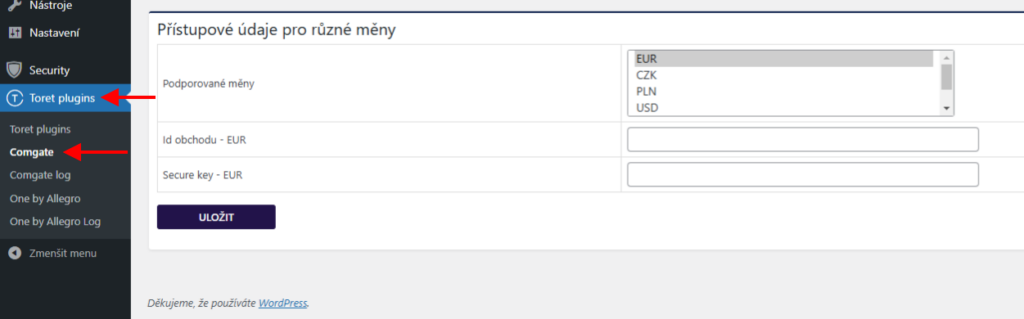
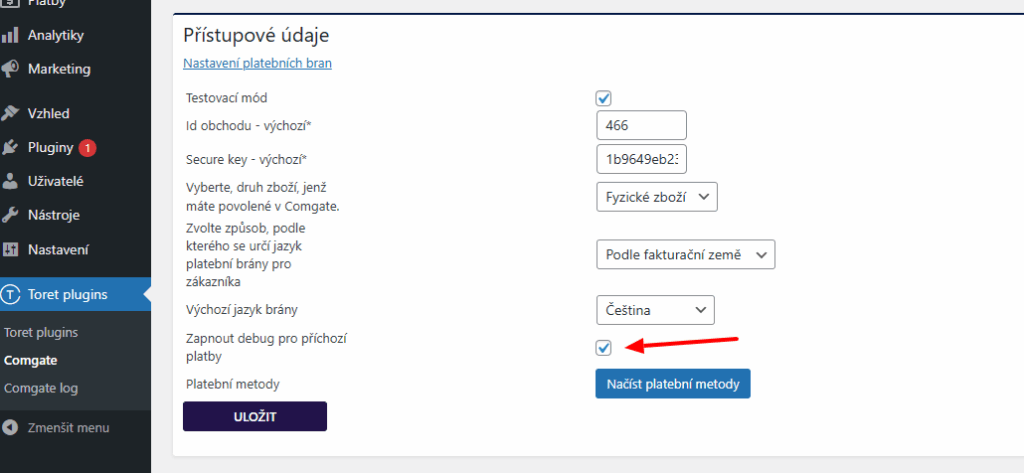
After you have activated the plugin (see Plugin Activation) and performed the settings in the Comgate Portal, you must enter the access credentials into the plugin (Toret plugins > Comgate). These are the Store ID (Id obchodu) and Secure key data obtained in the Comgate portal (see previous step).

Here you can also enable/disable test mode (see below), set the type of goods whose sale you have approved by the payment gateway provider, and the method for determining the gateway’s default language. It can be set according to the WordPress language or the billing country.
The Načíst platební metody (Load Payment Methods) button is used to load currently available methods, which we will set up in the next step.
Access Credentials for Multiple Currencies
If you accept payments in multiple currencies, enter the access credentials for different currencies in the plugin settings below (Toret plugins > Comgate).
Payment Methods Settings
Subsequently, you can proceed to the payment methods settings.
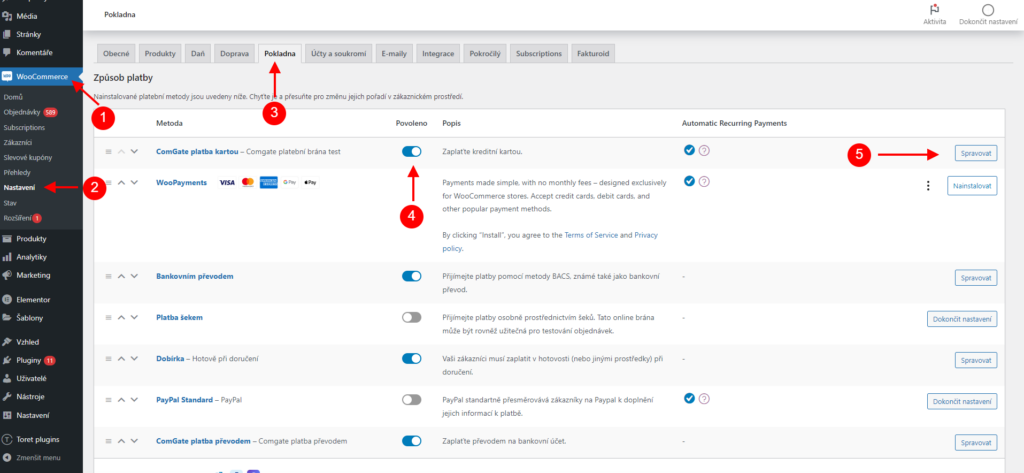
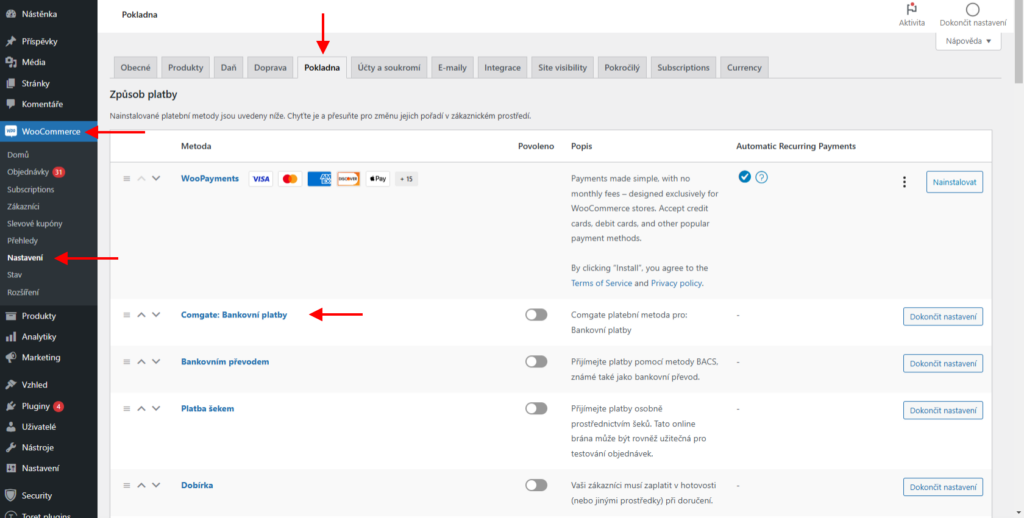
In the WordPress menu, go to the WooCommerce (1) – Settings (2) tab. A table will appear; in the top menu bar, click on Payments (3). Here you will find Comgate payment methods. Select and enable the payment methods you want to use from the list.
The ComGate platba kartou (Card Payment) and ComGate platba převodem (Bank Transfer) methods are grouped payment methods compatible with the classic WooCommerce checkout. Through these two methods, you can set up all available payment methods.
Attention! To use the Gutenberg Checkout (Block Checkout), it is necessary to use separate payment methods and set each one individually (e.g., Comgate: Card Payment, Comgate: Apple Pay, etc.), see Separate Payment Methods Settings.
Grouped Payment Methods Settings
Grouped payment methods (ComGate Card Payment and ComGate Bank Transfer) are compatible with the original WooCommerce checkout. You can use them to configure all available payment methods.
We will start with Comgate Card Payment settings. Enable this method with the toggle (4) and click on Manage (5).
Now you are in the payment method settings.
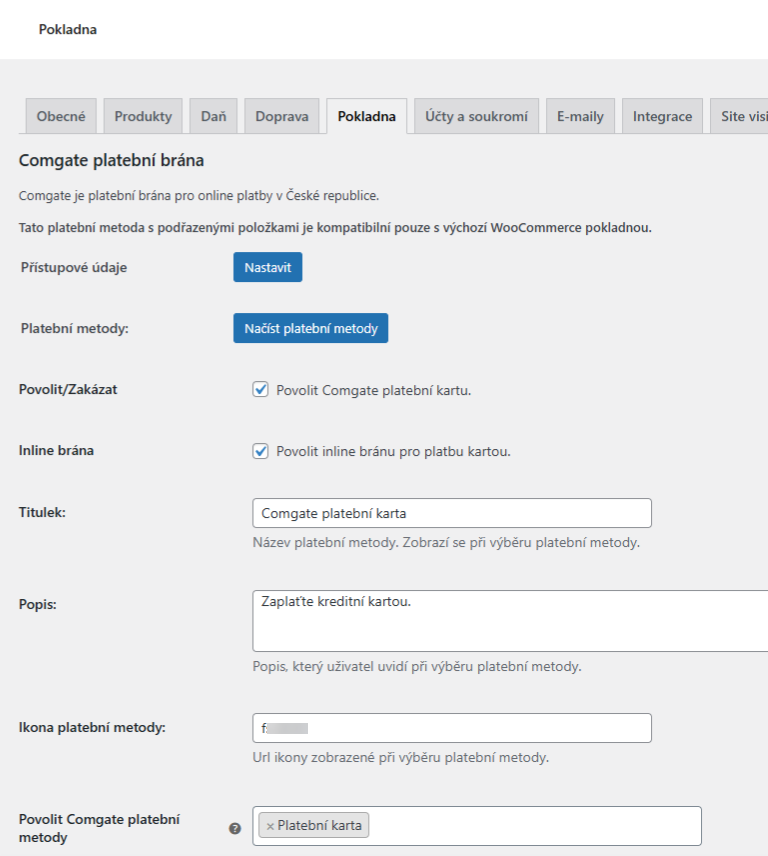
Let’s describe the individual steps in more detail:
1. Přístupové údaje (Access Credentials) – we entered these details in the Entering Access Credentials into the Plugin step
2. Platební metody (Payment Methods) – used to load currently available payment methods
3. Povolit /Zakázat (Enable/Disable) – by checking this box, you determine whether this payment method will be available to customers
4. Inline brána (Inline Gateway) – checking enables the inline version of the payment gateway, where customers pay in a pop-up window. If unchecked, customers will be redirected to the payment gateway website.
3. Titulek (Title) – here you must enter the name of the payment method as it will appear when selecting the payment method at checkout
4. Popis (Description) – in this field, you can describe the payment method for the customer and what they need to do
5. Ikona platební metody (Payment Method Icon) – if you want the relevant icon to appear with the payment method at checkout, enter its URL here
6. Povolit Comgate platební metody (Enable Comgate Payment Methods) – here you enter the payment methods you want to offer customers in the checkout
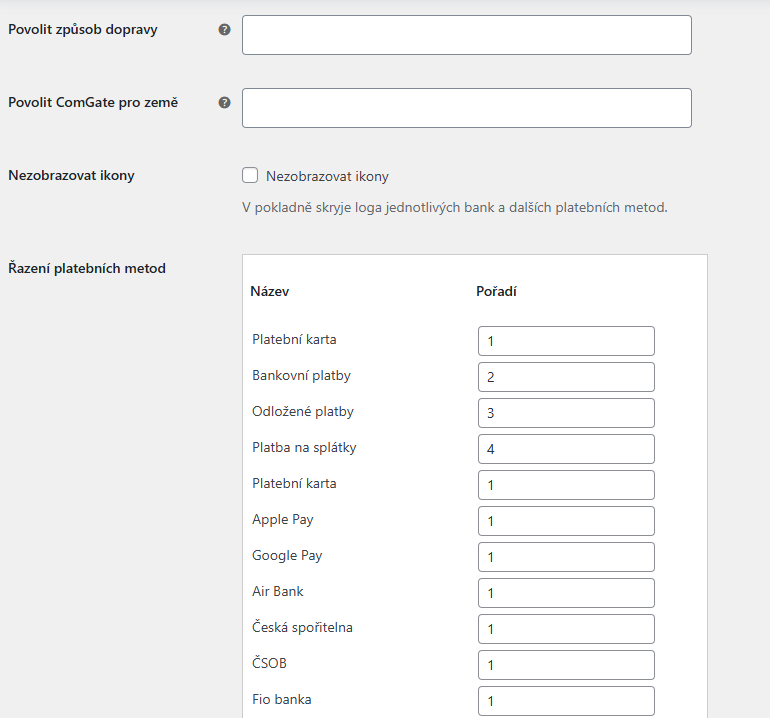
7. Povolit způsob dopravy (Enable Shipping Method) – if you want to enable all shipping methods, leave this field empty. If you have active Cash on Delivery payment, you can define the shipping method here
8. Povolit Comgate pro země (Enable Comgate for Countries) – enter all countries for which this payment method should be enabled here
9. Nezobrazovat ikony (Hide Icons) – checking this box hides bank and payment method logos in the checkout
10. Řazení platebních metod (Payment Method Sorting) – here you can set the order of payment methods in the checkout
After filling in the data, don’t forget to click the Uložit změny (Save Changes) button found at the bottom of the page. You can set up the second payment method, Comgate Bank Transfer, in the same way.
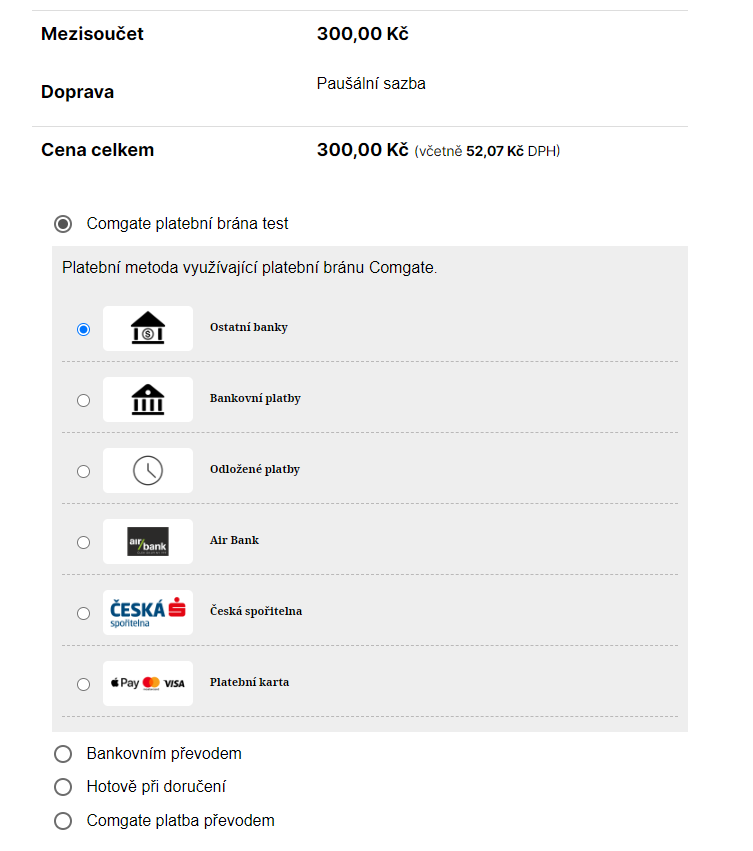
In the image below, we see how this payment option with the icon and offer of individual payment methods is displayed on the Checkout page (original WooCommerce checkout).
Separate Payment Methods Settings (for Block Checkout)
If you use a checkout with blocks (Gutenberg) in your e-shop, it is necessary to set up separate payment methods compatible with this checkout. Grouped payment methods are not compatible with this checkout.
In the checkout settings (WooCommerce > Settings > Payments), select the payment method you want to use, e.g., Comgate: Bankovní platby (Bank Payments).
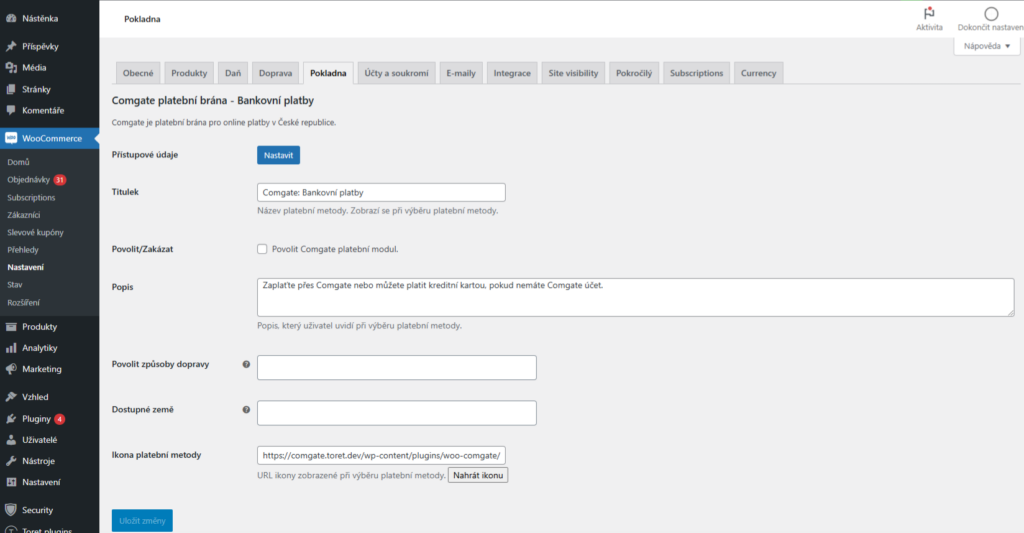
In the given payment method, you can set:
1. Titulek (Title), which will be displayed as the name of the payment method in the checkout
2. Povolit/Zakázat (Enable/Disable): Here you can turn the given method on or off.
3. Popis (Description): This description will be displayed to customers in the checkout when selecting the payment method.
4. Povolit způsoby dopravy (Enable Shipping Methods): Here you can add shipping methods for which the given payment will be available. If you do not add any, the payment will be available for all shipping methods.
5. Dostupné země (Available Countries): Here you can enter countries for which this payment method will be available. If you do not add any, the payment will be available regardless of the country.
6. Ikona platební metody (Payment Method Icon): Here you can enter a custom icon for the payment. If you do not enter it, the default icon will be used.
Do not forget to save the changes made. Proceed in the same way for other payment methods you want to use.
Performing Test Payments
The next step before launching is so-called test payments. Verify that you have test mode enabled in the plugin settings (Toret plugins > Comgate).
Now it’s time to return to the Comgate portal.
You can find a list of all test payments in the Comgate portal under the Technické propojení (Technical Connection) tab – Testovací platby (Test Payments). You can also search and filter among them.
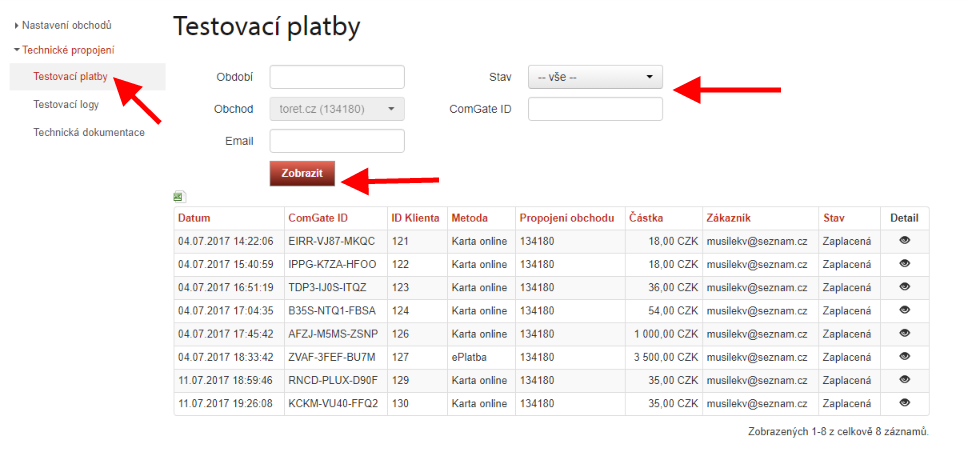
The Testovací logy (Test Logs) item also hides a record of payments including errors that caused the payment to fail.
In the Technická dokumentace (Technical Documentation) section, you will find instructions for performing payments. After successfully completing testing, do not forget to turn off test mode.
After testing, contact Comgate, which will check the test payments and payment gateway integration and request approval from the card association. This process takes approximately 14 days. During this time, the gateway can be used for payments via bank buttons, but not for card transactions.
Once you are informed of the approval, your Comgate payment gateway will be fully operational, and you can start accepting payments through it without restrictions.
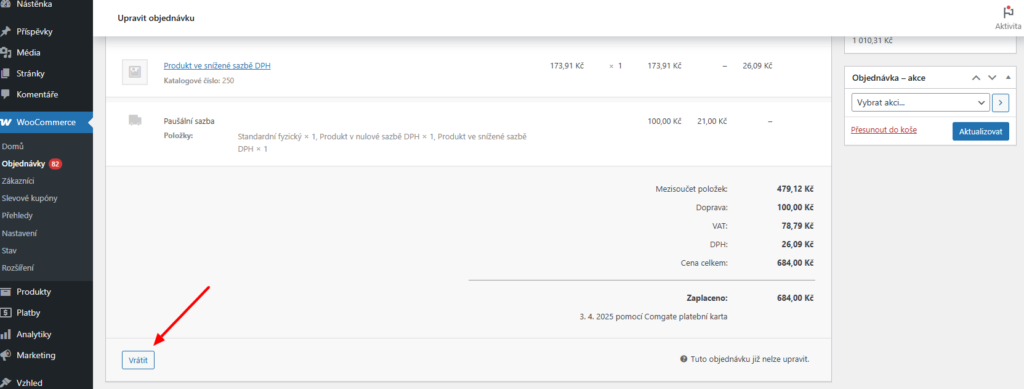
Refunds
The plugin allows direct refunds via the payment gateway. You can find this function in the order detail > Refund button > Refund x CZK via Comgate
Filters in the Plugin
It is not necessary to use filters to use the plugin. Filters serve to extend or customize the functionality of the plugin. Your programmer can help you with their implementation.
Filters for inserting the Account ID parameter into data sent to Comgate
$account = apply_filters( ‚toret_comgate_send_account‘, “, $order );
includes/class-wc-gateway-comgate.php

$account = apply_filters( ‚toret_comgate_send_account_bank‘, “, $order );
includes/class-wc-gateway-comgate-bank.php
Changing the status of a paid order with a physical product to a custom status
add_filter("toret_comgate_custom_status_paid", "toret_comgate_custom_status_paid_fce", 10, 1 );
if ( !function_exists( "toret_comgate_custom_status_paid_fce" ) ) {
function toret_comgate_custom_status_paid_fce( $status) {
return "slug vlastního stavu"; // custom status slug
}
}
Changing the status of a paid order with a virtual product to Processing
add_filter("toret_comgate_custom_status_paid_virtual", "toret_comgate_custom_status_paid_virtual_fce", 10, 1 );
if ( !function_exists( "toret_comgate_custom_status_paid_virtual_fce" ) ) {
function toret_comgate_custom_status_paid_virtual_fce( $status) {
return "processing";
}
}
Setting log retention period
- filter toret_comgate_log_retention_days
Testování pluginu
Pro účely testování můžete využít:
- subdoménu “dev.doménalicence” (se stejnou licencí jako pro produkční web)
- localhost (127.0.0.1)
Na těchto umístěních budou zakoupené pluginy fungovat také a můžete zde otestovat implementaci a kompatibilitu před ostrým nasazením na web i v průběhu jeho užívání.
FAQ
Installment Payments
Installment payments are available only for the Czech Republic and for orders over 2000 CZK. This payment method is subject to additional approval, so you need to contact Comgate and request its authorization.
How to activate new payment methods from Comgate in WooCommerce?
First, you must contact Comgate.cz and request activation of installment payments. After they are enabled, you can go to the payment method settings in WooCommerce (WooCommerce → Settings → Payments → Comgate) and activate them in the Enable Comgate Payment Methods field.
Debugging Errors
Since things can always go wrong, the plugin has a built-in method for catching errors.
In the detail of the order where the error occurred, you will find the Comgate Log in the upper right corner, which applies only to the specific opened order.

In the Toret plugins overview, you will find the Comgate log, which contains all orders at once.
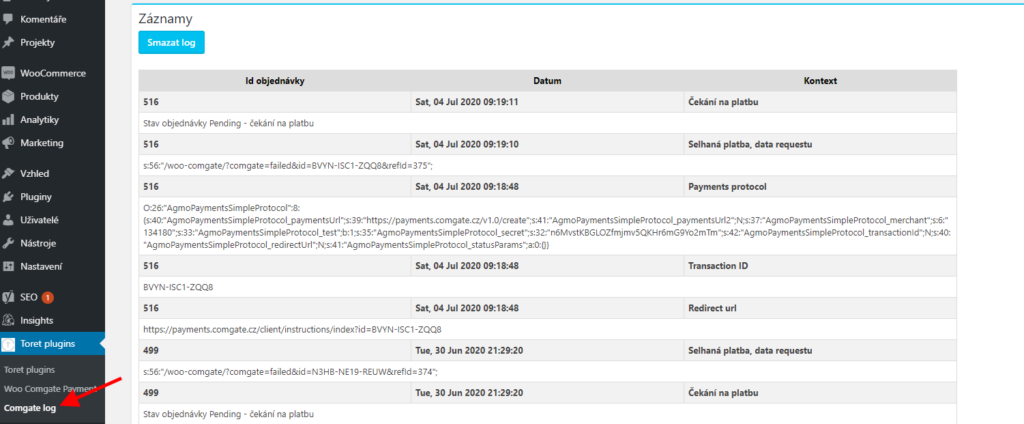
The debug log for incoming payments can be turned on/off in the plugin settings (Toret plugins > Comgate > Přístupové údaje (Access Credentials) > Zapnout debug pro příchozí platby (Turn on debug for incoming payments))
Broken Payment Methods Display
The error is in the theme, which will require CSS adjustment.
Often, inserting the following code into CSS helps:
.comgate_select {display:flex;}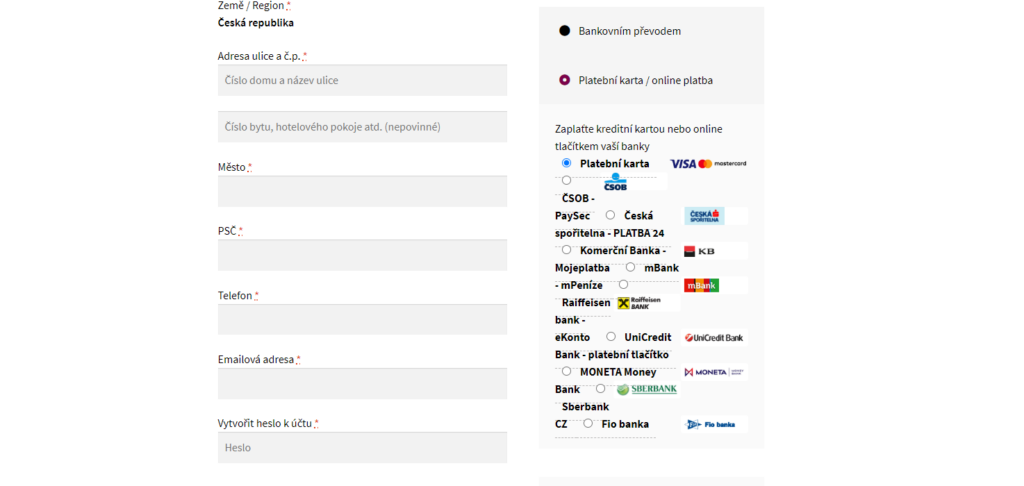
Redirect Limit Exceeded / Error in cURL request: Maximum (5) redirects followed
The payment gateway passes information about performed/failed payments using a notification URL. This notification URL has a maximum number of redirects set. This is a protection measure by Comgate.
However, some hostings have internal redirects, and this limit may be exceeded.
The problem needs to be solved with the hosting provider and, in cooperation with them, trace the redirects and reduce their number.
This problem arises, for example, with Wedos hosting.
The error can also be caused by a third-party plugin that redirects the notification more times than Comgate allows.
Check if you have one of the plugins listed below on your site:
- Redirect all 404 to home
If you do not have any of the listed plugins on your site, you can gradually deactivate plugins and test payments (e.g., in test mode) until you find out which plugin causes excessive notification redirects.
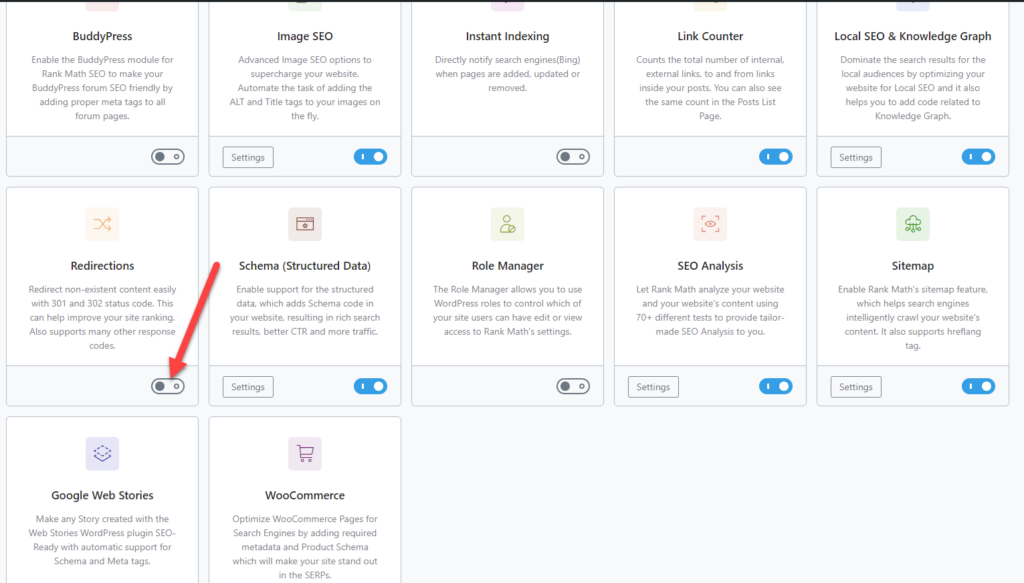
Comgate and RankMath
In case you use the RankMath plugin on your site together with our Comgate plugin, you need to disable the Redirection function in Rank Math settings.
If the function is enabled, notifications from the payment gateway may not be passed to the e-shop.
Comgate API error: Access from unauthorized location.
If the message “Comgate API error: Access from unauthorized location” appears in the administration, it means that the e-shop is creating payments from an unauthorized server IP address. This can happen if your hosting changes the server IP addresses.
For your payment gateway to work again, you need to enable the currently correct IP addresses in the Comgate Client Portal. How to do it:
1. Log in to the Comgate portal: https://portal.comgate.cz/cs/prihlaseni
2. After logging in, go to the Integrace (Integration) > Nastavení obchodů (Store Settings) tab in the top menu and select the store you want to manage.
3. Then click on Propojení obchodu (Store Connection) and finally on the pencil icon Upravit (Edit).
4. Enter your server’s IP address(es). You can find it either from your hosting provider or in the error message in the e-shop administration.
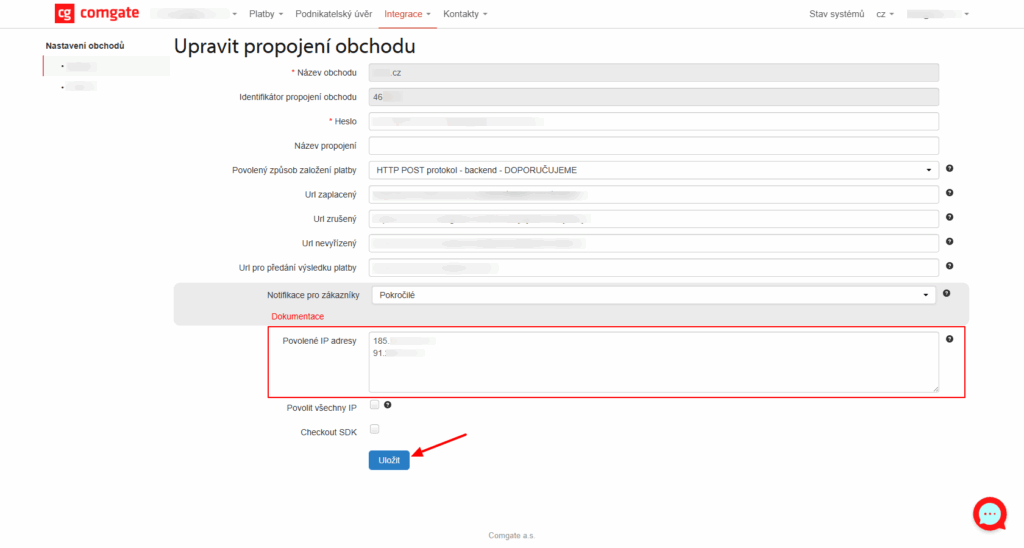
After saving the changes, your payment gateway should be functional again.
Note: IP addresses do not have to be defined individually but can be written as a range. That is, the IP address followed by a slash and a number determining the number of locked bits of the address (the so-called network mask). For example, the entry 192.168.1.0/24 will allow IP addresses starting with 192.168.1. with any last number.